Paper and Imposition/Finishing Settings
This section explains how to open a job and configure paper and binding (imposition, finishing) settings.
You can view thumbnails of the document with the settings applied to confirm the results of the settings before printing, which will minimize misprints.
On the job edit screen, click the [Paper/Imposition/Finishing] button to display the following screen, where you can configure the settings.
Paper/Imposition/Finishing screen
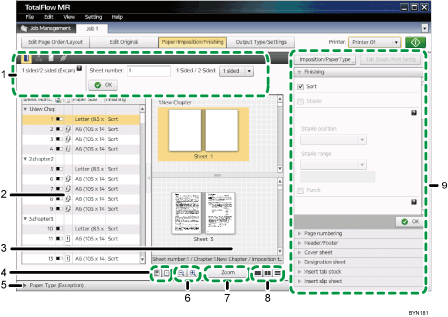
Exception settings
For each selected sheet, you can specify simplex/duplex, color/black and white, and stapling exception settings.
When you click a function button, the settings related to that function will appear.
Sheet list
The following items are displayed in a list for each sheet:
Chapter and sheet number
Color / Black and White (
 [Color]/
  [Black and White])
Simplex/Duplex (
 [1 sided]/
 [2 sided])
Paper size
Finishing
Clicking
 the [Close Sheet List]/
 the [Open Sheet List] button allows you to display or hide the sheet list.
View
Sheets are displayed as a list of thumbnails or icons.
Change View
You can switch the list between thumbnail and icon display.
If you switch the list to thumbnail display, you can confirm the results of the settings specified on the [Paper/Imposition/Finishing] screen.
Paper selection area (Exception settings)
You can specify the paper selection for an individual sheet.
Clicking [Paper Type (Exception)] allows you to display or hide this area.
Enlarge/Reduce Adjustment
You can enlarge or reduce the thumbnails or icons displayed for the sheets.
[Zoom]/[Thumbnails] button
You can switch the view between thumbnail and an individual sheet. When you select [Zoom], you can check each side of the sheet by clicking [Front] and [Back].
Split Window (Full Window/Split Vertically/Split Horizontally)
You can split the View display.
Splitting the display allows you to make settings more effectively when there are many sheets.
Main settings pane
In this pane, you can configure the page, imposition, and finishing settings for the entire job.
Clicking a setting item’s bar expands the settings pane for that item like an accordion. Specify each setting in the settings area, and then click [OK].
Clicking the [Imposition/PaperType] button allows you to specify the imposition and paper settings for the entire job.
To specify the settings for printing on tab stock, click the [Tab Stock Print Settg] button.
Operations you can do on the [Paper/Imposition/Finishing] screen:
Specify imposition and paper type settings
Specify finishing settings
Insert page numbers
Add a header and/or footer
Add cover sheets
Insert a page as a chapter separator
Insert tab stock
Insert slip sheets
Configure tab-stock printing
Apply individual settings to specified sheets
![]()
You can access the settings on the [Paper/Imposition/Finishing] screen using the [Edit] menu or the right-click menu.
Related topics
Imposition SettingsSelecting the Paper Type for the Entire Job
Finishing Settings
Adding Pagination (Page Numbering)
Adding a Header and/or Footer
Adding Cover Sheets
Inserting Pages at Chapter Breaks
Inserting Tab Stock
Inserting Slip Sheets
Setting Text and Images to Print on Tabs
Applying Separate Settings to a Specified Sheet (Exception Setting)