Selecting the Paper Type for the Entire Job
You can specify the paper type for an entire job.
There are two methods of using the [Imposition/Paper Type Settings] screen for specifying a paper type for the entire job:
Automatic selection
Manual selection
To select the paper type manually, click [Paper Type], and then specify the paper size, type, color, and other settings on the [Select Paper Type] screen.
Custom paper types must be specified manually, and the settings you specify must match those set on the printer exactly. For details about your printer’s paper settings, see the documentation provided with your printer.
Note that this explanation outlines the paper settings. For details about a specific setting, see the on-screen balloon help that appears when you click the ![]() button.
button.
![]()
For details about displaying the [Imposition/Paper Type Settings] screen, see Imposition Settings
 .
.
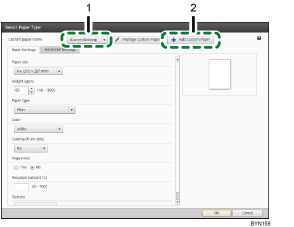
Select Paper Type screen

Custom paper selection
You can select a custom paper registered to Paper Catalog.
To use an unregistered paper type, select [(CurrentSetting)] from the drop-down list, and then specify the settings on the [Basic Settings] tab and [Advanced Settings] tab separately.
Add Custom Paper
You can register currently-used paper settings to Paper Catalog.
![]()
For details about registering paper types to Paper Catalog, see Registering Custom Paper Types in Paper Catalog
 .
.The paper type settings for cover sheets, chapter pages, tab stock, and slip sheets can be made in the general settings pane of the [Paper/Imposition/Finishing] screen.
You can specify paper types for individual sheets. For details about how to do so, see Specifying a separate paper type for specific pages
 .
.

