Editing Originals
You can perform many types of edits on scanned images of paper documents, such as correcting images, rotating pages, changing page size, inserting text and images, and filling in specified areas.
Additionally, the following functions allow you to perform editing more efficiently:
Batch editing/Single page editing
You can apply edits to multiple pages at once, or you can apply edits one page at a time to confirm the results of each edit. For details, see Applying Edits to Multiple Pages
 .
.Image overlay registration
You can register created objects (text, images, fills) as an image overlay, and then use the image overlay in other jobs. For details, see Registering and Applying Image Overlays
 .
.
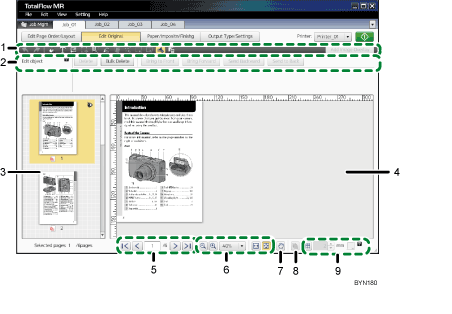
Page editing is done on the following screen, which you can display by clicking the [Edit Original] button on the job edit screen.
Edit Original screen

Toolbar
This area contains the function buttons used for editing pages.
Clicking
 , the [Undo]/
 , [Redo] button allows you to undo or redo an operation.
Settings area
When you click a function button on the toolbar, the settings for that function will appear here.
You can use the mouse to change the position and size of an area border or reference line.
Thumbnail list
The document’s pages are displayed as a list of thumbnail images. Select the thumbnail of the page you want to edit.
The following icons are displayed on each thumbnail:
 , the [Displaying] icon: Indicates this is the current page in the View.
 , the [Object PDF]/
 , [Image PDF] icon: Indicates the document type (PDF/Image).
 , the [Already Changed] icon: Indicates which pages were finished using a multiple-page process.
View
This area displays the selected page.
All editing operations are done in the View area.
Page turn
Click this or enter a page number to display a page for editing.
Enlarge/Reduce
Enlarge or reduce the display of a selected page.
[Move] button
While the page view is enlarged, you can move and change the displayed area of the page.
[Merge] button
You can confirm the result of merged images for the selected pages.
Grid (edit guidelines) display
Click
 , the [Grid] button, to enable or disable the grid display. You can also change the size and color of the grid.
Operations you can do on the [Edit Original] screen:
Straighten skewed pages*1
Remove noise (unwanted dots or marks) from a document*1
Remove borders around a document (Erase Border)*1
Remove shadows in the center of a document, caused by book binding (Erase Center)*1
Move a specified area*1
Rotate pages
Change page sizes
Fill in specified areas
Insert characters (Insert Text)
Insert images
Edit objects (text, images, fillings)
Register and edit image overlays
*1 This function is available only if the original type is Image PDF (![]() ). For details about limitations of functions in regards to document types, see Limitations of Edit Functions for Document Pages
). For details about limitations of functions in regards to document types, see Limitations of Edit Functions for Document Pages![]() .
.
![]()
Edit functions on the [Edit Original] screen can be accessed from the Toolbar and also from the [Edit] menu and the right-click menu.
Mouse operations on the [Edit Original] screen
When you use a function where you specify the edit area with a start point and an end point (in X and Y coordinates), you can specify the area also by dragging the mouse.
Additionally, you can use the mouse to perform the following operations on the specified area.
|
|
|
|
Related topics
Straightening Skewed PagesRemoving Noise from Documents
Removing Edge Shadows from Documents (Erase Border)
Removing Center Shadows from Book Sources (Erase Center)
Moving a Selected Area
Rotating Pages
Changing the Size of Pages
Filling a Specified Area
Inserting Text
Inserting Images
Editing Objects
Applying Edits to Multiple Pages
Registering and Applying Image Overlays


