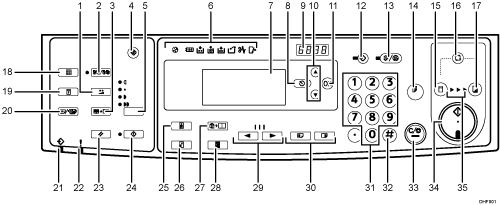
This illustration shows the control panel of the A3 drum machine.

[Economy] key
Press to reduce ink consumption. See Economy Mode.
[Memory/Class] key
Press to select Memory or Class mode. See Memory/Class.
[Erase Border] key
Press to erase margins on the prints. See Erase Border.
[User Tools] key
Press to change the default settings to meet your requirements. See User Tools Menu.
[Master Making Density] key
Press to make prints darker or fainter. See Adjusting the Print Image Density.
Indicators
Show errors and machine status.
Panel Display
The panel display shows the machine status, error messages, and function menus.
[Escape] key (Cancel key)
Press to cancel a selection or entry, and to return to the previous display.
Counter
Shows the number of prints entered. It also shows the remaining number of prints while printing.
[
 ] [
] [ ] keys
Press to select an item on the panel display.
[OK] key
Press to confirm a selection or entry.
[Program] key
Press to register print settings, or to recall stored print settings. See Storing Frequently Used Functions.
[Clear Modes/Energy Saver] key
Clear Modes
Press to clear the previously entered print settings.
Energy Saver
Press to switch to and from Energy Saver mode. See Saving Energy.
[Proof] key
Press to make a proof print.
[Master Making] mode select key
Press to select the master making mode.
[Auto Cycle] key
Press to make masters and prints in a single operation. See Basic Procedure.
[Print] mode select key
Press to select the print mode.
[Fine] key
Press to select a fine image. See Fine Mode.
[Security] key
Press to make prints from confidential documents. See Security Mode.
[Skip Feed/A3 Paper Feed] key
Press to select skip feed or A3 paper feed printing. See Skip Feed / A3 Paper Feed.
Data In indicator (Green)
On: Data waiting for Master Making and printing is in the machine.
Blinking: Data is being received, or Master Making or printing is in progress.
Off: Master Making and printing are completed.
Error indicator (Red)
On: An error has occurred. Master Making and printing stops.
Off: Normal status
[Job Reset] key
Press to stop the optional printer controller.
[Hold Data-in] key
Press to reject the online print temporarily.
[Original Type] key
Press to select [Text], [Photo], [Text/Photo], [Pale], or [Pencil]. See Selecting the Original Type.
[Reduce/Enlarge] key
Press to reduce or enlarge an image by preset ratios. See Reducing or Enlarging Originals.
[Combine/Repeat] key
Press to combine two originals into one print. See Combine.
Press to repeat the image of an original on one print. See Repeat.
[Full Size] key
Press to make full size prints.
[
 ] and [
 ] keys (Speed keys)
Press to change printing speed. See Changing the Printing Speed.
[Image Position] keys
Press to move an image forwards or backwards. See Sample Print and Adjustment.
Number keys
Press to enter the number of prints you want, as well as data for certain modes.
[
 ] key
] keyPress to confirm an entry that you have made.
[Clear/Stop] key
Press to cancel a number that you entered or to stop printing.
[Start] key
Press to make masters or start printing.
Processing indicators
Shows the process of making master to printing.
