Scanning Documents and Sending the Scanned Data to a Folder
To send the data of a scanned original to a shared folder on a computer, create the shared folder on the computer in advance and register the destination folder in the address book.
You also need to configure the settings for connecting to the network from the machine.
You can add a folder destination in the address book easily using Scan to Folder Helper.
Specifying the Destination of Send to Folder Using the Scan to Folder Helper App

Using the SMB 3.0 protocol, you can save a file in the folder that was configured individually to apply encryption.
The scanned file can be also saved to an FTP server.
Registering the Destination Folder to Use for Send to Folder
Printing the Check Sheet
Print the check sheet below to make a note of the setting values regarding the destination computer.
Check sheet | ||
|---|---|---|
No. | Items to check | Setting entry column |
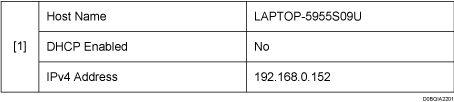
[1] | Host Name | |
DHCP Enabled | ||
IPv4 Address | ||
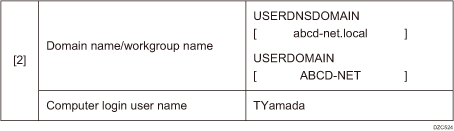
[2] | Domain name/workgroup name | USERDNSDOMAIN:  USERDOMAIN: |
Computer login user name | ||
[3] | Computer login password | |
[4] | Shared folder name on computer | |
Confirming the Computer Information (Windows)
Confirm the name, IP address, and other information of the computer used to create a shared folder, and write down the information on the check list.
 Click [Start] on the computer and click [Windows System]
 ![]() [Command Prompt].
[Command Prompt].
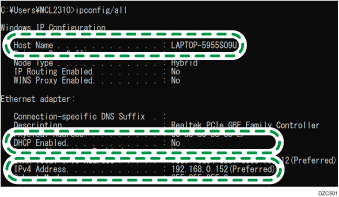
 Enter "ipconfig/all" and press the [Enter] key.
 Check the computer name, enable/disable status of the DHCP server and IP address, and write down the information in [1] on the check sheet.
When the screen shown above is displayed, fill in the sheet as follow:
 Enter "set user" and press the [Enter] key.
Enter a space between "set" and "user".
 Check the domain name, workgroup name and login user name, and write down the information in [2] on the check sheet.

When the screen shown above is displayed, fill in the sheet as follow:
"USERDNSDOMAIN" is not displayed when the login user who executed the command is a local user.
 Check the login password on the computer, and write down the information in [3] on the check sheet.
The required information on the computer is confirmed. Now create a shared folder on your computer and specify the access permissions of the folder.
Creating a Shared Folder (Windows)
Create a shared folder on the Windows Desktop and specify the access permissions of the folder.
Log on to Windows as a user with administrative privileges.
Create a new folder in Windows Explorer and write down the folder name in [4] on the check sheet.
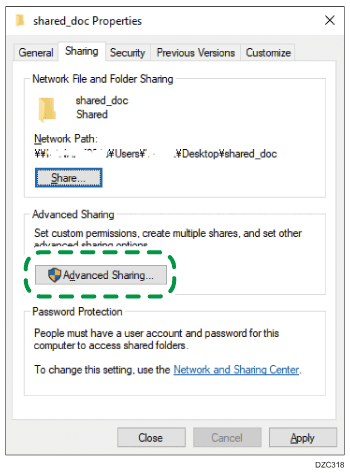
Right-click the created folder, and then click [Properties].
On the [Sharing] tab, click [Advanced Sharing].
Select the [Share this folder] check box, and then click [Permissions].
After completing the procedure, remove Everyone (unspecified user), and then add a user allowed access the folder. The user whose information is written down on the check sheet is used in the example shown below.
Select [Everyone] under [Group or user names], and then click [Remove].
 Click [Add]
 ![]() [Advanced]
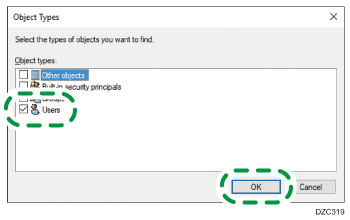
[Advanced] ![]() [Object Types].
[Object Types].
 Select [Users], and then click [OK].
 Click [Locations], select the name of the domain or work group the user belongs to ([2] on the check sheet) and then click [OK].
 Click [Advanced]
 ![]() [Find Now].
[Find Now].
 From the Search Results, select the login user name of the computer to be added ([2] on the check sheet) and then click [OK].
When you cannot find a specific user, click [Columns], or right-click the [Search results] field, select [Select Column], and then select [Logon Name] from the [Available columns] list or [Pre-Windows 2000 Logon Name].
 Click [OK].
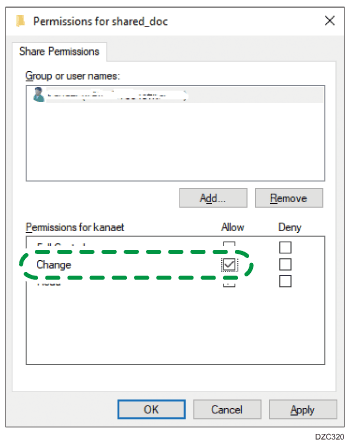
 Select the added user, and then select the [Allow] check box under [Permissions].
 Click [OK] to close all windows.
The access permissions on the folder have been successfully configured. If you want to specify access permissions for the folder to allow other users or groups to access the folder, configure the folder as follows:
Right-click the created folder and then click [Properties].
Click [Edit...] on the [Security] tab.
Click [Add]
 [Advanced].
Select [Object Types] or [Locations] and click [Search].
Select the user or group to assign permissions and click [OK].
Click [OK].
Select the added user, and then select the [Allow] check box under [Permissions].
Click [OK] to close all windows.
Confirming the Computer Information (OS X/macOS)
Confirm the name of the computer used to create the shared folder, login user name and other settings and write down the information on the check list.
Log on to OS X/macOS as a user with administrative privileges.
Click the Apple menu.
Click [System Report].
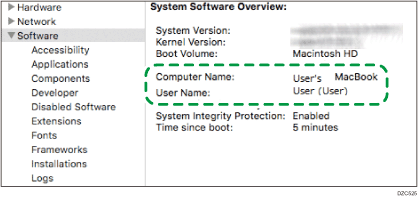
Click [Software] on the left pane and write down the displayed computer name in [1] and the user name in [2] on the check sheet.
When the screen shown above is displayed, fill in the sheet as follow:

Click the Apple menu and select [System Preferences].
In [Network], click [Ethernet] or [Wi-Fi] and write down the displayed IP address in [1] on the check sheet.
The required information on the computer is configured. Now create a shared folder.
Creating a Shared Folder (OS X/macOS)
Create a shared folder and specify the access permissions of the folder.
Create a new folder and write down the folder name in [4] on the check sheet.
Click the Apple menu and select [System Preferences].
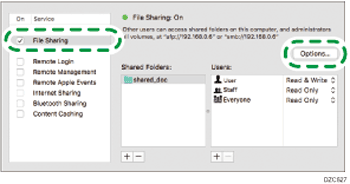
Click [Sharing], select the [File Sharing] check box and then click [Options].
Select the check boxes of [Share files and folders using SMB] and the user account to use for file sharing and then click [Done].
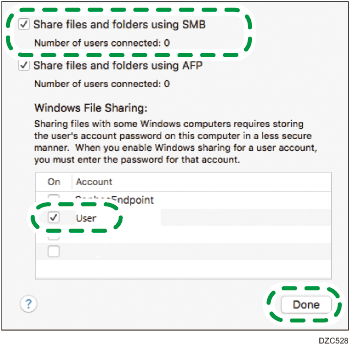
When the [Authentication] screen is displayed, enter the password of the selected account and then click [Done].
Click [ ] below [Shared Folders] on the [Sharing] screen.
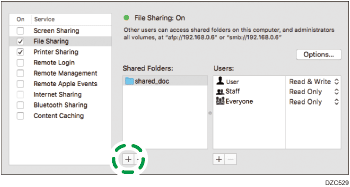
Specify the folder created in Step 1 and click [Add].
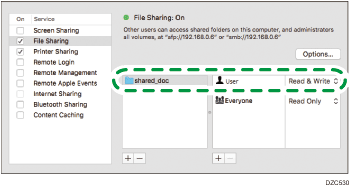
Select the folder added in Step 6 and confirm that the permission of the user to access the folder is set to "Read & Write".
Registering the Created Shared Folder in the Address Book
This section describes the procedure for registering a shared folder created in Windows using the information on the check sheet as an example.
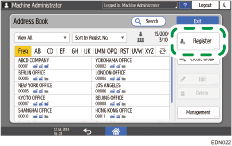
Press [Address Book] on the Home screen.
Press [Register] on the address book screen.
The items displayed on the screen vary depending on the version of RICOH Always Current Technology that is implemented on the machine.
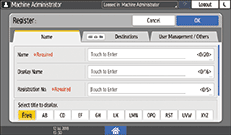
Enter the information of the destination in the input boxes displayed on the [Name] tab, and select the title to classify the destination.
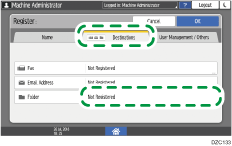
Press the [Destinations] tab, and then press [Folder].
Select [SMB (Send to Shared Folder on PC)] in [Protocol].
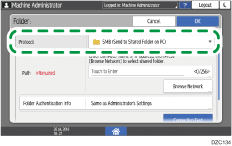
Specify the network path to the shared folder in "Path".
Entering the path name manually
If the computer name is "YamadaPC" ([1] on the check sheet) and the shared folder name is "shared_doc" ([4]), enter as follows:
\\YamadaPC\shared_doc
Selecting a folder from the list
Enter the IP address or host name of the computer on which to search for a shared folder, press [Browse Network], and then select the destination folder.
Under [Folder Authentication Info], select [Specify Other Authentication Information] and then enter the name and password of the login user who will access the shared folder.
Press Connection Test.
When no connection is established, check the message that appears.
When a Message Is Displayed While Using the Scanner Function
Press [OK].
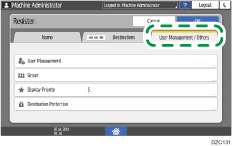
Press the [User Management / Others] tab and specify the settings as required.
Press [OK].
After completing the procedure, press [Home] ( ).
).
Basic Procedure for Performing Send to Folder
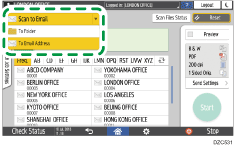
Press [Scanner] on the Home screen.
Select [To Folder] on the scanner screen.
Place the original on the scanner.
Press [Send Settings] and configure the scan settings according to the purpose of the scanned data.
Scanning an Original with Suitable Quality and Density
Specifying the File Type or File Name When Scanning a Document
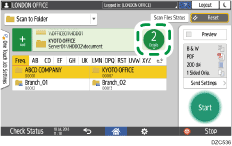
Press , select [Search Address Book] or [Specify by Reg. No.] and then specify the shared folder that is registered in the address book.
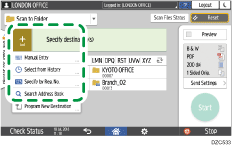
To enter the information manually, press
, and select [Manual Entry]. Select SMB as the protocol and enter the required information.To specify the destination again, press
 .
.
Press [Start].