Registering the Destination Folder to Use for Send to Folder
Register the destination folder to send scanned documents or forward documents received by fax to the address book. Specify the protocol according to the destination folder.

You can register the address easily using the "Scan to Folder Helper" application.
Specifying the Destination of Send to Folder Using the Scan to Folder Helper App
 On the Home screen, press [Address Book].
 On the Address Book screen, press [Register].
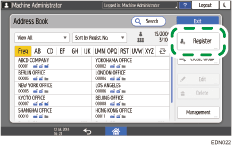
The items displayed on the screen vary depending on the version of RICOH Always Current Technology that is implemented on the machine.
 Enter the details of the address in the form on the [Name] tab, and then select a title for sorting.
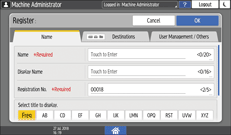
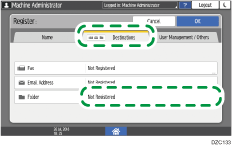
 Press the [Destinations] Tab
  [Folder].
 Select the protocol.
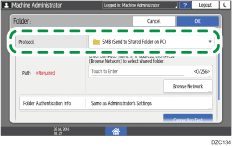
SMB (Send to Shared Folder on PC): When sending files to a shared folder in Windows or OS X/macOS.
FTP (Send to FTP Server): When sending files to a folder on a FTP server.
 Specify the path to the folder and authentication information.
When you select SMB
Path: Enter computer name or IP address, then press [Browse Network] to select shared folder.
When the computer name is "User1PC" and the shared folder name is "shared_doc", enter as below:
\\User1PC\shared_doc
If the machine is not configured to obtain the IP address automatically, specify the path by entering the IP address of the computer (for example "192.168.0.191") and folder name (for example "Share") as below:
\\192.168.0.191\Share
You can also specify the folder by pressing [Browse Network]. You must enter the login user name and password for certain destinations.
Folder Authentication Info: To register a folder to share among only certain users/groups using the machine, such as a shared folder on a private computer, select [Specify Other Authentication Information], and then enter Login User Name and Login Password of an account that can access the folder.
If you select [Use Authentication Info Set in User Management], the user name and password specified in the following setting items are applied. When the user authentication is specified, contact the administrator.
Settings screen type: Standard
[System Settings]
 [Send (Email/Folder)]
 [Folder]
 [Default User Name/Password (Send)]
Settings screen type: Classic
[System Settings]
 [File Transfer] tab
  [Default User Name / Password (Send)]
When you select FTP
Server Name: Enter the FTP server name (host name).
Japanese Character Code: Specify the character set to use when transmitting a file.
Port Number: Specify the port number to use when transmitting a file.
Path: Enter the path to the folder. The IPv4 address can also be entered. When no path is specified, the login directory is specified.
When the folder name is "user" and the subfolder name is "lib", enter as below:
user/lib
When using the absolute path, enter it in the format "\(user) \(home) \(user)".
Folder Authentication Info: To register a folder to share among only certain users/groups using the machine, such as a shared folder on a private computer, select [Specify Other Authentication Information], and then enter Login User Name and Login Password of an account that can access the folder.
If you select [Use Authentication Info Set in User Management], the user name and password specified in the following setting items are applied. When the user authentication is specified, contact the administrator.
Settings screen type: Standard
[System Settings]
 [Send (Email/Folder)]
 [Folder]
 [Default User Name/Password (Send)]
Settings screen type: Classic
[System Settings]
 [File Transfer] tab
  [Default User Name / Password (Send)]
 Press [Connection Test], confirm that the path is configured correctly, and then press [OK].
 Press the [User Management / Others] tab and set the required items.
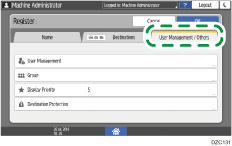
User Management: Enter the authentication information to login and use the machine.
Registration Destination Group: Select a group to which this address belongs as necessary. Register the group in advance.
Display Priority: When the destinations are sorted in the order of priority, a destination with higher priority is displayed prior to that with lower priority. The destinations with the same priority are displayed in the order of registration.
Destination Protection: Select this check box to require entering of the protection code to select the destination.
Using the Protection Function to Prevent the Misuse of Addresses
 Press [OK].
 After completing the configuration, press [Home](
 ).
).

To change or delete a registered folder, select the destination folder to change or delete on the address book screen, and then press [Edit] or [Delete].
If the machine fails to send to the destination folder registered in the address book, the firewall of the destination computer may be blocking sending of the data. See Help of the operating system and exempt the IP address of the machine from the firewall.
