Connecting to a Wired LAN
Connect the LAN cable to the machine, and then specify the IP address and other settings to connect to the Local Area Network (LAN) connection on the machine. There are two methods for configuration: settings in Wizard format (Settings) or manual settings in [System Settings].
Settings in Wizard format
Follow the instructions on the screen to specify [IP Address], [Subnet Mask], and [Default Gateway Address].
Setting in System Settings
Specify [IP Address], [Subnet Mask], and [Default Gateway Address] manually. To display the IP address of the machine in the form of domain name (name resolution), also specify the DNS server.
Settings for the Connection in Wizard Format (Settings Screen Type: Standard)
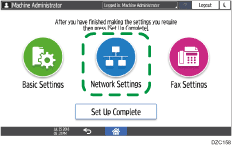
Configure the settings from [Network Settings] of [Basic Settings When Installing].
 Press [Settings] on the Home screen.
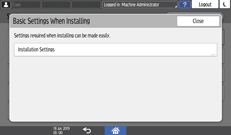
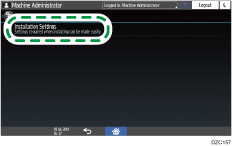
 Press [Basic Settings When Installing]
![]() [Installation Settings].
[Installation Settings].
 Press [Network Settings].
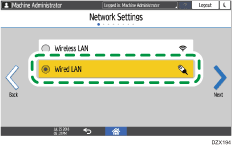
 Select [Wired LAN], and then press [Next].
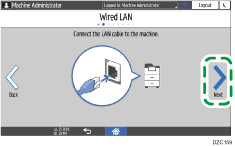
 Insert the LAN cable in the corresponding port on the machine, and then press [Next].
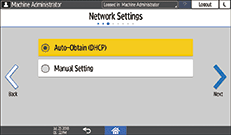
 Select the method to obtain the IP address, and then press [Next].
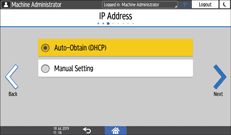
Auto-Obtain (DHCP): The machine obtains the IP address automatically from the DHCP server.
Manual Setting: Select this when you are using a fixed IP address. Also specify IP Address, Subnet Mask, and Gateway Address.
Proceed to the settings of the direct connection and USB connection as necessary.
 After completing the procedure, press [Set Up Complete], and then press [Home] (
 ).
).
Settings for the Connection in System Settings (Settings Screen Type: Standard)
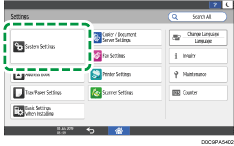
Configure the settings from the [Network/Interface] in [System Settings].
Press [Settings] on the Home screen.
Press [System Settings].
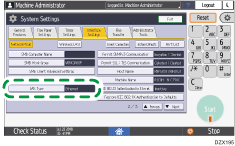
Press [Network/Interface]![]() [Machine: LAN Type].
[Machine: LAN Type].
Select [Wired LAN: Ethernet].

Press [OK].
Specify the IPv4 address of the main unit and DNS server address.
Specifying the IP address automatically
Press [IP Address (IPv4)].
Press [IPv4 Address Configuration].
Select [Auto-Obtain (DHCP)] from [IPv4 Address Configuration].
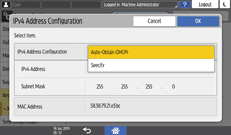
Subnet Mask and Gateway Address are also obtained automatically.
Press [OK].
To specify the address of the DNS server, press [
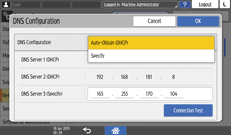
 ], and then press [DNS Configuration].
Select [Auto-Obtain (DHCP)] from [DNS Configuration].
Press [OK].
Setting the IP address manually
Press [IP Address (IPv4)].
Press [IPv4 Address Configuration].
Select [Specify] from [IPv4 Address Configuration].
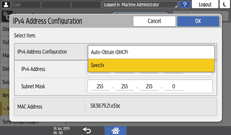
Press the input field for the IP Address, and then enter the IP Address.

Press the input field for the Subnet Mask, and then enter the Subnet Mask.
Confirm the entered information, and then press [OK].
Press [IPv4 Gateway Address].
Press the input field for the IPv4 Gateway Address, and then enter the IPv4 Gateway Address.
Confirm the entered information, and then press [OK].
To specify the address of the DNS server, press [
], and then press [DNS Configuration].Select [Specify] from [DNS Configuration], press the input field for the IP Address for the DNS server, and then enter the IP Address.
To specify the secondary DNS server, enter the IPv4 Address of the DNS servers in [DNS Server 2] and [DNS Server 3].
Confirm the entered information, and then press [Connection Test].
When “Connection to the server was successful.” is displayed, press [Exit].
When “Failed to connect to the server.” is displayed, consult the network administrator to check whether the entered information is correct.
Press [OK].
After completing the procedure, press [Home] ().

You can print the information of the network settings on the Configuration Page.
For the setting items of IPv6, see the following section:
Settings for the Connection in Wizard Format (Settings Screen Type: Classic)
Configure the settings from [Network Settings] of [Installation Settings].
Press [Settings] on the Home screen.
Press [Basic Settings When Installing]![]() [Installation Settings].
[Installation Settings].
Press [Network Settings].
Select [Wired LAN], and then press [Next].
Insert the LAN cable in the corresponding port on the machine, and then press [Next].
Select the method to obtain the IP address, and then press [OK].
Auto-Obtain (DHCP): The machine obtains the IP address automatically from the DHCP server.
Manual Setting: Select this when you are using a fixed IP address. Also specify IP Address, Subnet Mask, and Default Gateway Address.
Proceed to the settings of the direct connection and USB connection as necessary.
After completing the procedure, press [Home] ().
Settings for the Connection in System Settings (Settings Screen Type: Classic)
Configure the settings from the [Interface Settings] tab in [System Settings].
Press [Settings] on the Home screen.
Press [Machine Features Settings].
Press [System Settings]![]() [Interface Settings] tab
[Interface Settings] tab ![]() [Network/USB]
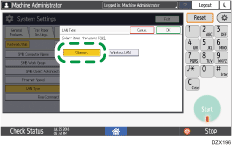
[Network/USB]![]() [LAN Type].
[LAN Type].
Press [Ethernet].
Press [OK].
Specify the IPv4 address of the main unit and DNS server address.
Specifying the IP address automatically
Press [Machine IPv4 Address].
Press [Auto-Obtain (DHCP)].
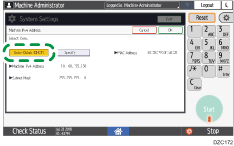
Subnet Mask and Gateway Address are also obtained automatically.
Press [OK].
To specify the address of the DNS server, press [DNS Configuration].
Press [Auto-Obtain (DHCP)].
Press [OK].
Setting the IP address manually
Press [Specify], press [Change] of [Machine IPv4 Address], enter an IPv4 Address, and then press [#].
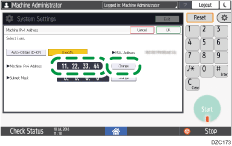
Press [Change] of [Subnet Mask], enter the Subnet Mask, and then press [#].
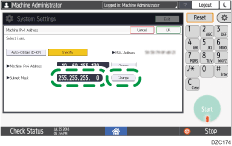
Confirm the entered information, and then press [OK].
Press [IPv4 Gateway Address].
Enter IPv4 Gateway Address, and then press [#].
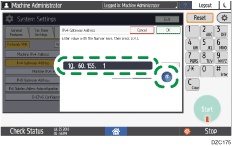
Confirm the entered information, and then press [OK].
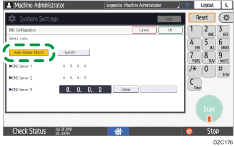
To specify the address of the DNS server, press [DNS Configuration].
Press [Specify] and [Change] of [DNS Server 1], enter IPv4 Address of the DNS server, and then press [#].
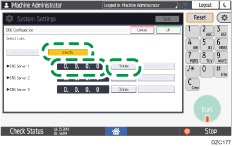
To specify the secondary DNS server, enter the IPv4 Address of the DNS servers in [DNS Server 2] and [DNS Server 3].
Confirm the entered information, and then press [Connection Test].
When “Connection to the server was successful.” is displayed, press [Confirm].
When “Failed to connect to the server.” is displayed, consult the network administrator to check whether the entered information is correct.
Press [OK].
After completing the procedure, press [Home] ().
You can print the information of the network settings on the Configuration Page.
For the setting items of IPv6, see the following section: