Specifying the File Type or File Name When Scanning a Document
Specify the settings in [Send Settings] on the scanner screen.
 Press [Scanner] on the Home screen.
 Place the original on the scanner.
 Press [Send Settings] on the scanner screen.
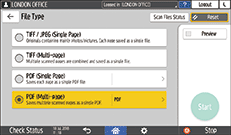
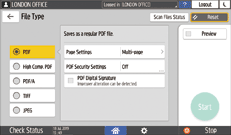
 Press [File Type], and select the file type to save the scanned document.
Press [Others] to display the detailed settings screen.
On machines with RICOH Always Current Technology v1.1 or earlier

TIFF/JPEG (Single Page): A separate image file is created for each single page.
When you specify Black & White in [Original Type], the scanned document will be sent in TIFF format.
When you specify Gray Scale or Full Color in [Original Type], the scanned document will be sent in JPEG format.
TIFF (Multi-page): Multiple pages are combined into a single image file.
PDF (Single Page): A PDF file is created for each single page.
PDF (Multi-page): Multiple pages are combined into a single PDF file.
In addition to the normal PDF format, you can also specify [High Compression PDF] which reduces the file size while maintaining the legibility, or [PDF/A] which conforms to the international standard and is suitable for long-term storage.
On machines with RICOH Always Current Technology v1.2 or later

PDF: A normal PDF file is created.
High Compression PDF: A PDF file with a reduced file size is created while maintaining legibility.
PDF/A: A PDF file that conforms to the international standard and is suitable for long-term storage is created.
TIFF: A TIFF file is created.
JPEG: A JPEG file is created.
Except for JPEG, you can specify whether to create a separate file for each single page or combine multiple pages into a single file.
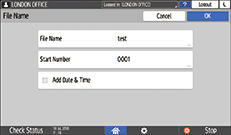
 To specify the file name, press [File Name] and enter the file name.
The file name is generated by combining the following three items:

File Name: Enter the string to use at the beginning of the file name.
Start Number: Specify the starting number of a serial number that will be appended at the end of each file name when specifying a file format comprising a single page per file.
Add Date & Time: Select this check box to add the "year, month, day, hour, and minute" the scanning is performed at the end of the file name.
 Specify the scan settings according to the purpose of the scanned data.
 Specify the destination to send the scanned document and then press [Start].

You can also embed the security and digital signature settings, and text information in the PDF file.
Scanning an Original as a PDF with Security Setting Specified
There are requirements that must be met when scanning the original to create a file in the High Compression PDF format.
You can change the number of digits in the following setting items.
Settings screen type: Standard
[Scanner Settings]
 [Sending Settings]
 [File Name]
 [Number of Digits for Single Page Files]
Settings screen type: Classic
[Scanner Settings]
 [Send Settings] tab
  [No. of Digits for Single Page Files].
