Scanning an Original as a PDF with Security Setting Specified
You can encrypt a PDF or configure security privileges to prevent unauthorized use of the scanned data.
Encryption
Specify an encryption password to allow opening the PDF only after entering the password.
Security privilege configuration
Specify whether to allow printing of the PDF or copying a text from the PDF. You can only modify the security privilege after entering the Change Permissions Password upon opening the PDF file.
Security privileges cannot be specified for a PDF/A.
To prevent falsification of important documents, you can attach a digital signature that certifies the author and creation date of a PDF.
Scanning an Original as a PDF with Security Setting Specified

The encryption password is required when opening an encrypted PDF. Be careful not to forget the encryption password.
On machines implemented with RICOH Always Current Technology v1.1 or before
 Press [Scanner] on the Home screen.
 Place the original on the scanner.
 Press [Send Settings] on the scanner screen.
 Press [File Type]
![]() [Others].
[Others].
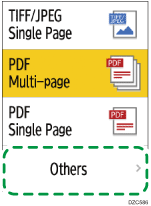
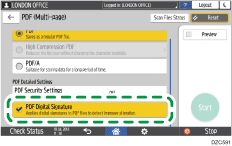
 Press [PDF (Single Page)] when creating a PDF with only one page, and press [PDF (Multi-page)] when creating a PDF with multiple pages.
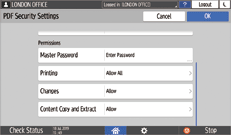
 Press [PDF Security Settings] under "PDF Detailed Settings" and configure the security settings.
To encrypt the PDF
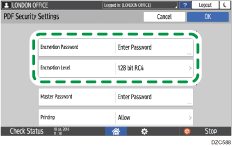
Press [Encryption Password] in "Encryption" and enter a password.
Specify [Encryption Level].
To specify the security privilege in the PDF

Press [Master Password] in "Permissions" and enter a password. Use a password that is different from [Encryption Password].
Press [Printing], [Changes] or [Content Copying and Extraction] and specify whether to allow each operation. When modifying the privileges in an existing PDF file, enter the [Change Permissions Password] in Adobe Acrobat.
If [40 bit RC4] is selected in [Encryption Level] under "Encryption", [Low Resolution Only] cannot be selected in [Printing].
 After configuring the security settings, press [OK].
 Specify the scan settings according to the purpose of the scanned data.
 To send the scanned document to an e-mail address, press [Sender] and then specify the sender.
 Specify the destination, and press [Start].
On machines implemented with RICOH Always Current Technology v1.2 or later
Press [Scanner] on the Home screen.
Place the original on the scanner.
Press [Send Settings] on the scanner screen.
Press [File Type]![]() [Others].
[Others].
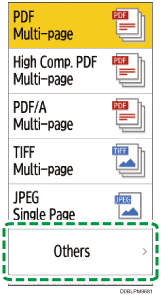
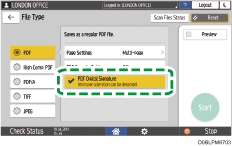
Press [PDF] or [High Comp. PDF].
Press [PDF Security Settings] and configure the security settings.
To apply the PDF security settings for the current destination only
Select the [Do not Scan Continuously for Same Security Setting] check box.

To encrypt the PDF
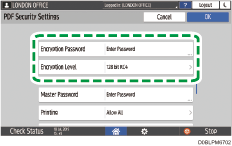
Press [Encryption Password] in "Encryption" and enter a password.
Specify [Encryption Level].
To specify the security privilege in the PDF
Press [Master Password] in "Permissions" and enter a password. Use a password that is different from [Encryption Password].
Press [Printing], [Changes] or [Content Copy and Extract] and specify whether to allow each operation. When modifying the privileges in an existing PDF file, enter the "Change Permissions Password" in Adobe Acrobat.
If [40 bit RC4] is selected in [Encryption Level] under "Encryption", [Low Resolution Only] cannot be selected in [Printing].
After configuring the security settings, press [OK].
Specify the scan settings according to the purpose of the scanned data.
To send the scanned document to an e-mail address, press [Sender] and then specify the sender.
Specify the destination, and press [Start].
Selecting the Certificate to Use for Digital Signature
To create a PDF with a digital signature, select the certificate to use in the signature from device certificates.
Configure the following in advance:
Specify [Administrator's Email Address] in the following setting items.
Settings screen type: Standard
[System Settings]
 [Send (Email/Folder)][Email][Administrator's Email Address]
Settings screen type: Classic
[System Settings]
[File Transfer] tab [Administrator's Email Address]
Install the Device Certificate
Log in to Web Image Monitor as the network administrator.
Click [Configuration] from the [Device Management] menu.
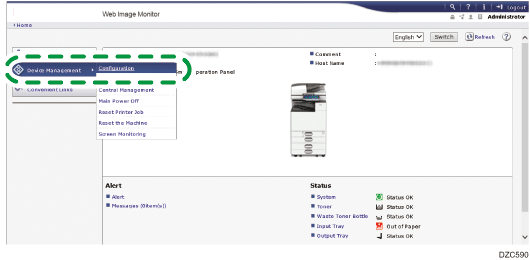
Click [Device Certificate] in [Security].
Select a certificate to use from the valid certificates in [PDF Digital Signature] or [PDF/A Digital Signature] under [Certification].
PDF Digital Signature: Use this for a PDF other than PDF/A.
PDF/A Digital Signature: Use this for a PDF in PDF/F format. Only a device certificate using sha1WithRSA-1024 as the signing algorithm can be attached to PDF/A.
Click [OK].
The "Updating..." screen is displayed. Wait one or two minutes before clicking [OK].
If the screen is not displayed when you click [OK], wait for a while and then click [Refresh] in the Web browser.
Click [OK], and then close the Web browser.
Scanning an Original as a PDF File with Digital Signature
On machines implemented with RICOH Always Current Technology v1.1 or before
Press [Scanner] on the Home screen.
Place the original on the scanner.
Press [Send Settings] on the scanner screen.
Press [File Type]![]() [Others].
[Others].
Press [PDF (Single Page)] when creating a PDF with only one page, and press [PDF (Multi-page)] when creating a PDF with multiple pages.
Select the [PDF Digital Signature] check box under "PDF Detailed Settings".
Specify the scan settings according to the purpose of the scanned data.
To send the scanned document to an e-mail address, press [Sender] and then specify the sender.
Specify the destination, and press [Start].
On machines implemented with RICOH Always Current Technology v1.2 or later
Press [Scanner] on the Home screen.
Place the original on the scanner.
Press [Send Settings] on the scanner screen.
Press [File Type]![]() [Others].
[Others].
Press [PDF], [High Comp. PDF], or [PDF/A].
Select the [PDF Digital Signature] check box.
Specify the scan settings according to the purpose of the scanned data.
To send the scanned document to an e-mail address, press [Sender] and then specify the sender.
Specify the destination, and press [Start].