Registering E-mail Addresses in the Address Book
By registering the e-mail addresses that you frequently use in the address book, you can easily send e-mail to registered addresses.
You can specify a registered e-mail address as the sender of the e-mail as well as the destination. For example, if you send an e-mail by specifying your e-mail address as the sender, you can receive the reply from the destination to the address.
Registering the E-mail Address and the Use Conditions
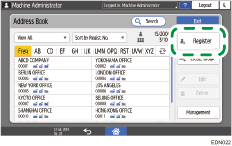
 Press [Address Book] on the Home screen.
 Press [Register] on the Address Book screen.
The items displayed on the screen vary depending on the version of RICOH Always Current Technology that is implemented on the machine.
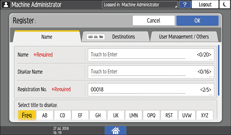
 Enter information such as a name on the [Name] tab, and then select a title to classify it.
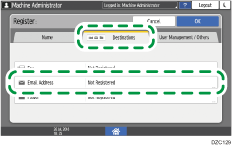
 Press the [Destinations] tab
 ![]() [Email Address].
[Email Address].
 Specify the e-mail address and the use conditions.
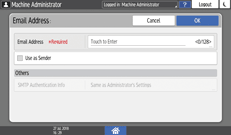
Use as Sender: When you select this check box, specify the settings for "Send via SMTP Server" and "SMTP Authentication Info" also.
When you select [Specify Other Authentication Information] in "SMTP Authentication Info", enter the Login User Name and Login Password to access the SMTP Server. Ask the administrator for the Login user name and Login password.
When you select [Same as Administrator's Settings] in "SMTP Authentication Info", the setting of [SMTP Authentication] in the following setting items is enabled.
Settings screen type: Standard
[System Settings]
 [Send (Email/Folder)][Email]
Settings screen type: Classic
[System Settings]
[File Transfer] tab
Use as Sender: Select the check boxes of the functions to use the e-mail address.
 Press the [User Management / Others] tab, and specify the required settings.
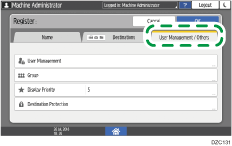
User Management: Enter the authentication information to login and use the machine.
Registration Destination Group: Select a group to which this address belongs as necessary. Register the group in advance.
Display Priority: When the destinations are sorted in the order of priority, a destination with higher priority is displayed prior to that with lower priority. The destinations with the same priority are displayed in the order of registration.
Destination Protection: Select this check box to require entering of the protection code to select the destination.
Using the Protection Function to Prevent the Misuse of Addresses
 Press [OK].
 After completing the procedure, press [Home] (
 ).
).

When you specify your e-mail address as the sender, you can receive the transmission result by e-mail.
Changing/Deleting Registered Data Such as an E-mail Address
If you delete the destination used for the personal box, transmission of the fax reception file will fail. Exclude the destination to delete from the personal box in advance.
Press [Address Book] on the Home screen.
Select the destination to change/delete on the Address Book screen.
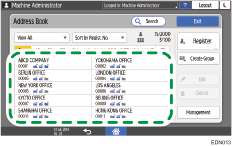
The items displayed on the screen vary depending on the version of RICOH Always Current Technology that is implemented on the machine.
You can delete multiple destinations at one time.
Press [Edit] or [Delete] to change or delete the destination information.
When changing/deleting is complete, press [Home] ().