Sending Documents by IP-Fax
You can send faxes over an IP network by specifying the destination IP address, host name, or Own Fax No. when the destination fax supports the IP-Fax function.
Preparing the Machine to Send IP-Faxes
The IP-Fax function employs H.323 or SIPS as the connection protocol for communication. You may need to configure the Gatekeeper, SIP server, or gateway in advance depending on the environment where the machine is used.

This function does not support sending and receiving IP-Fax using the H.323 protocol in an IPv6 environment.
To use the IP-Fax function without using a SIP server in an IPv6 environment, specify the Manual Configuration Address as the IPv6 address of the machine. The machine receives IP-Faxes to the address specified in Manual Configuration Address.
Settings screen type: Standard
Settings screen type: Classic
Methods for specifying an IP-Fax destination according to the network environment
To send a fax to a G3 fax
Specify the G3 fax number (example: 0312345678) regardless of the network environment in which the machine is used.
To send a fax to another IP-Fax
The method for specifying an IP-Fax destination varies depending on the network environment where the machine is used.
Gatekeeper or SIP server usage
Method for specifying a destination
When using neither
IP address or host name of the destination
Example of an IP address: 192.168.1.10
Example of a host name: IPFAX1
When using Gatekeeper
Own Fax No. of the destination
Example: 0311119999
When using SIP server
SIP user name of the destination
Example: ABC
In an IPv6 environment, enter the address specified manually at the destination.
To send a fax through a SIP server in an IPv4/IPv6 mixed environment, add "v4" or "v6" at the beginning of the destination address/host name according to the environment.
Depending on the destination environment, you may need to append a port number at the end of the IP address or host name. Consult your administrator to check if a port number is required.
When using Gatekeeper (H.323) (Settings Screen Type: Standard)
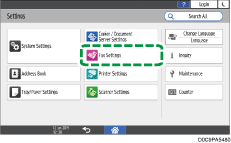
 Press [Settings] on the Home screen.
 Press [Fax Settings] on the Settings screen.
 Press [Detailed Initial Settings]
![]() [IP-Fax Settings]
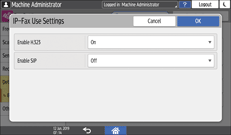
[IP-Fax Settings]![]() [IP-Fax Use Settings].
[IP-Fax Use Settings].
 Press [On] in [Enable H.323] and then press [OK].
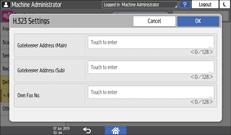
 Press [H.323 Settings].
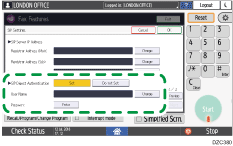
 Specify the Gatekeeper address or Own Fax No., and then press [OK].
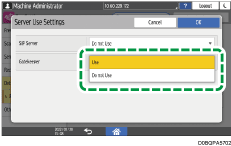
 Press [Server Use Settings].
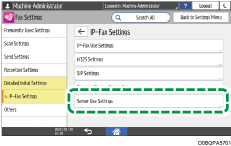
 Select [Use] in [Gatekeeper], and then press [OK].
 After completing the procedure, press [Home] (
 ).
).
Configure Gatekeeper in addition to specifying the settings on the machine. Consult your network administrator.
When using SIP server (SIP) (Settings Screen Type: Standard)
Press [Settings] on the Home screen.
Press [Fax Settings] on the Settings screen.
Press [Detailed Initial Settings]![]() [IP-Fax Settings]
[IP-Fax Settings]![]() [IP-Fax Use Settings].
[IP-Fax Use Settings].
Press [On] in [Enable SIP] and then press [OK].

Press [SIP Settings].
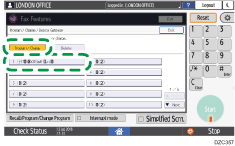
Specify the value.
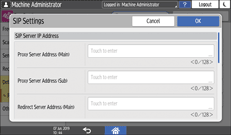
Enter the server IP address when specifying the proxy server, redirect server, and registered server.
Enter the SIP user name when specifying the SIP user name.
To use SIP digest authentication, press [On], and enter the user name and password.
Press [OK].
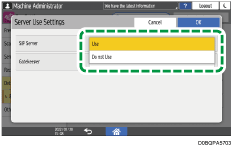
Press [Server Use Settings].
 Select [Use] in [SIP Server], and then press [OK].
 After completing the procedure, press [Home] ().
Configure the SIP server, in addition to specifying the settings on the machine. Consult your network administrator.
When using the gateway (Settings Screen Type: Standard)
Press [Settings] on the Home screen.
Press [Fax Settings] on the Settings screen.
Press [Detailed Initial Settings]![]() [IP-Fax Settings]
[IP-Fax Settings]![]() [Register/Change/Delete Gateway].
[Register/Change/Delete Gateway].
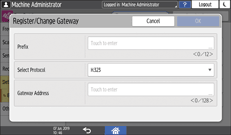
Press [Register].
Specify the prefix number.
About Prefix
The prefix is used to identify the telephone number of the G3 fax sending a fax via the VoIP gateway. If a gateway with an ID number that matches the first few digits in the telephone number exists, the fax is sent via the matching gateway. For example, specifying "0312345678" as the destination when the gateways of ID number "03" and "04" are registered, the transmission goes through the gateway of ID number "03".
To use the gateways regardless of the ID number in the IP-Fax destination, register only the gateway addresses without specifying the ID numbers.
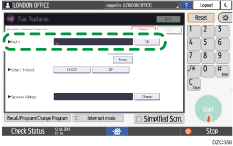
Select [H.323] or [SIP] in "Select Protocol".
Specify the gateway address.
Press [OK].
After completing the procedure, press [Home] ().
To change or delete the registered gateway, press [Fax Settings]
 [Detailed Initial Settings][IP-Fax Settings][Register/Change/Delete Gateway], select the gateway to delete or change, and then press [Change] or [Delete] on the displayed screen.
Configure the settings on the VoIP gateway, in addition to specifying the settings on the machine. Consult your network administrator.
When using Gatekeeper (H.323) (Settings Screen Type: Classic)
Press [Settings] on the Home screen.
Press [Machine Features Settings] on the Settings screen.
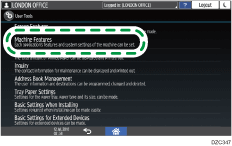
Press [Fax Settings]![]() [Initial Settings] tab
[Initial Settings] tab ![]() [Enable IP-Fax H.323].
[Enable IP-Fax H.323].
Press [On] and then press [Exit].
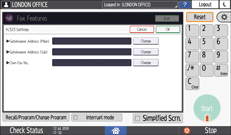
Press [H.323 Settings].
Press [Change] to specify the Gatekeeper address or Own Fax No., and then press [Exit].
Press [Parameter Setting] to display the switch operation screen.
Press switch number [34] ![]() bit number [0], and change current value to "1".
bit number [0], and change current value to "1".
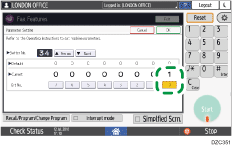
Press [Exit].
After completing the procedure, press [Home] ().
Configure Gatekeeper in addition to specifying the settings on the machine. Consult your network administrator.
When using SIP server (SIP) (Settings Screen Type: Classic)
Press [Settings] on the Home screen.
Press [Machine Features Settings] on the Settings screen.
Press [Fax Settings]![]() [Initial Settings] tab
[Initial Settings] tab ![]() [Enable IP-Fax SIP].
[Enable IP-Fax SIP].
Press [On] and then press [Exit].
Press [SIP Settings].
Press [Change] next to each item, and then specify the value.
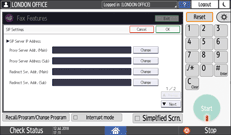
Enter the server IP address when specifying the proxy server, redirect server, and registered server.
Enter the SIP user name when specifying the SIP user name.
To use SIP digest authentication, press [Set], and enter the user name and password.
Press [OK].
Press [Parameter Setting] to display the switch operation screen.
Press switch number [34] ![]() bit number [1], and change current value to "1".
bit number [1], and change current value to "1".

Press [OK].
 After completing the procedure, press [Home] ().
Configure the SIP server, in addition to specifying the settings on the machine. Consult your network administrator.
When using the gateway (Settings Screen Type: Classic)
Press [Settings] on the Home screen.
Press [Machine Features Settings] on the Settings screen.
Press [Fax Settings]![]() [Initial Settings] tab
[Initial Settings] tab ![]() [Program / Change / Delete Gateway].
[Program / Change / Delete Gateway].
Confirm that [Program / Change] is selected, and then press [* Not Programmed].
Press [Change] under "Prefix" and specify the prefix number.
About Prefix
The prefix is used to identify the telephone number of the G3 fax sending a fax via the VoIP gateway. If a gateway with an ID number that matches the first few digits in the telephone number exists, the fax is sent via the matching gateway. For example, specifying "0312345678" as the destination when the gateways of ID number "03" and "04" are registered, the transmission goes through the gateway of ID number "03".
To use the gateways regardless of the ID number in the IP-Fax destination, register only the gateway addresses without specifying the ID numbers.
Select [H.323] or [SIP] in "Select Protocol".
Press Change under "Gateway Address", and specify the gateway address.
Press [OK].
After completing the procedure, press [Home] ().
To change or delete the registered gateway, press [Fax Settings]
[Initial Settings] tab [Program / Change / Delete Gateway], press [Program / Change] or [Delete] on the displayed screen, and then select the gateway to delete or change.Configure the settings on the VoIP gateway, in addition to specifying the settings on the machine. Consult your network administrator.
Basic Procedure for Sending IP-Faxes
The machine scans the original to send into the machine's memory before establishing communication with the destination (Memory Transmission).
You can also transmit an IP-Fax while confirming the transmission status.
Sending a Fax While Scanning the Original
Press [Fax] on the Home screen.
Check that [Fax] and [Memory Transmission] are displayed on the fax screen.
Place the original in the ADF or on the exposure glass.
Press [Settings], and then specify the scan settings.
Sending a Fax at the Image Quality Suitable for the Original
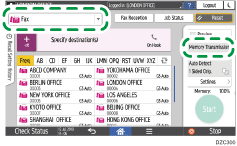
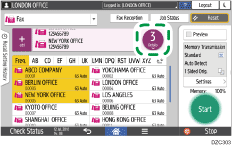
Specify the destination on the fax screen.
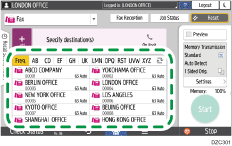
When you select a destination registered as an IP-Fax destination in the address book, the document is sent by IP-Fax.
To enter the destination manually, select from the destination history, or search in the address book, press
 , and specify the destination.
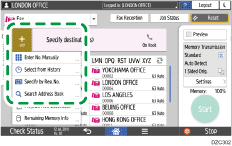
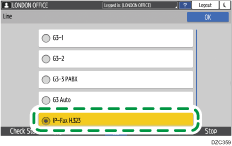
To enter the destination manually, select [Enter with Number Keys], press [Line], and then select [IP-Fax H.323] or [IP-Fax SIP].
To specify the destination by entering a host name or SIP user name, press [Keyboard] to display the-screen keyboard.

To specify the destination again, press
 .
.
On the [Settings] screen, specify the Sender as necessary.
When a login user is operating the machine, the login user becomes the sender.
To receive a transmission result by e-mail, select [Notification of Results]. The e-mail address that you selected the [Use as Sender] check box when registering the address will be used as the e-mail address of the sender.
To print the sender name on the page received at the destination, select the [Stamp Sender Name] check box.
Press [Start].
To cancel transmission after scanning the original, press [Stop] and operate in [Job Status]![]() [Transmission Standby File].
[Transmission Standby File].