Overview of the Remote Fax Function
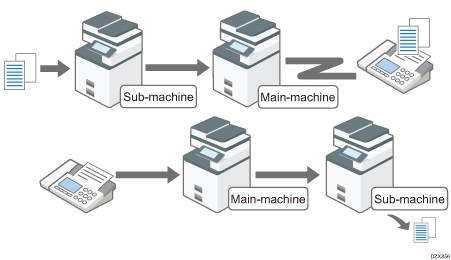
Using the fax function of the main machine, you can send and receive faxes from a device (sub-machine) that does not have a fax function. Use the Remote Fax screen of the sub-machine to send a fax from the main machine, or print the fax received on the main-machine from the sub-machine. This function can be used only between our MFPs.

Printing a Received Fax on a Sub-machine
Sending Faxes via Another Machine (Non-fax Equipped Model)
Requirements for Remote Fax function
The optional Fax connection unit must be installed in both the main machine and sub-machine.
Hard disk drives are installed in both the main- and sub-machines.
The machine and sub-machine must be connected via the network.
When user authentication is enabled, the same authentication method must be specified on both the main machine and sub-machine.
Verifying Users to Operate the Machine (User Authentication)

The optional fax connection unit is required to use this function.
Preparing the Main Machine to use Remote Fax
To use the Remote Fax function, register the sub-machine as the remote faxes on the main machine in advance. You can register up to six sub-machines.
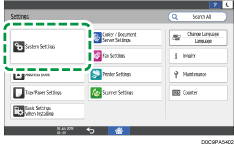
 Press [Settings] on the Home screen.
 Press [System Settings] on the Settings screen.

 Press [Machine]
 [Others]
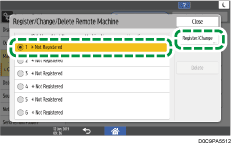
 [Register/Change/Delete Remote Machine].
 Press [*Not Registered], and then press [Register/Change].

 Enter the IP address or hostname of the sub-machine in [IP Address/Host Name] and press [Connection Test].
If you cannot connect, check the message that appears.
 Press [OK].
 Press [Home] (
 ) after specifying the settings.
Preparing the Sub-machine to Use Remote Fax
To use the Remote Fax function, register the main machine as the remote machine on the sub-machine in advance. You can register only one main machine.
 Press [Settings] on the Home screen.
 Press [System Settings] on the Settings screen.

 Press [Machine]
 [Others]
 [Register/Change/Delete Remote Machine].
 Press [*Not Registered], and then press [Register/Change].

When a machine is registered already as the main machine, you cannot select other items that are displayed as [*Not Registered].
 Enter the IP address or hostname of the main machine in [IP Address/Host Name] and press [Connection Test].
If you cannot connect, check the message that appears.
 Press [OK].
 Press [Home] (
 ) after specifying the settings.
Functions That Can Be Used on the Sub-machine
To use the fax function on the sub-machine, use the Remote Fax screen. Also, the scan settings and some print settings can be specified in [Fax Settings].
Functions that can be used on the [Remote Fax] screen of the sub-machine
You can send and receive a fax from the sub-machine using the function, transmission/reception capability, line type, paper type and functions that are supported on the main machine. Also, you can select a fax destination from the address book of the sub-machine when specifying the fax destination. However, the following limitations apply:
Only a G3 line can be selected when sending a fax.
The address book of the main machine cannot be used.
Immediate Transmission and On Hook function cannot be used.
Only 10 sender names (for print) can be registered as Fax Header in [Fax Settings].
Functions that can be used on the [Fax Settings] screen of the sub-machine
The functions configured in [Fax Settings] on the sub-machine are applied when sending and receiving faxes on the sub-machine.
Function category | Items that can be configured |
|---|---|
General Setting |
|
Scan Settings |
|
Reception Settings |
|
Initial Settings |
|
Reports that can be checked on Remote Fax
You can print the reports below on the sub-machine. However, those may not be printed depending on the settings on the main machine.
Communication Result Report
Communication Failure Report
Error Report
Power Off Report
