Sending and Receiving Documents by Internet Fax
Using Internet Fax, you can send and receive documents between a fax machine and computer or between two fax machines.
Preparing the Machine to Send Internet Faxes
To send documents by Internet Fax:
Configure the fax mail account
Enable the Internet Fax function
Specify the interval to check for reception automatically

Configure the network settings and initial settings for sending e-mails from the machine in advance.
Prepare an e-mail address dedicated for Internet Fax. For Internet Fax, do not use an e-mail address that you are using for receiving e-mail to your computer or a smart device.
Configuring an e-mail account to use for fax
Configure the e-mail address to use when receiving incoming Internet Fax from a sender.
 Press [Settings] on the Home screen.
 Press [Fax Settings] on the Settings screen.
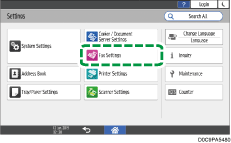
 Press [Detailed Initial Settings]
 [Fax Email Account].
 Press [Receive] in [Account], and then enter the user name, e-mail address, and password.
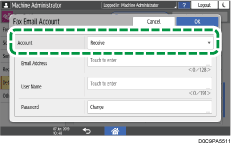
 Press [OK].
 Press [Home] (
 ) after specifying the settings.
Configuring of the e-mail account to use for Internet Fax is complete. Now enable the Internet Fax function.
Enabling the Internet Fax function
 Press [Settings] on the Home screen.
 Press [Fax Settings] on the Settings screen.

 Press [Detailed Initial Settings]
 [Internet Fax/Email/Folder].
 Check that [On] in [Internet Fax Setting] is selected.
 Press [OK].
 Press [Home] (
 ) after specifying the settings.
The Internet Fax function is now enabled. Now specify the interval for checking the reception automatically.
Specify the interval to check for reception automatically
Specify the interval to check for incoming e-mails automatically. You can also configure the machine to only receive e-mails manually.
 Press [Settings] on the Home screen.
 Press [System Settings] on the Settings screen.
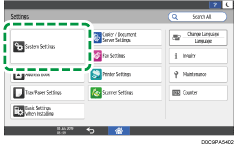
 Press [Send (Email/Folder)]
 [Email]
 [Email Reception Interval].
 Press [On], and enter the interval to check for reception.
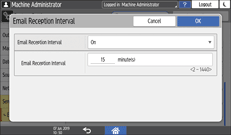
If you want to check for incoming e-mail only manually, press [Off].
 Press [OK].
 Press [Home] (
 ) after specifying the settings.

To receive faxes manually, specify the setting in [Fax Reception]
 [Manual Reception: Email] on the fax screen.
Basic Procedure for Sending Internet Faxes
 Press [Fax] on the Home screen.
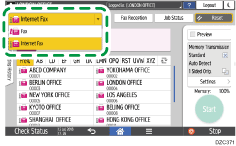
 Select [Internet Fax] on the fax screen.
 Place the original in the Auto Document Feeder (ADF) or on the exposure glass.
 Press [Settings]
 [Sender] to specify the sender.
When a login user is operating the machine, the login user becomes the sender.
To receive a transmission result by e-mail, select [Notification of Result]. The e-mail address that you selected in the [Register as both a destination and a sender] check box when registering the address will be used as the e-mail address of the sender.
To print the sender name on the page received at the destination, select the [Stamp Sender Name] check box.
 To specify the subject, enter Subject.
If you do not specify the subject, it is entered automatically.
For the maximum number of characters for an e-mail subject, see List of Maximum Values for Each Setting Item.
 To specify the main text, select "Text".
Select the main text to use in the main from the text registered in [Register / Change / Delete Email Message] under [System Settings] in advance.
 Configure the scan settings.
Sending a Fax at the Image Quality Suitable for the Original
Specify TIFF as the file format when sending to an e-mail address of a machine that supports Internet Fax.
 Specify the destination on the fax screen.
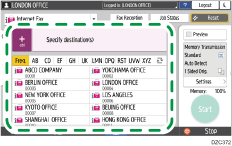
To enter an e-mail address manually, select from the destination history, or search in the address book, press
 , and specify the destination.
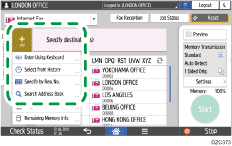
You can select only the destination entered using the numeric keypad from the history.
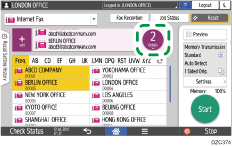
To specify the destination again, press
 .
.
 Press [Start].
To cancel transmission after scanning the original, press [Stop] and operate in [Job Status] [Transmission Standby File].

You cannot send an e-mail without attaching a document to send.
The Subject that is Entered Automatically for an Internet Fax
If you do not enter the subject when sending an Internet Fax, the machine specifies the subject automatically upon transmission.
The subject that is specified automatically varies depending on the setting in [Settings] [Sender]
 [Stamp Sender Name].
When [Stamp Sender Name] is specified
From [sender name] (Fax Message NO.xxxx)
When [Stamp Sender Name] is not specified
The subject is automatically entered as follows according to the registration status of the sender information.
The registration status of [Own Fax Number] and [Own Name]
Subject
Both items are specified
From: "Own Fax Number" ("Own Name") (Fax Message NO.xxxx)
Only [Own Fax Number] is specified
From: "Own Fax Number" (Fax Message NO.xxxx)
Only [Own Name] is specified
From: "Fax Header (for display)" (Fax Message NO.xxxx)
Both items are not specified
Fax Message NO.xxxx
* "xxxx" indicates the document number shown in Records.
When Receiving Internet Fax on a Computer
A fax is sent as a file attached to an e-mail when sending an Internet Fax from the machine to an e-mail address of a computer. The subject and main text of the e-mail are displayed as described below.
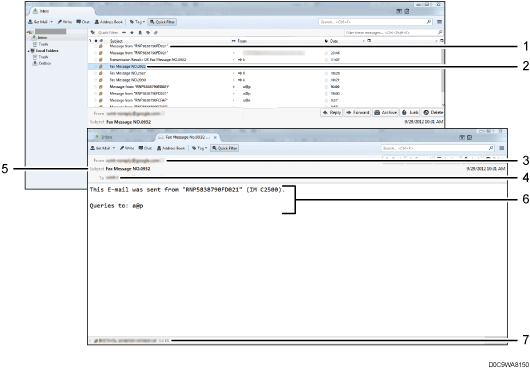
E-mail sent without specifying the subject
E-mail sent with the subject specified
Name and e-mail address of the sender
Subject specified at the time of transmission
Destination specified at the time of transmission
Text
Sent document (displayed as an attached document)
The following message is inserted in every e-mail sent:
This E-mail was sent from "Host Name" (product name)
Queries to: "Administrator's e-mail address"
[Administrator Email Address] and [Host Name] registered in [System Settings] are displayed as the host name and e-mail address of the administrator.
[System Settings]
 [Send (Email/Folder)]
 [Email]
 [Email Communication Port]
[System Settings]
 [Network/Interface]
 [Host Name]

Text may appear garbled if characters in a language other than English is contained in the e-mail message.
Sending/Receiving Documents Between Machines Supporting T.37 Full Mode
The machine supports T.37 Full Mode that is defined in the international standards for Internet Fax (ITU-T recommendation, RFC2532). When the destination device also supports T.37 Full Mode, the machine and destination device can exchange their reception statuses and performance details information bidirectionally.
Receiving Reception Notice
When you send an Internet Fax requesting reception notice, the destination device will send back a Reception Notice e-mail upon receiving the Internet Fax. You can confirm the reception results at the destination in "Records".
Sending faxes in the optimal size and resolution
The Reception Notice e-mail contains the properties of the destination device such as the supported compression methods, reception paper sizes, and resolution. When the destination device is registered as supporting Full Mode in the address book, the properties in the Reception Notice e-mail are registered automatically in the address book. The machine then uses this information to send Internet Faxes to the destination, optimizing the size and resolution according to the information.

When the destination device does not support T.37 Full Mode, the machine automatically sends Internet Faxes in the size and resolution that corresponds to Simple Mode (81/2 × 11 (A4) size, at 200×100 dpi or 200×200 dpi) regardless of the settings specified when sending the fax.
Use Web Image Monitor to register a destination address as supporting Full Mode. The properties of the destination can also be registered manually.
Programming the Performance Details Information of an Internet Fax Destination
When specifying more than one destination for an Internet Fax, the fax will be sent separately to each destination if a destination registered as supporting Full Mode is included.
You cannot use the following fax functions when specifying an Internet Fax destination:
Immediate Transmission
On-hook dialing
Manual dialing
Closed Network
JBIG Transmission
ECM (Error Correction Mode)
Memory File Transfer
