Confirming and Handling a Document in the Fax Queue
The document stored in the memory of the machine after it has been scanned and until it is transmitted is referred to as a Transmission Standby File.
On the fax screen, you can perform the following operations on Transmission Standby Files:
Confirming/changing the destination
Changing the time specified for transmission
Printing the file
Deleting the destination
Canceling the transmission
A document that could not be sent because of a transmission error (unsent document) and documents waiting in queue for Forwarding are also included in the Transmission Standby Files.
What Can Be Done to Transmission Standby Files
Operation | Document waiting in queue for Memory Transmission/unsent document | Document waiting to be forwarded |
|---|---|---|
Confirming the destination |
|
|
Adding a destination |
| - |
Editing a destination |
| - |
Deleting a destination |
| - |
Confirming the transmission document*4 |
|
|
Printing the transmission document |
|
|
Sending immediately |
|
|
Cancel Sending |
| - |
Changing the time specified for transmission |
| - |
*1 You cannot add a group destination.
*2 You can only edit the fax number or e-mail address or change the line to use for a destination entered manually.
*3 When all destinations specified for a transmission document are deleted, the transmission is canceled.
*4 You can confirm the scan date (received date for a document waiting to be forwarded), destination, number of destinations, number of pages in the original, document number, status and sender (only for a document waiting to be forwarded).
*5 You can change the setting for a document that was stored in the memory with the time specified for transmission.
Confirming and Handling a Transmission Standby File
 Press [Fax] on the Home screen.
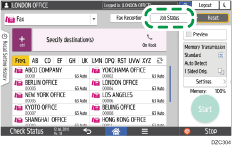
 Press [Job Status] on the fax screen.
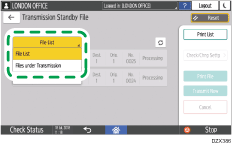
 Press [Transmission Standby File] and select [File List], [Files under Transmission], or [Display Forwarded Files Only].
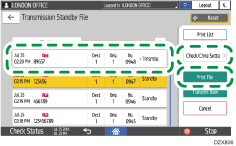
 Confirm or specify how to handle the Transmission Standby Files.
For a document specified with more than one destination, the destination specified first is displayed. Also, only the number of destinations of the unsent faxes is displayed in "Dest.".
The destination may be displayed as "*" and cannot be selected depending on the security settings.
See the table below for the procedure to confirm or specify how to process the Transmission Standby Files.
Confirmation or processing
Steps
Confirming the destination / printing the document
Select a document and then press [Check/Chng Settg] or [Print File].
Adding a destination
Select the document to add a destination and then press [Check/Chng Settg].
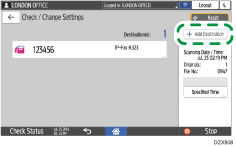
Press [Add Destination].
Select the destination to add and press [OK].
The destinations that are already specified are grayed out.
You cannot add a destination if you have disabled broadcasting.
Editing the destination manually entered / deleting a destination
Select a document to change the destination and then press [Check/Chng Settg].
Select the destination to edit or delete.
Specify [Edit Destination] or [Delete Destination].
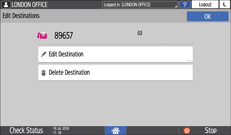
You can only edit a destination that was entered manually.
Canceling transmission / sending document immediately
Select the document to cancel transmission or send immediately and press [Cancel] or [Transmit Now].
Pages on which transmission is completed may not be canceled depending on when you cancel transmission.
Resending the unsent document
Select a document whose status is "Failed" and press [Transmit Now].
The document is deleted in the memory and from the Transmission Standby File list after resending the document is completed.
Changing the time specified for transmission
Select the document to change the time specified for transmission and then press [Check/Chng Settg].
Press [Specified Time].
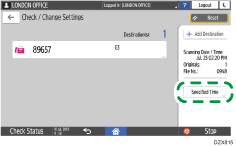
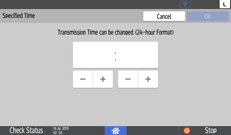
Specify the time and press [OK]. To cancel the specified time and send the document immediately, press [Cancel].
Printing the List of Transmission Standby Files
Print the list of transmission standby files to check for the specified destinations, the pages that are not yet transmitted, and the transmission result.
 Press [Fax] on the Home screen.
 Press [Job Status] on the fax screen.

 Press [Transmission Standby File] and press [File List] or [Files under Transmission].

Forwarding documents are not printed in the list.
 Press [Print List] and then press [Print] on the confirmation screen.
