Printing the Destination Name, Fax Header, and Standard Message on the Fax Received at the Destination
You can print the destination name, fax header, and standard message on the page received at the destination along with the image of the original sent by fax. Specify the information to print on the received page in advance.
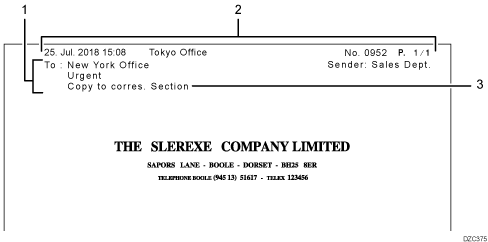
Information Printed on Received Pages at the Destination

Name or standard message of the destination registered in the address book
When sending a fax to a destination selected from the address book, you can print the name of the destination registered in the address book with its title on the first page of the fax received at the destination (Label Insertion). A standard message or any text up to 28 single-byte characters is also printed according to the [Label Insertion] settings specified in the address book.
Fax Header
The fax header (for printing) is printed on all the pages received at the destination.

Register the fax header in [Register Fax Information] under [Fax Settings] in advance. You can register up to 10 fax headers.
The fax header (for printing) will not be added on the document that is delivered to the destination.
In some cases, you may want the other party to receive an unmarked copy of your original. To do this, switch fax header off.
Standard message stamp
Specify a standard message to print on the first page of the fax received at the destination from the followings (Standard Message Stamp). The selected message is printed directly under the fax header when [Label Insertion] is not specified, and two lines below the destination name when [Label Insertion] is specified.
4 preset phrases: "Confidential", "Urgent", "Please phone", "Copy to corresponding section"
A phrase registered in [Fax Settings]
 [Send Settings]
 [Register/Change/Delete Standard Message]
The machine cannot stamp multiple standard messages.
Registering and Changing the Sender Information
Register the sender information to print on the fax received at the destination and in the records, or to display on the fax screen. As the sender information, you can register the following:
Fax Header
This item is printed on the fax received at the destination indicating the origin of the fax.
You can register up to ten fax headers (for print) on the machine, and use a separate fax header for each department. When a fax header is not specified when sending, the fax header registered at the top is printed.
Own Name
This item is displayed on the fax screen at the destination or printed in the Records when sending or receiving fax over a G3 line or by IP-Fax. The own name can be used only if the other machine is of the same manufacturer and has the own name function.
Own Fax Number
This item is displayed on the fax screen at the destination or printed in the Records when sending or receiving fax over a G3 line or by IP-Fax. This feature is valid even when the destination device is an other manufacturer's fax.
 Press [Settings] on the Home screen.
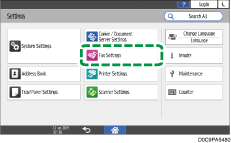
 Press [Fax Settings] on the Settings screen.

 Press
Press [Detailed Initial Settings]
 [Register Fax Information]
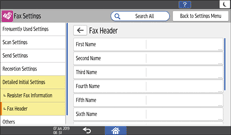
 [Fax Header], and register the fax header (for print).

Specify the fax header to register or change, enter the fax header (to be printed), and then press [OK].
You can use characters, symbols, numbers, and spaces.
The maximum number of characters that can be entered is 32.
 Press [
 ].
].
 Press the [Own Name], and register your name (for display).
Press [Own Name], enter your name, and then press [OK].
You can use characters, symbols, numbers, and spaces.
The maximum number of characters that can be entered is 20.
 Press the [Own Fax Number], and register the fax number of the sender.
Specify a line to register the fax number, enter the fax number of the sender, and then press [OK].
You can use numbers, spaces, and "+" symbol.
You can register the name using up to 20 characters.
 Press [Home] (
 ) after specifying the settings.

To erase the sender information, press [Fax Settings]
 [Detailed Initial Settings]
 [Register Fax Information]
 the menu of the information you want to erase ([Fax Header], [Own Name], or [Own Fax Number]), and then erase the sender information from the input box.
Specifying the Print Function When Sending Faxes

 (mainly North America)
In the USA, the fax header must contain the telephone number of the line your machine is connected to. It will be printed on the header of every page you send. Required in the USA.
To use [Label Insertion], register the destination in the address book, and configure the Label Insertion settings in advance.
 Press [Fax] on the Home screen.
 Place the original in the Auto Document Feeder (ADF) or on the exposure glass.
 Press [Settings]
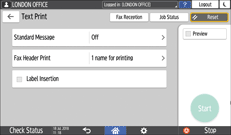
 [Text Print], and select the item to print on the fax received at the destination.

To specify [Standard Message] and [Fax Header Print], press "![]() ", and then select an item from the list.
", and then select an item from the list.
 Configure the scan settings.
Sending a Fax at the Image Quality Suitable for the Original
 After configuring the send settings, specify the destination on the fax screen, and send the fax.
Basic Procedure for Transmitting Faxes

The image of the original will be printed cropped in the area where the destination name, fax header, and standard message are printed.
When you specify [Standard Message], the standard message in the third line of [Label Insertion] will not be printed, and will be replaced by the standard message specified in [Standard Message] instead.
