Configuring the Settings to Send E-mails from the Machine
You can send e-mails by the Internet Fax or scanner from the machine. Configure the settings required for connecting to and authenticating the server before sending an e-mail to a specified e-mail address.
You can send an e-mail easily by configuring the following settings in advance.
The e-mail address of the administrator as the sender (From:). You will not need to specify the sender for each e-mail.
Fixed messages of salutations or information about the sender to use in e-mails.
Configuring the Initial Settings to Send E-mails (Settings Screen Type: Standard)
 On the Home screen, press [Settings].
 Press [System Settings].
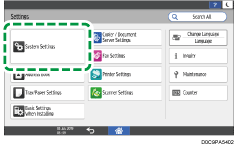
 Press [Send (Email/Folder)]
 [Email]
 [SMTP Server].
 Configure the information of the server.
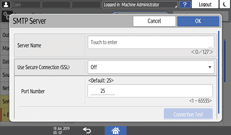
Server Name: Enter the FQDN (Fully Qualified Domain Name without omitting the domain name, subdomain name, or host name used in the TCP/IP network) of the SMTP server, or enter the IPv4 address. When you enter the FQDN, configure [DNS Configuration] on [System Settings]
 [Network/Interface].
Use Secure Connection (SSL): Specify whether to use SSL.
Port Number: Enter the port number to use for the connection to the SMTP server.
 Press [Connection Test], confirm that the machine is connected to the server, and then press [OK].
If the machine fails to connect to the server, check with the network administrator or internet service provider (ISP) that the entered information is correct.
 According to the settings on the SMTP server to connect, configure [SMTP Authentication] or [POP before SMTP].
 After completing the configuration, press [Home] (
 ).
).
Specifying the E-mail Address of the Administrator as the Sender (Settings Screen Type: Standard)
Register the e-mail address of the administrator on [System Settings] [Send (Email/Folder)]
 [Email]
 [Administrator's Email Address] to enable the sender name to be specified automatically.

When sending e-mail with the scanner function or Internet fax, you can specify the e-mail address using the procedure below.
 On the Home screen, press [Settings].
 Press [System Settings].

 Press [Send (Email/Folder)]
 [Email]
 [Administrator's Email Address].
 Press the input field for the [Administrator's Email Address], and then enter the Administrator's Email Address.
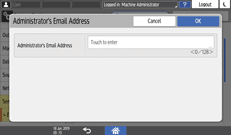
 Press [OK].
 Press [Auto Specify Sender Name].
 Select [On], and then press [OK].
 After completing the configuration, press [Home] (
 ).
).

To use an e-mail address other than that of the administrator as the sender, specify the sender name manually.
When you use another account to send e-mail with Internet Fax, specify [Fax Email Account].
Registering Fixed Messages (Settings Screen Type: Standard)
Register fixed messages to use in e-mails on [System Settings] [Send (Email/Folder)]
 [Email]
 [Register/Change/Delete Email Message].
 On the Home screen, press [Settings].
 Press [System Settings].

 Press [Send (Email/Folder)]
 [Email]
 [Register/Change/Delete Email Message].
 Select the item you want to register, and then press [Register/Change].
 Press the input field for the name and text, and then enter them.
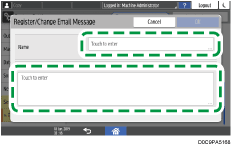
 Press [OK].
 After completing the registration, press [Home] (
 ).
).

To change or delete the registered message, press [System Settings]
 [Send (Email/Folder)]
 [Email]
 [Register/Change/Delete Email Message] to display the screen, and then select the item and press [Register/Change] or [Delete].
For details about the procedure to insert fixed phrases in the e-mail message, see the sections below.
Editing the Subject and Message When Sending the Scanned Document by E-mail
Configuring the Initial Settings to Send E-mails (Settings Screen Type: Classic)
 On the Home screen, press [Settings].
 Press [Machine Features Settings]
 [System Settings]
 [File Transfer] tab
  [SMTP Server].
 Configure the information of the server.
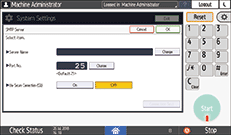
Server Name: Enter the FQDN (Fully Qualified Domain Name without omitting the domain name, subdomain name, or host name used in the TCP/IP network) of the SMTP server, or enter the IPv4 address. When you enter the FQDN, configure [DNS Configuration] on [System Settings]
 [Interface Settings] tab
  [Network/USB].
Port Number: Enter the port number to use for the connection to the SMTP server.
SSL: Specify whether to use SSL.
 Press [Connection Test], confirm that the machine is connected to the server, and then press [Confirm].
If the machine fails to connect to the server, check with the network administrator or internet service provider (ISP) that the entered information is correct.
 According to the settings on the SMTP server to connect, configure [SMTP Authentication] or [POP before SMTP].
 After completing the configuration, press [Home] (
 ).
).
Specifying the E-mail Address of the Administrator as the Sender (Settings Screen Type: Classic)
Register the e-mail address of the administrator on [System Settings] [File Transfer] tab to enable the sender name to be specified automatically.

When sending e-mail with the scanner function or Internet fax, you can specify the e-mail address using the procedure below.
 On the Home screen, press [Settings].
 Press [Machine Features Settings]
 [System Settings]
 [File Transfer] tab
  [Administrator's Email Address].
 Enter the e-mail address of the administrator, and then press [OK].
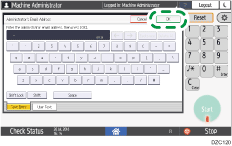
 Press [Auto Specify Sender Name].
 Select [On], and then press [Settings].
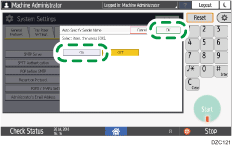
 After completing the configuration, press [Home] (
 ).
).

To use an e-mail address other than that of the administrator as the sender, specify the sender name manually.
When you use another account to send e-mail with Internet Fax, specify [Fax Email Account].
Registering Fixed Messages (Settings Screen Type: Classic)
Register fixed messages to use in e-mails on [System Settings] [File Transfer] tab.
 On the Home screen, press [Settings].
 Press [Machine Features Settings]
 [System Settings]
 [File Transfer] tab
  [Program / Change / Delete Email Message].
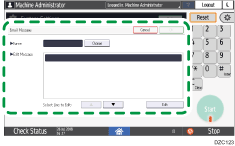
 Press [Program / Change]
 [*Not programmed].
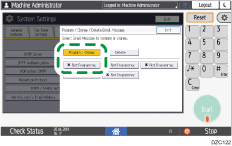
 Enter the e-mail message, and then press [OK].
 After completing the registration, press [Home] (
 ).
).

To change or delete the registered message, press [System Settings]
 [File Transfer] tab
  [Program / Change / Delete Email Message], press [Program / Change] or [Delete], and then select the message.
For details about the procedure to insert fixed phrases in the e-mail message, see the sections below.
Editing the Subject and Message When Sending the Scanned Document by E-mail
