Inserting Other Documents
You can insert another document during editing. Scanned-in documents, electronic files, and documents saved in jobs can be combined to make a single job.
This function can be performed using the on-screen items indicated in the following illustration.
Note that this explanation outlines general use of the settings area. For details about a specific setting, see the on-screen balloon help that appears when you click the ![]() button.
button.
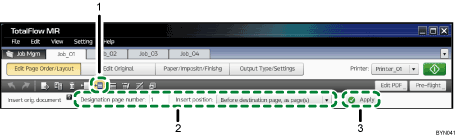
 , the [Insert Original Document] button
Click this to insert another document into the job currently being edited.
Settings area
When you click
, the [Insert Original Document] button, the settings for inserting documents will appear here.Specify each setting, and then click [Apply].
[Apply] button
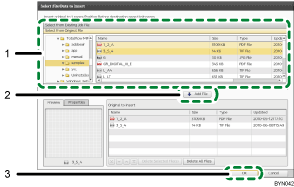
After you click this, the [Select File/Data to Insert] screen will appear.
On this screen, add the document files you want to insert.
Select File/Data to Insert Screen Operation Click either [Select from Existing Job File] or [Select from Original File], and then select a file. Or, click [Select from Scanned Data], scan an original, and then select the scanned document.
Click [Add File] to add the document to insert.
Click [OK].
![]()
When you insert PDF or TIFF (multi-page supported) files, you can click the [Page range] cell and enter the page range that you want to insert in the job. You can also specify multiple pages ranges. It is possible to specify them using reverse order or overlapping page ranges. (For example, 2-4,18-2)