Output Settings
After you have configured the [Edit Page Order/Layout], [Edit Original], and [Paper/Imposition/Finishing] settings for the documents in a job, you can view a preview of the final output, select the output method, and configure the print settings.
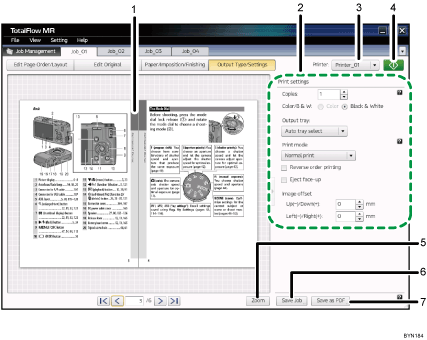
Clicking [Output Type/Settings] in [Job Edit] will display the following screen, where you can configure the output settings.
Output Type/Settings screen

Preview display
This area shows the document in its final form, after any edits have been applied.
You can use the buttons at the bottom of the screen to change the page and preview the final form of each page.
Depending on the printer, paper type settings, and finishing settings, actual output might differ from the results shown in the preview.
Print Settings
You can configure the following print settings. (The available print settings might differ depending on the printer.)
For details about a specific setting, click the
 button to display the on-screen balloon help.
[Copies:], [Color/B & W:], [Output tray:]
[Print mode:]
You can select Normal print, Save as job file and print, Sample print, etc.
Reverse order printing
Eject face-up
Image offset
When printing two-sided documents, you can adjust the position of the front-side image and the back-side image.
Printer selection
In the drop-down list, select the printer you want to use.
Only printers that are registered appear in the drop-down list. For details about registering printers, see Registering a Printer
 .
.Note that if you change the printer after you edit a job, any functions not supported by the new printer will be disabled.
[Start Printing] button
Begin printing.
After you begin a print job, you can check its progress and change its status (pause, resume, cancel, etc.) if necessary.
For details about checking a job’s progress and changing a job’s status, see Checking Job Progress and Results
 .
.[Zoom]/[View Whole] button
Use this to switch the preview display.
[Save Job] button
Save the modified job as an RJF, JDF or MJD format.
The RJF format is a job file format unique to this application. RJF files are PDF files that have embedded information about settings such as finishing settings and print settings.
Saved jobs can be retrieved and opened later for editing and printing or outputting.
When you save the modified job as a JDF or MJD format, you cannot delete or modify the contents of placed objects (text, images, and fill areas).
[Save as PDF] button
Save a job as a single PDF file with edits applied.
Information such as finishing settings, slip sheet insertion, number of copies, and output tray will not be saved.
![]()
When saving a job as a JDF format, a folder will be created and PDF files that are linked with the JDF file will be saved in a folder. The folder name will be the same as the JDF file name with "_mrjob" appended to the end. For example, if the JDF file name is "ABCD.jdf", the PDF files will be saved in the "ABCD_mrjob" folder.
The created JDF files are only available with the TotalFlow applications.

