Step 8: Add page numbers
In this step, you will configure settings so that page numbers (P1, P2, ...) are printed.
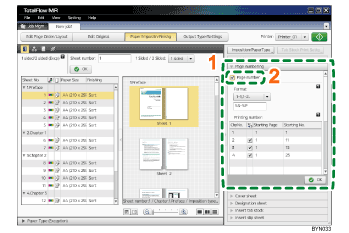
1 |
On the [Paper/Imposition/Finishing] screen, click [Page numbering] to open the settings pane. |
|
2 |
Select the [Page number] check box. |
|
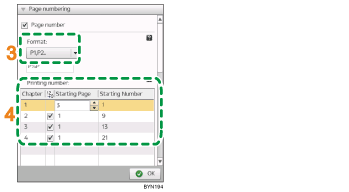
3 |
In the [Format:] drop-down list, select [P1,P2...]. |
|
4 |
In [Printing number:], enter 3 in [Starting Page] and enter 1 in [Starting Number] for chapter 1. Select |
|
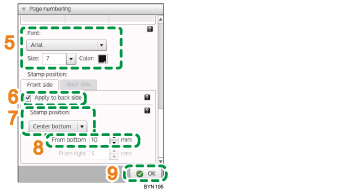
5 |
Specify “Arial” in [Font:], specify “7” points in [Size:], and specify [Color:]. |
|
6 |
Click the [Front side] tab. Select the [Apply to back side] check box. |
|
7 |
Specify the print position of the page numbers. In [Stamp position:], select [Center bottom]. |
|
8 |
In [From bottom], enter 10 mm (0.39 inch). |
|
9 |
Click [OK]. |
![]()
For more details about [Page numbering], see Adding Pagination (Page Numbering)
 .
.