

  |  | ||
This section describes how to register scan destinations in the Address Book. To send scanned files to an e-mail address (Scan to E-mail), FTP server (Scan to FTP), or a shared folder on a network computer (Scan to Folder), you must first register the destination in the Address Book using Web Image Monitor.
![]()
The Address Book data could be damaged or lost unexpectedly. The manufacturer shall not be responsible for any damages resulting from such data loss. Be sure to create backup files of the Address Book data periodically.
Depending on your network environment, the Scan to FTP and Scan to Folder functions may require a user name and password to be correctly entered in the destination information. In such cases, after registering destinations, check that the user name and password are correctly entered by sending test documents to those destinations.
The Address Book can contain up to 100 entries, including 20 Quick Dial entries.
Destinations registered as Quick Dial entries can be selected by pressing the corresponding One Touch button.
Start the Web browser, and access the machine by entering its IP address.
Click [Quick Dial Destination] or [Scan Destination].
From the [Destination Type] list, select [E-mail Address], [FTP] or [Folder].
Register information as necessary.
The information you must register varies depending on the destination type. For details, see the tables below.
Enter the administrator password if required.
Click [Apply].
Close the Web browser.
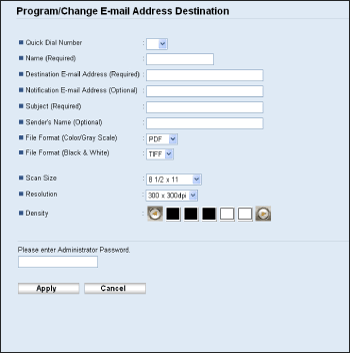
Scan to E-mail Settings

Item |
Setting |
Description |
|---|---|---|
Quick Dial Number |
Optional |
Select when setting the destination as a Quick Dial entry. |
Name |
Required |
Name of the destination. The name specified here will be shown on the screen when selecting a scan destination. Can contain up to 16 characters. |
Destination E-mail Address |
Required |
E-mail address of the destination. Can contain up to 64 characters. |
Notification E-mail Address |
Optional |
E-mail address to which a notification is sent after transmission. Can contain up to 64 characters. |
Subject |
Required |
Subject of the e-mail. Can contain up to 64 characters. |
Sender's Name |
Optional |
Name of e-mail sender. The name specified here will be shown under "From" or a similar field of the recipient's email application. Can contain up to 32 characters. |
File Format (Color/Gray Scale) |
Required |
File format of the scanned file when scanning in color. PDF or JPEG can be selected. PDF supports multiple pages in a document, but JPEG does not. |
File Format (Black & White) |
Required |
File format of the scanned file when scanning in black and white. PDF or TIFF can be selected. Both formats support multiple pages in a document. |
Scan Size |
Optional |
Select the scanning size for the original from A5, B5, A4, Executive, Half Letter, Letter, Legal, or custom size. If you select custom size, select [mm] or [Inch], and then specify the width and length. |
Resolution |
Optional |
Select the scan resolution from 100×100, 150×150, 200×200, 300×300, 400×400, or 600×600 dpi. |
Density |
Optional |
Specify the image density by clicking the right or left buttons. |
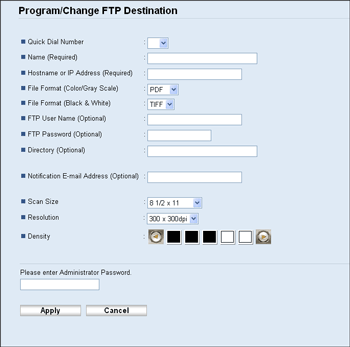
Scan to FTP Settings

Item |
Setting |
Description |
|---|---|---|
Quick Dial Number |
Optional |
Select when setting the destination as a Quick Dial entry. |
Name |
Required |
Name of the destination. The name specified here will be shown on the screen when selecting a scan destination. Can contain up to 16 characters. |
Hostname or IP Address |
Required |
Name or IP address of the FTP server. Can contain up to 64 characters. |
File Format (Color/Gray Scale) |
Required |
File format of the scanned file when scanning in color. PDF or JPEG can be selected. PDF supports multiple pages in a document, but JPEG does not. |
File Format (Black & White) |
Required |
File format of the scanned file when scanning in black and white. PDF or TIFF can be selected. Both formats support multiple pages in a document. |
FTP User Name |
Optional |
User name for logging in to the FTP server. Can contain up to 32 characters. |
FTP Password |
Optional |
Password for logging in to the FTP server. Can contain up to 32 characters. |
Directory |
Optional |
Name of the FTP server directory where scanned files are stored. Can contain up to 64 characters. |
Notification E-mail Address |
Optional |
E-mail address to which a notification is sent after transmission. Can contain up to 64 characters. |
Scan Size |
Optional |
Select the scanning size for the original from A5, B5, A4, Executive, Half Letter, Letter, Legal, or custom size. If you select custom size, select [mm] or [Inch], and then specify the width and length. |
Resolution |
Optional |
Select the scan resolution from 100×100, 150×150, 200×200, 300×300, 400×400, or 600×600 dpi. |
Density |
Optional |
Specify the image density by clicking the right or left buttons. |
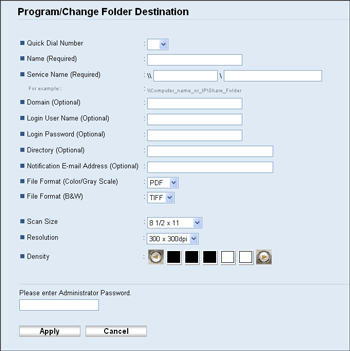
Scan to Folder Settings

Item |
Setting |
Description |
|---|---|---|
Quick Dial Number |
Optional |
Select when setting the destination as a Quick Dial entry. |
Name |
Required |
Name of the destination. The name specified here will be shown on the screen when selecting a scan destination. Can contain up to 16 characters. |
Service Name |
Required |
Path to the directory where scanned files will be stored. Consists of the IP address or name of the destination computer (can contain up to 64 characters), and name of the shared folder (can contain up to 32 characters). |
Domain |
Optional |
If the destination computer is a member of an Active Directory domain, specify that domain name. Can contain up to 15 characters. |
Login User Name |
Optional |
User name for logging in to the destination computer. Can contain up to 32 characters. |
Login Password |
Optional |
Password for logging in to the destination computer. Can contain up to 32 characters. |
Directory |
Optional |
Directory within the shared folder for storing scanned files. Can contain up to 64 characters. |
Notification E-mail Address |
Optional |
E-mail address to which a notification is sent after transmission. Can contain up to 64 characters. |
File Format (Color/Gray Scale) |
Required |
File format of the scanned file when scanning in color. PDF or JPEG can be selected. PDF supports multiple pages in a document, but JPEG does not. |
File Format (B&W) |
Required |
File format of the scanned file when scanning in black and white. PDF or TIFF can be selected. Both formats support multiple pages in a document. |
Scan Size |
Optional |
Select the scanning size for the original from A5, B5, A4, Executive, Half Letter, Letter, Legal, or custom size. If you select custom size, select [mm] or [Inch], and then specify the width and length. |
Resolution |
Optional |
Select the scan resolution from 100×100, 150×150, 200×200, 300×300, 400×400, or 600×600 dpi. |
Density |
Optional |
Specify the image density by clicking the right or left buttons. |
![]()
To send files via e-mail, SMTP and DNS settings must be configured properly.
If you are using the Scan to E-mail function, select a time zone according to your geographic location to send email with correct transmission date and time.
To send files to an FTP server or computer, the user name, password, and directory must be configured properly.
On a network that uses a DNS server, specify a computer name in [Service Name] and the name of the domain to which the computer belongs in [Domain]. In this case, also configure the DNS related settings using Web Image Monitor.
The Scan to Folder destination must operate on one of the following operating systems: Windows XP/Vista/7, Windows Server 2003/2003 R2/2008/2008 R2, or Mac OS X.
Scan destinations cannot be registered using the control panel.
The Scan to USB function does not require destinations registered in the Address Book.
![]()
To test sending files to a Scan to FTP or Scan to Folder destination, see Basic Operation for Scan to E-mail/FTP/Folder.
For details about creating backup files, see Backing Up the Machine's Settings.
For details about SMTP and DNS settings, see Configuring the DNS Settings and Configuring the SMTP Settings.
For details about the time zone setting, see Configuring the SMTP Settings.
For details about using Web Image Monitor, see Using Web Image Monitor.