Removing Paper Jammed in the Duplex Unit
Follow the procedure below to remove paper jammed in the duplex unit.
The GX e2600 is not equipped with a duplex unit.
![]()
Make sure the duplex unit is attached properly.
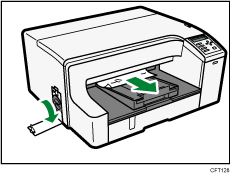
If the bypass tray is attached to the printer, switch the printer off and detach the bypass tray.
You can feed the jammed paper to output ramp by opening the left cover and turning the paper feed wheel.
If turning the paper wheel does not remove the jammed paper, use the following procedure to remove it:
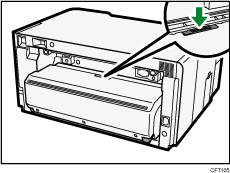
![]() Press the duplex unit cover button at the center of the bypass tray, and then open the duplex unit cover.
Press the duplex unit cover button at the center of the bypass tray, and then open the duplex unit cover.
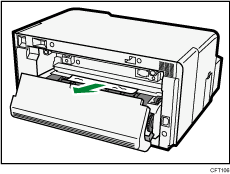
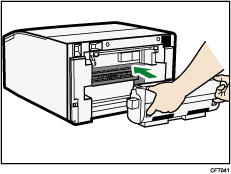
![]() Remove jammed paper.
Remove jammed paper.
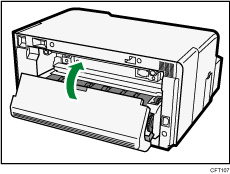
![]() Close the duplex unit cover.
Close the duplex unit cover.
If the bypass tray has been detached, be sure to switch the power off before reattaching the tray.
Printing starts.
If you cannot find jammed paper or remove jammed paper easily, follow the procedure below.
GX e3350N/GX e3300N
![]() Press and hold down the [Power] key on the printer until it turns off, and then unplug the power cord.
Press and hold down the [Power] key on the printer until it turns off, and then unplug the power cord.
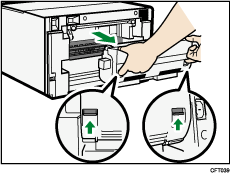
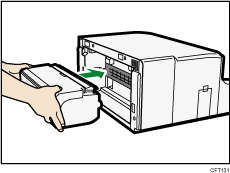
![]() Pressing the catches on both side of the duplex unit, remove the unit.
Pressing the catches on both side of the duplex unit, remove the unit.
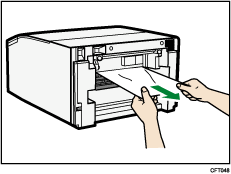
![]() Remove the jammed paper from the rear of the printer.
Remove the jammed paper from the rear of the printer.
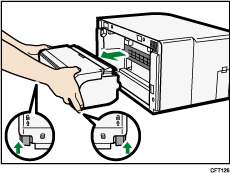
![]() Without pressing the catches on its sides, push the duplex unit all the way in until it clicks into place.
Without pressing the catches on its sides, push the duplex unit all the way in until it clicks into place.
If the bypass tray has been detached, be sure to switch the power off before reattaching the tray.
GX e7700N
![]() Press and hold down the [Power] key on the printer until it turns off, and then unplug the power cord.
Press and hold down the [Power] key on the printer until it turns off, and then unplug the power cord.
![]() Pressing the catches on both side of the duplex unit, remove the unit.
Pressing the catches on both side of the duplex unit, remove the unit.
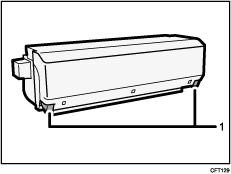
If the catches for the duplex unit attachment and detachment (Figure 1 below) are installed properly, they will click. Make sure they click when attached.
![]() Remove the jammed paper from the rear of the printer.
Remove the jammed paper from the rear of the printer.

![]() Without pressing the catches on its sides, push the duplex unit all the way in until it clicks into place.
Without pressing the catches on its sides, push the duplex unit all the way in until it clicks into place.
If the multi bypass tray has been detached, be sure to switch the power off before reattaching the tray.
![]()
Unless the duplex unit is properly attached, paper jams may occur.
Depending on how the paper was jammed, printing may resume from the next page, not the one jammed.
The error message will remain displayed until you remove the jammed paper. Check the places where paper jams are likely to occur and remove the jammed paper.
For details about attaching and detaching the multi bypass tray, see "Attaching and Detaching the Multi Bypass Tray BY1000" or "Attaching and Detaching the Multi Bypass Tray BY1020".
To remove paper from Tray 1, see "Removing Paper Jammed on Tray 1".
To remove paper from Tray 2, see "Removing Paper Jammed on Tray 2".
To remove paper from the multi bypass tray, see "Removing Paper Jammed in the Bypass Tray".
To remove paper from the top cover, see "Removing Paper Jammed under the Top Cover".
To remove paper from the guide board, see "Removing Paper Jammed around the Guide Board".
If you cannot remove jammed paper completely, see "If You Cannot Remove Jammed Paper".
If paper jams occur repeatedly, see "Paper Is Not Fed or Delivered Normally".
![]()