Specifying Login Information in the LAN-Fax Driver
When the machine is set up to require login from the control panel for operation, specify the user name and password for login in the LAN-Fax driver. If the login information has not been specified for a fax job, you cannot send it by fax.
 Display the "Devices and Printers" screen.
Windows 10 (version 1703 or later), Windows Server 2019
On the [Start] menu, click [Windows System]
 [Control Panel].
Click [View devices and printers].
Windows 10 (earlier than version 1703), Windows Server 2016
Right-click [Start], and then click [Control Panel].
Click [View devices and printers].
Windows 8.1, Windows Server 2012/2012 R2
On the Charm Bar, click [Set]
 [Control Panel].
Click [View devices and printers].
Windows 7, Windows Server 2008 R2
On the [Start] menu, click [Devices and Printers].
Windows Server 2008
On the [Start] menu, click [Control Panel].
Click [Printer] on [Hardware and Sound].
 Right-click the LAN-Fax icon, and then click [Printer Properties].
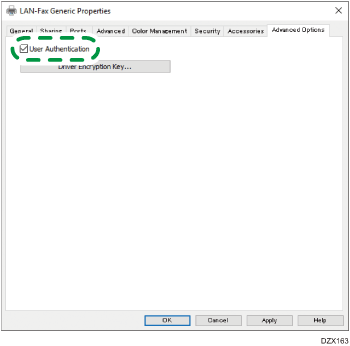
 Click the [Advanced Options] tab, and then select the check box of [User Authentication].

 When the driver encryption key is specified, click [Driver Encryption Key], enter the text, and then click [OK].
Enter the text when the driver encryption key is specified on the machine. Consult the administrator for the driver encryption key.
 Click [Apply].
 Click [Preferences] on the [General] tab.
 Click the [Detailed Settings] tab
  the [Job Setup] menu
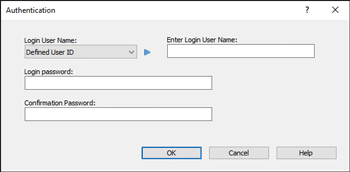
  [Authentication].
 Specify the "Login User Name" and "Login Password".
Enter the login user name and login password for logging in from the control panel.

If the login user name for logging in from the control panel is the same as that for Windows, select [Windows Login Name] in "Login User Name".
 Click [OK].
 After specifying the setting, close the setting screen of the LAN-Fax driver.
