New Document Server Application (Managing Saved Documents)
You can organize documents saved in the document server using folders. You can also specify access privileges to prevent unauthorized use of documents.
IM C530 series does not support this function.
Screen display may differ from your model.
Organizing Document Server Using Folders
There are two types of folders: shared folders and user folders. Classify the documents in the folders according to the feature of each folder.
Shared folder
Shared folder is created in the factory default configuration. All users can share it. If you do not specify a folder to save a document, the document is saved in the shared folder. You cannot change the folder name or delete the folder.
User folders
You can create up to 200 user folders. You can change the name of the folder and set a password to restrict access, which is convenient when each user has their own folder.
Creating a folder
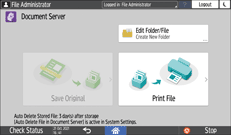
 On the Home screen, press [Document Server].
 On the document server screen, press [Edit Folder/File].
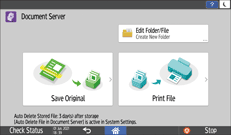
 Press [Create New Folder].
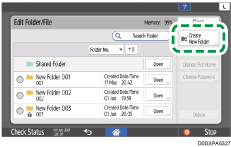
 Specify the information about the folder, and then press [OK].
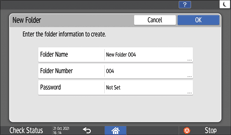
Folder Name: Enter a name.
Folder Number: An unused number is automatically assigned. The folders can be sorted in ascending or descending order in the folder list.
Password: Specify a password so that you cannot access the folder unless you enter the password. Enter a number with 4 to 8 digits as the password.
 is displayed for a password-protected folder.
 Press [OK].
Editing or deleting a folder
On the Home screen, press [Document Server].
On the document server screen, press [Edit Folder/File].
Select the folder to edit or delete, and then perform the required operation.
If you select a password-protected folder, enter the password, and then press [OK].
You cannot delete a folder containing a password-protected document.
When you delete a folder, all documents in the folder are deleted.
After completing edit or delete, press [Close].
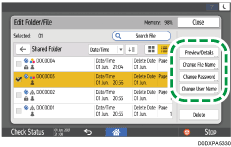
Editing the Information of Documents in Document Server
You can change the user name and file name of a document saved in the document server.
On the Home screen, press [Document Server].
On the document server screen, press [Edit Folder/File].
Press [Open].
Press [Search Folder] to search for a folder by folder name or number.
If you select a password-protected folder, enter the password, and then press [OK].
Select a document to edit the document information.
Press [Search File] to search for a document by document name or user name.
If the document is password protected, enter the password and press [OK].
To preview a document and check its details, such as total number of pages
Select a document for which you want to see the detailed information, and then press [Preview/Details].
After checking the information, press [Close].
To change the name of a document
Press [Change File Name].
Enter a document name.
To change the password of a document
Press [Change Password].
Enter a new password.
To change the user name of a document
Press [Change User Name].
Select a user name from the address book or type a name.
After editing the document information, press [OK].
The file select screen appears again.

[Access Privileges] appears instead of [Change User Name] in the following cases:
When basic authentication, Windows authentication, or LDAP authentication is enabled
When authentication management of Document Server is enabled in [Application Authentication Management]
When you are logged in to the machine as a user or file administrator
Specifying Access Privileges for Documents Saved in Document Server
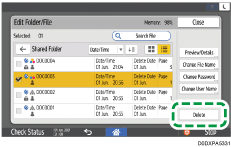
Deleting Documents from Document Server
Delete unnecessary documents from the document server.
On the Home screen, press [Document Server].
On the document server screen, press [Edit Folder/File].
Press [Open] for the folder where the document that you want to delete is saved.
Press [Search Folder] to search for a folder by folder name or number.
If you select a password-protected folder, enter the password, and then press [OK].
You can select and delete folder. When you delete a folder, all documents in the folder are deleted.
Select the document to delete, and press [Delete].
Press [Search File] to search for a document by document name or user name.
If the document is password protected, enter the password and press [OK].
You can select up to 30 documents to delete at once.
Press [Delete].
Changing the Storage Period of Document Server or Specifying an Indefinite Period
Documents saved in the document server are deleted automatically after three days (72 hours) in the factory-default configuration. You can change the period until documents are deleted or specify not to delete documents automatically.
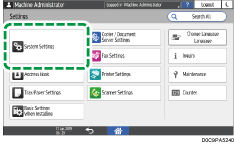
Login to the machine as the file administrator.
On the Home screen, press [Settings].
Press [System Settings].
Press [Settings for Administrator]![]() [File Management]
[File Management]![]() [Auto Delete File in Document Server].
[Auto Delete File in Document Server].
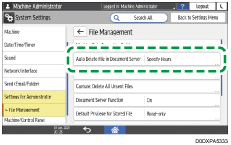
Change the storage period, and then press [OK].
Select [Specify Days] or [Specify Hours] and specify the days or hours.
To specify not to delete documents automatically, select [Off].
 After completing the configuration, press [Home] (
 ).
).
On the document list, you can check the dates when the documents are scheduled to be deleted.
Specifying Access Privileges for Documents Saved in Document Server
You can specify access privileges (authority to read or edit a document) for documents saved in the document server so as to prevent unauthorized use. Only the user who has access privileges can perform operations on the document within his/her privileges.
The user who saved the document or the file administrator can specify the access privileges. Access privileges can be granted to the users registered in the address book.
[Access Privileges] appears in the following cases:
When basic authentication, Windows authentication, or LDAP authentication is enabled
When authentication management of Document Server is enabled in [Application Authentication Management]
When you are logged in to the machine as a user or file administrator
To protect a document when user authentication is not specified, specify a password on the document when saving.
Login to the machine as the file administrator or the user who saved the document.
On the Home screen, press [Document Server].
On the document server screen, press [Edit Folder/File].
Press [Open] of the folder where the document that you want to specify access privileges.

Press [Search Folder] to search for a folder by folder name or number.
If you are prompted for a password, enter the password, and then press [OK].
Select the document to specify the access privileges, and then press [Access Privileges].
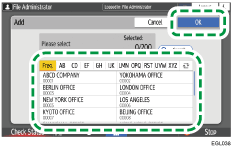
Press [Add].
 Select the user to grant access privileges, and then press [OK].
 Select the user to grant access privileges, and then press [Change Privilege].
To grant access privileges to all users, check [All Users].
To grant access privileges to individual users, make sure that [All Users] is unchecked, and then check the individual users. You can also check multiple users at the same time.
 Select a level of access privileges for the user.
The contents of the access privileges are as follows:
No Privilege: Not able to read or edit the document. You can select this when you check [All Users].
Read-only: Authorized to read and print the document.
Edit: The privileges of [Read-only], and authorized to change the printer settings.
Edit/Delete: The privileges of [Edit], and authorized to delete the document.
Full Control: The privileges of [Edit/Delete], and authorized to specify the access privileges.
 Press [OK]
![]() [Close].
[Close].
To cancel access privileges, select a user and press [Delete] after Step 5, and then press [Delete].
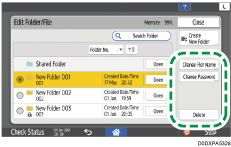
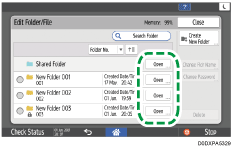
Managing Folders as a File Administrator
Users with file administrator privileges can manage password-protected user folders.
The file administrator can delete unnecessary folders, change the password of a user who forgot it, and unlock a folder if it is locked by accidental operation.
Login to the machine as the file administrator.
On the Home screen, press [Document Server].
On the document server screen, press [Edit Folder/File].
Select the desired folder, and press the operation key.
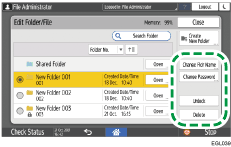
- is displayed for password-protected folders.
Change Fldr Name: Changes the name of a folder.
Change Password: Enter a new password.
Unlock: Unlocks the locked folder.
 is displayed for a locked folder. When the document is unlocked, changes to .
Delete: Deletes the folder. When you delete a folder, all documents in the folder are deleted.
After completing the operation, press [Close].
Press [Home] ().
Log out of the machine.
User folders can be accessed from Web Image Monitor. Log in to the machine as the file administrator and perform the required operations.