This function prints the test sheet for adjusting paper feed if misalignment of horizontals or image surface irregularities occurs.
To check the print results of the test sheet, proceed to Step 8.
![]()
Printing the test sheet consumes ink. Perform this function only when necessary.
Adjustment results vary depending on the Prevent Paper Abrasion mode's status. If you perform an adjustment while Prevent Paper Abrasion mode is enabled and do not want to print using this mode, cancel Prevent Paper Abrasion mode, and then perform the adjustment again.
Perform no other operations while the test sheet is printing.
An error will occur and test sheets will not print if:
There is a misfeed.
One of the machine's covers is open.
The machine is performing maintenance operations.
The machine has run out of ink.
The machine has run out of paper.
![]() Press [Home] (
Press [Home] (![]() ) at the bottom of the screen in the center.
) at the bottom of the screen in the center.
![]() Flick the screen to the left, and then press the [User Tools] icon (
Flick the screen to the left, and then press the [User Tools] icon (![]() ).
).
![]() Press [Machine Features].
Press [Machine Features].
![]() Press [Maintenance].
Press [Maintenance].
![]() Press [Adjust Paper Feed].
Press [Adjust Paper Feed].
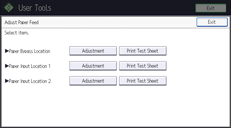
![]() Select the paper input location of the paper feed you want to adjust, and then press [Print Test Sheet].
Select the paper input location of the paper feed you want to adjust, and then press [Print Test Sheet].

![]() Press [Start Printing].
Press [Start Printing].
![]() Check the optimal adjustment value based on the print results of the test sheet.
Check the optimal adjustment value based on the print results of the test sheet.
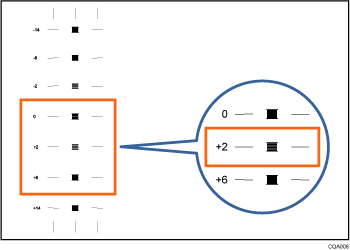
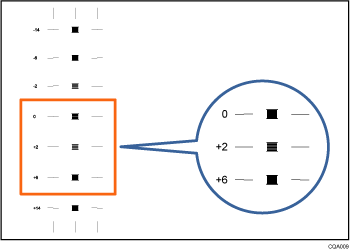
The optimal adjustment value is the number next to the square pattern that has the faintest color closest to gray and aligned horizontals on both sides. If the value on the left of the pattern is "+2", the adjustment value is "+2".

If the horizontal lines on the both sides of the faintest square are misaligned, determine an adjustment value based on a pattern that is above or below, whose horizontals are misaligned in the opposite direction. For example, "+2" square is the faintest and the horizontals on both sides of "+6" are in the opposite direction to "+2", so the adjustment value is between "+3" and "+5" depending on the degree of misalignment. After completing the adjustment, adjust the paper feed again to check if the optimal adjustment value is set.

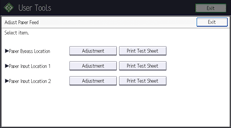
![]() Select the paper input location of the paper feed you selected to adjust, and then press [Adjustment].
Select the paper input location of the paper feed you selected to adjust, and then press [Adjustment].

![]() Enter the adjustment value with [
Enter the adjustment value with [![]() ] [
] [![]() ], and then press [OK].
], and then press [OK].
![]() Press [Exit].
Press [Exit].
To check the results of adjustment, print the test sheet again.
![]() Press [User Tools] (
Press [User Tools] (![]() ) on the top right of the screen.
) on the top right of the screen.
![]() Press [Home] (
Press [Home] (![]() ) at the bottom of the screen in the center.
) at the bottom of the screen in the center.
![]()
For details about Prevent Paper Abrasion mode, see Checking Whether the Print-heads Scratch the Paper.
