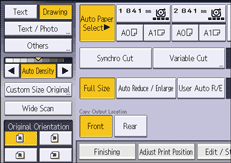
When the original is placed, the machine automatically enlarges or reduces the image to fit the paper size specified in advance.
![]()
You cannot use the bypass tray with this function.
Using User Tools allows you to specify how much each original is enlarged or reduced.
You can select the following combinations:
![]() (mainly Europe)
(mainly Europe)
Original size |
Copy size |
|---|---|
A0 |
A0, A1, A2, A3, A4, B1 JIS, B2 JIS, B3 JIS, B4 JIS |
A1 |
|
A2 |
|
A3 |
|
A4 |
|
B1 JIS |
|
B2 JIS |
|
B3 JIS |
|
B4 JIS |
![]() (mainly North America)
(mainly North America)
Original size |
Copy size |
|
|---|---|---|
Engineering |
E (34 × 44) |
E (34 × 44), D (22 × 34), C (17 × 22), B (11 × 17), A (81/2 × 11) |
D (22 × 34) |
||
C (17 × 22) |
||
B (11 × 17) |
||
A (81/2 × 11) |
||
Architecture |
E (36 × 48) |
E (36 × 48), D (24 × 36), C (18 × 24), B (12 × 18), A (9 × 12) |
D (24 × 36) |
||
C (18 × 24) |
||
B (12 × 18) |
||
A (9 × 12) |
||
![]() Press [User Auto R/E].
Press [User Auto R/E].

![]() Check that the combination selected for User Auto Reduce / Enlarge is the one you want.
Check that the combination selected for User Auto Reduce / Enlarge is the one you want.
![]() Place the original, and start scanning.
Place the original, and start scanning.
![]()
Make sure that the original orientation setting matches the actual orientation of your original. For details, see Original Orientation.
For details about the base point, see Reducing or Enlarging Originals.
The default is to copy at the same size (full size). You can change the combination under [Reproduction Ratio] in User Tools. For details, see Reproduction Ratio.
