To achieve the print results you expect, it is important to select an appropriate input tray according to the size, type, and weight of the paper you want to use for printing. You also need to specify the paper size and type properly using the control panel or Web Image Monitor, and/or the paper size dial on the tray.
Follow the procedure below to load paper.
![]() Check the paper tray available for the size, type, and weight of the paper you want to use for printing.
Check the paper tray available for the size, type, and weight of the paper you want to use for printing.
For details about available paper trays for each paper size and type, see Paper Size Specifications and Paper Type Specifications.
![]() Change the paper size and type settings for the tray you selected.
Change the paper size and type settings for the tray you selected.
Use the control panel of the printer or Web Image Monitor to change the paper size and type.
When loading paper into Trays 1 to 4, adjust the paper size dial on the trays.
For details about changing paper settings using the control panel, see Paper Settings.
![]() Load paper into the tray.
Load paper into the tray.
For details about loading paper, see Loading Paper into Paper Trays or Loading Paper into the Bypass Tray.
For details about loading envelopes, see Loading Envelopes.
![]()
 (mainly Europe)
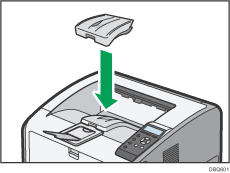
When A3-size paper is loaded, attach the active tray onto the standard tray, as shown in the illustration below.

