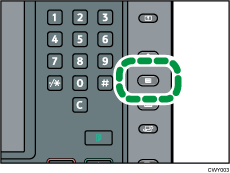
![]() Press the [Paper Setting] key.
Press the [Paper Setting] key.
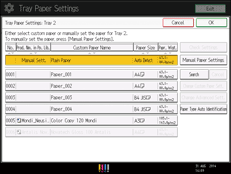
![]() Select the number of the tray whose paper settings you want to specify.
Select the number of the tray whose paper settings you want to specify.
![]() Press [Paper Type Auto Identification].
Press [Paper Type Auto Identification].
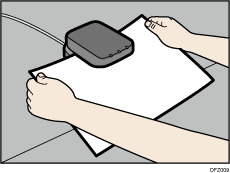
![]() Insert paper into the Media Identification Unit, and then remove it.
Insert paper into the Media Identification Unit, and then remove it.
Hold the edges of the paper with both hands when inserting the paper.
Keep the paper flat as you pull it out.
The list of custom paper whose configurations are similar to those of the scanned paper appears.
![]() Select the custom paper you want to use, and then press [OK].
Select the custom paper you want to use, and then press [OK].
![]() Press the [Paper Setting] key.
Press the [Paper Setting] key.
You can also close the [Tray Paper Settings] screen by pressing [Exit].
![]()
If you want to change the custom paper settings, press [Change Custom Paper Sett.] in Step 3.