Control Panel
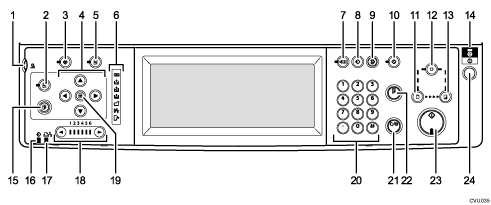
Screen contrast knob
Adjusts the brightness of the display panel.
[Image Position] key
Adjusts the position of printed images.
[User Tools] key
Press to change the default settings to meet your requirements.
Position Setting keys
Adjusts the position of printed images.
[Printer Settings] key
Press to change the default settings for online printing.
Indicators
These following indicators display the machine's status:
 : Open Cover/Unit indicator.
See When the Open Cover/Unit Indicator Is Lit
 .
. : Add Ink indicator.
See Adding Ink
. : Master End indicator.
See Replacing the Master Roll
. : Load Paper indicator.
See Adding Paper
. : Master Eject indicator.
See When the Master Eject Indicator Is Lit
. : Misfeed indicator.
See Clearing Misfeeds
.[Check Modes] key
Press this key to check settings.
[Program] key
Press to register frequently used settings, or to recall registered settings.
[Clear Modes] key
Press to clear previously entered print job settings.
[Hold Data-in] key
Press to reject the online print temporarily.
[Master Making] mode select key
Press to select the master making mode.
[Auto Cycle] key
Press to make masters and prints in a single operation. See Basic Procedure
.[Print] mode select key
Press to select the print mode.
Main power indicator
The main power indicator lights up when the main switch is turned on.
[Proof] key
Press to make a proof print. Same as 22
Data In indicator (Green)
On: Data waiting for Master Making and printing is in the machine.
Blinking: Data is being received, or Master Making or printing is in progress.
Off: Master Making and printing are completed.
Error indicator (Red)
On: An error has occurred. Master Making and printing stops.
Off: Normal status
Speed setting keys
Press to adjust the printing speed. See Changing the Printing Speed
.[Initial position] key
Press to reset to the default image position.
Number keys
Press to enter the desired number of prints and data for selected modes.
[Clear/Stop] key
Clear
Press to delete a number entered.
Stop
Press to stop a job in progress.
[Proof] key
Press to make a proof print. Same as 15
[Start] key
Press to start making masters or printing.
Operation switch
Press this switch to operate the machine in Energy Saver mode.
To go back into the Energy Saver mode, press this switch.