Creating a New Job from a Paper Document
Use the following procedure to import a document from a scanner and make a new job from it.
![]()
A TWAIN driver must be installed and [Basic Scan Properties] must be set in advance. See Registering a Scanner
 .
.
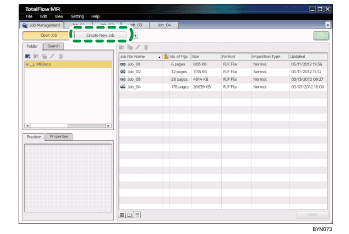
![]() On the [Job Management] screen, click [Create New Job].
On the [Job Management] screen, click [Create New Job].
![]() Click [Scan originals]. The settings area opens.
Click [Scan originals]. The settings area opens.
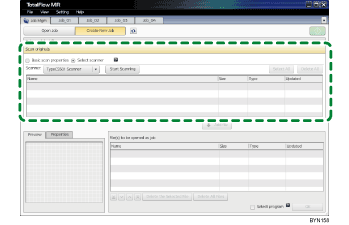
![]() Select a scanning method, and then click [Start Scanning].
Select a scanning method, and then click [Start Scanning].
There are two methods:
Basic scan properties
Scanning is performed automatically using the registered scanning conditions. Any conditions displayed on the [Add/Edit Basic Scan Properties] screen can be changed before scanning.
Select scanner
Scanning is performed after the scan conditions are set in the TWAIN driver setup screen.
The file name of scanned data will be "ScanDatahhmmssXXXX".
hhmmss: The time the file was scanned (hour, minute, and second)
XXXX: Added automatically by the system
![]() Select the scan file, and then click [Add file].
Select the scan file, and then click [Add file].
If you have added multiple files, click ![]() [Bottom]/
[Bottom]/![]() [Down]/
[Down]/![]() [Up]/
[Up]/![]() [Top] to change their order as necessary.
[Top] to change their order as necessary.
In addition to paper documents, electronic files can also be added to create a single job. For details about adding electronic files to a job, see Making a New Job from an Existing File![]() .
.
![]() Click [OK].
Click [OK].
![]() Edit the job.
Edit the job.
For more details about editing jobs, see Editing Jobs![]() .
.
![]() On the [File] menu, select [Save as] to save the job.
On the [File] menu, select [Save as] to save the job.
You can also save the job as a PDF file: on the [File] menu, select [Save as PDF]. A password can also be specified for the job or PDF file.
![]()
On the [Properties] and [Preview] tabs, you can view the details of a document.
You can use a program registered in advance to create, save, and output jobs. For details about registering programs and using them, see Using the Program Function
.