Step 2: Set chapters (Create Chapter, Edit Chapter)
After creating a job, all pages of the document will be together in one chapter (chapter number: 1, chapter name: New Chapter).
In a later step, you will insert tab stock for each chapter, so in this step you will divide the pages into different chapters.
Set chapters according to the following table:
Chapter Number |
Chapter Name |
Target Page (First page of the chapter) |
|---|---|---|
1 |
Preface |
1 |
2 |
Chapter 1 |
First page of “1. Before Setting Up”, page 11. |
3 |
Chapter 2 |
First page of “2. Installation”, page 15. |
4 |
Chapter 3 |
First page of “3. Start-up/Shutdown”, page 23. |
1 |
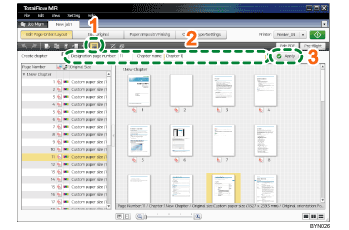
On the [Edit Page Order/Layout] screen, click |
|
2 |
Set Chapter Number 2: For [Designation page number:], enter “11”, and for [Chapter name:], enter “Chapter 1”. |
|
3 |
Click [Apply]. In the same way, make similar settings for chapter numbers 3 and 4, using the above table as reference for “Target Page” and “Chapter Name”. |
|
4 |
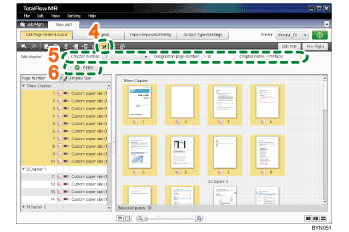
Click |
|
5 |
From the [Chapter number:] drop-down list, select “1”, and for [Chapter name:] enter “Preface”. |
|
6 |
Click [Apply]. |
![]()
For more details about [Create Chapter] and [Edit Chapter], see Editing Chapters
 .
.


