
| |||
This section introduces the names and functions of the components.
![]()
Do not obstruct the ventilation holes by placing objects near them or leaning things against them. If the printer overheats, a fault might occur.
Front view

Control panel
See “Control Panel”.
Main power indicator
The main power indicator goes on when you turn on the main power switch.
Operation switch
Press to turn the power on (the operation switch indicator lights up). To turn the power off, press again (the operation switch indicator goes off).
See “Turning On/Off the Power”.
Front cover
Open to access the inside of the printer.
Paper trays (Trays 1 ![]() 3)
3)
Load paper here.
Tray 1 is a tandem tray where paper on the left side automatically moves to the right when paper there has run out.
Front Lower Left Cover
Open to change the toner container.
Main power switch
If the printer does not operate after turning on the operation switch, check if the main power switch is turned on. If it is off, turn it on.
See “Turning On/Off the Power”.
Suspend/Resume switch
Press to momentarily stop printing. Pressing again resumes the stopped operation.
Rear right view
Ventilation holes
Prevent overheating.
Rear left view
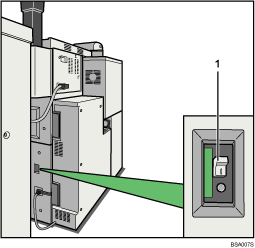
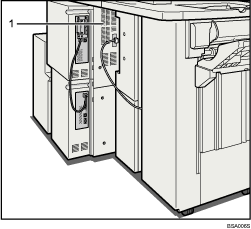
Earth leakage breaker
Protects users from electric shock. For details about checking the earth leakage breaker, see “Checking the Earth Leakage Breaker”.
![]()
When the Energy Saver Timer is enabled, the operation switch might flash during printing. This indicates the printer will enter Energy Saver mode when it finishes the current print job. When the printer is about to enter Energy Saver mode, the operation switch is the only usable key. To use any other keys, you must first press the operation switch.
| Copyright (C) 2009,2010 |