
| |||
The multi bypass tray allows you to copy non-standard paper.
Use the multi bypass tray to copy onto paper that cannot be loaded in the paper trays.
![]()
Following size paper can be copied from the multi bypass tray:
When the large capacity tray (LCT) is installed
Vertical: 100 - 305.0 mm (3.94 - 12.00 inches), Horizontal: 139.7 - 487.7 mm (5.50 - 19.20 inches)
When the wide large capacity tray (Wide LCT) is installed
Vertical: 100 - 330.2 mm (3.94 - 13.00 inches), Horizontal: 139.7 - 487.7 mm (5.50 - 19.20 inches)
The machine can automatically detect the following sizes as regular size copy paper:
Metric version
A3![]() , B4 JIS
, B4 JIS![]() , A4
, A4![]()
![]() , B5 JIS
, B5 JIS![]() , A5
, A5![]()
![]() , 11 × 17
, 11 × 17![]() , 81/2 × 11
, 81/2 × 11![]() ,8 × 13
,8 × 13![]() , 51/2 × 81/2
, 51/2 × 81/2![]() , 12 × 18
, 12 × 18![]()
Inch version
A3![]() , B4 JIS
, B4 JIS![]() , A4
, A4![]() , B5 JIS
, B5 JIS![]() , A5
, A5![]() ,11 × 17
,11 × 17![]() , 81/2 × 11
, 81/2 × 11![]()
![]() , 8 × 13
, 8 × 13![]() , 51/2 × 81/2
, 51/2 × 81/2![]() , 12 × 18
, 12 × 18![]()
If you want to use the size of paper other than the above, be sure to specify the size.
The maximum number of sheets you can load at the same time depends on paper type. Do not load paper above the limit mark on the multi bypass tray.
Slide in the side fences until they are flush with the paper. (To move the side fences, pinch the release levers.)
Place paper face-up in the multi bypass tray (Tray 7).
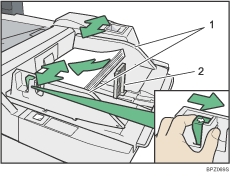
Side fences
End fence
Adjust the side fences again to ensure they properly fit the paper size.
Set the end fence.
To remove the end fence, slide it to the right by pressing the stopper down.
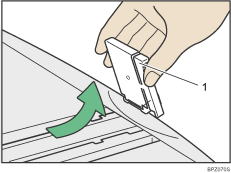
Stopper
Press the elevator switch on the multi bypass tray (Tray 7).
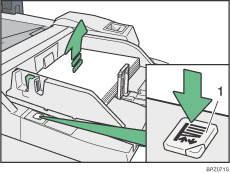
Elevator switch
The right bottom green lamp of the elevator switch is blinking while the multi bypass tray is going up, and keeps lit when it stops.
Press the elevator switch to move down the original table if you want to either add paper or remove jammed ones.
Select the multi bypass tray (Tray 7) on the control panel.
Press the [![]() ] key.
] key.
Select the size and type of the paper.
Press [OK].
Place the originals, and then press the [Start] key.
![]()
Do not load paper above the limit mark on the multi bypass tray. Overloading the multi bypass tray can result in misfeeds and skewed images.
To prevent multiple sheets from being fed at once, fan paper before placing it on the tray.
When the Sort function is selected, press the [![]() ] key after all originals have been scanned.
] key after all originals have been scanned.
Printing on special paper such as OHP transparencies and thick paper may be slower than printing on plain paper.
If you place originals on the exposure glass and want the copies to be delivered face down, select Face Down for Copy Eject Face Method in Glass Mode. For details about Copy Eject Face Method in Glass Mode, see "Input/Output".
If you select Tab Stock, you cannot have copies delivered face up.
If you use paper larger than 458 mm, 18.1 inches in size, you cannot have copies delivered face down.
If you select OHP (Transparency) or Thick Paper 2 in Paper Type, you cannot have copies delivered face down.
Depending on the environment where the machine is being used, you might at times hear a rustling noise from paper moving through the machine. This noise does not indicate a malfunction.
The following paper sizes can be selected as the standard sizes:
A3![]() , B4 JIS
, B4 JIS![]() , A4
, A4![]()
![]() , B5 JIS
, B5 JIS![]()
![]() , A5
, A5![]()
![]() , B6 JIS
, B6 JIS![]() , A6
, A6![]()
11 × 17![]() , 81/2 × 14
, 81/2 × 14![]() , 81/2 × 13
, 81/2 × 13![]() , 81/2 × 11
, 81/2 × 11![]()
![]() , 81/4 × 14
, 81/4 × 14![]() , 81/4 × 13
, 81/4 × 13![]() , 8 × 13
, 8 × 13![]() , 8 × 10
, 8 × 10![]() , 71/4 × 101/2
, 71/4 × 101/2![]()
![]() , 51/2 × 81/2
, 51/2 × 81/2![]()
![]() , 11 × 15
, 11 × 15![]() , 11 × 14
, 11 × 14![]() , 10 × 15
, 10 × 15![]() , 10 × 14
, 10 × 14![]() , 12 × 18
, 12 × 18![]()
13 × 191/5![]() , 13 × 19
, 13 × 19![]() , 123/5 × 191/5
, 123/5 × 191/5![]() , 123/5 × 181/2
, 123/5 × 181/2![]() , 13 × 18
, 13 × 18![]() , 8K
, 8K![]() ,16K
,16K![]()
![]() , 210 × 182mm
, 210 × 182mm![]() , 210 × 170mm
, 210 × 170mm![]() , 210 × 340mm
, 210 × 340mm![]() , SRA3
, SRA3![]() , SRA4
, SRA4![]()
![]() , 226 × 310 mm
, 226 × 310 mm![]()
![]() , 310 × 432 mm
, 310 × 432 mm![]()
Following size paper cannot be used if the LCT is installed:
13 × 191/5![]() , 13 × 19
, 13 × 19![]() , 123/5 × 191/5
, 123/5 × 191/5![]() , 123/5 × 181/2
, 123/5 × 181/2![]() , 13 × 18
, 13 × 18![]() , SRA3
, SRA3![]() , SRA4
, SRA4![]() , 226 × 310 mm
, 226 × 310 mm![]() , 310 × 432 mm
, 310 × 432 mm![]()
| Copyright (C) 2008 |