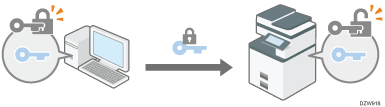
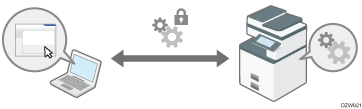
Encrypting Network Communication
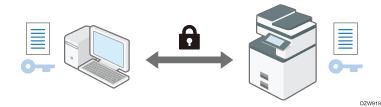
To protect communicated information, it is necessary to encrypt communication between computers and external equipment.
Data sent from and received by the machine can be intercepted, cracked, or tampered with during transmission. For example, the following data can be transmitted between the machine and external devices or the computer:
Documents printed in the company using the printer driver
Documents scanned and sent by e-mail to use in a meeting
Login user name and login password
See the table below for the methods of encrypting data.
Data to encrypt | Encryption method | Process/Reference |
|---|---|---|
Web Image Monitor IPP print Windows authentication LDAP authentication E-mail transmission | SSL/TLS | Install a device certificate.
|
S/MIME | Install a user certificate.
| |
Machine management data | SNMPv3 | Specify an encryption password.
|
Authentication information of print jobs | Driver encryption key IPP authentication | Specifying a Driver Encryption Key Specify IPP authentication.
|
Kerberos authentication data | Varies depending on the KDC server | Select an encryption method.
|

The administrator is required to manage the expiration of certificates and renew the certificates before they expire.
The administrator is required to check that the issuer of the certificate is valid.
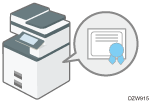
Installing a Self-signed Certificate/Certificate Issued by a Certificate Authority
To encrypt communication with the machine, install a device certificate.
Two types of device certificates can be used: a self-signed certificate created by the machine and a certificate issued by a certificate authority. When you need higher reliability, use a certificate issued by a certificate authority.
Install a device certificate from the control panel or Web Image Monitor.
You can install only one self-signed certificate from the control panel. To install multiple certificates or a certificate issued by a certificate authority, specify the settings from Web Image Monitor.
Installing a self-signed certificate from the control panel
 Log in to the machine as the network administrator on the control panel.
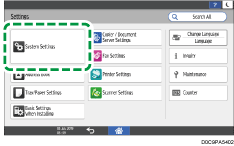
 On the Home screen, press [Settings].
 On the Settings screen, press [System Settings].
 Press [Settings for Administrator]
![]() [Security]
[Security]![]() [Register/Delete Device Certificate].
[Register/Delete Device Certificate].
 Select [Certificate No. 1] and press [Register].
 Specify the information to include in the certificate.
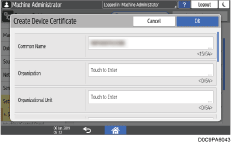
Common Name: Enter the name of the device certificate to create. You must enter a name.
Email Address: To use the device certificate for S/MIME, PDF Digital Signature, or PDF/A Digital Signature, enter the machine administrator's e-mail address.
Specify Organization, Organizational Unit, and other items as necessary.
 Press [OK].
 Press [Exit].
 Press [Home] (
 ), and then log out of the machine.
Installing a self-signed certificate/certificate issued by a certificate authority from Web Image Monitor
Log in to the machine as the network administrator from Web Image Monitor.
Click [Configuration] on the [Device Management] menu.
Click [Device Certificate] in the [Security] category.
On the [Device Certificate] screen, install a self-signed certificate or certificate issued by a certificate authority by following the instructions below:
To install a self-signed certificate
Create and install a self-signed certificate.
Select the number from the list to create a self-signed certificate.
Click [Create] to specify the necessary settings.
Common Name: Enter the name of the device certificate to create. You must enter a name.
Email Address: To use the device certificate for S/MIME, PDF Digital Signature, or PDF/A Digital Signature, enter the machine administrator's e-mail address.
Specify [Organization], [Organizational Unit], and other items as necessary.
Click [OK].
"Installed" is displayed in [Certificate Status].
To install a certificate issued by a certificate authority
Request a device certificate from a certificate authority and install it. Follow the same steps to install an intermediate certificate.
Select the number from the list to create a device certificate.
Click [Request] to specify the necessary settings.
Click [OK].
"Requesting" is displayed in [Certificate Status].
Apply to the certificate authority for the device certificate.
You cannot apply to the certificate authority from Web Image Monitor. The application procedure varies depending on the certificate authority. For details, contact the certificate authority.
For the application, click the Details icon
 and use the information that appears on the [Certificate Details] screen.
The issuing location may not be displayed if you request multiple certificates at the same time. When you install a certificate, be sure to check the certificate destination and installation procedure.
After the device certificate has been issued by the certificate authority, select the number of the issued certificate from the list on the [Device Certificate] screen, and then click [Install].
Enter the contents of the device certificate in the entry fields.
To install the intermediate certificate at the same time, enter also the contents of the intermediate certificate.
If an intermediate certificate issued by a certificate authority is not installed, an alert message is displayed during network communication. When an intermediate certificate has been issued by a certificate authority, you must install the intermediate certificate.
Click [OK].
"Installed" is displayed in [Certificate Status].
After completing the installation, select the certificate for each application on [Certification].
Click [OK].
Log out of the machine, and then exit the Web browser.

To print data in the machine using IPP-SSL, the user must install a certificate in the computer. Select [Trusted Root Certification Authorities] for the certificate store location when accessing the machine by IPP.
To change [Common Name] of the device certificate when using the Windows standard IPP port, delete any previously configured PC printer beforehand and install the printer driver again. Also, to change the user authentication settings (login user name and password), delete any previously configured PC printer beforehand, change the user authentication settings, and then install the printer driver again.
Encrypting Transmission Using SSL/TLS
SSL (Secure Sockets Layer) /TLS (Transport Layer Security) is a method to encrypt network communications. SSL/TLS prevents data from being intercepted, cracked, or tampered.
Flow of SSL/TLS encrypted communications
The user's computer requests the SSL/TLS device certificate and public key when accessing the machine.
The device certificate and public key are sent from the machine to the user's computer.
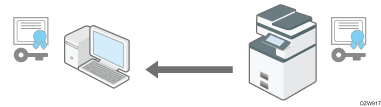
The shared key created on the computer is encrypted using the public key, sent to the machine, and then decrypted using the private key in the machine.
The shared key is used for data encryption and decryption, thus achieving secure transmission.
To enable encrypted communication, install a device certificate in the machine in advance.
To encrypt communication using SSL/TLS, enable SSL/TLS as follows:
To check whether SSL/TLS configuration is enabled, enter "https://(the machine's IP address or host name)/" in your Web browser's address bar to access this machine. If the "The page cannot be displayed" message appears, check the configuration because the current SSL/TLS configuration is invalid.
If you enable SSL/TLS for IPP (printer functions), sent data is encrypted, preventing it from being intercepted, analyzed, or tampered with.
Enabling SSL/TLS
Log in to the machine as the network administrator from Web Image Monitor.
Click [Configuration] on the [Device Management] menu.
Click [SSL/TLS] in the [Security] category.
Select the protocol to enable encrypted communication on [SSL/TLS] to specify the details about the communication method.
Permit SSL/TLS Communication: Select one of the encryption communication modes below:
Ciphertext Priority: Performs encrypted communication when a device certificate has been created. If encryption is not possible, the machine communicates data in clear text.
Ciphertext/Cleartext: Performs encrypted communication when connecting to the machine using an "https" address from a Web browser. Communicates in clear text when connecting to the machine using an "http" address.
Ciphertext Only: Allows encrypted communication only. If encryption is not possible for some reason, the machine cannot communicate. If this is the case, press [System Settings]
 [Network/Interface][Communication Security][Permit SSL/TLS Communication] on the control panel, change the communication mode to [Ciphertext/Cleartext] temporarily, and then check the settings.
SSL/TLS Version: Specify TLS 1.2, TLS 1.1, TLS 1.0, and SSL 3.0 to enable or disable. At least one of these protocols must be enabled.
Encryption Strength Setting: Specify the encryption algorithm to apply to AES, 3DES, and RC4. You must select at least one check box.
KEY EXCHANGE: Specify whether to enable or disable exchanging of the RSA key.
DIGEST: Specify whether to enable or disable SHA-1 DIGEST.
Click [OK].
Log out of the machine, and then exit the Web browser.
To encrypt communications with the SMTP server, use the following procedure to change [Use Secure Connection (SSL)] to [On].
Depending on the states you specify for TLS 1.2, TLS 1.1, TLS 1.0, and SSL 3.0, the machine might not be able to connect to an external LDAP server.
Enabling SSL for SMTP connection
Log in to the machine as the network administrator on the control panel.
On the Home screen, press [Settings].
On the Settings screen, press [System Settings].
Press [Send (Email/Folder)]![]() [Email]
[Email]![]() [SMTP Server].
[SMTP Server].
From the list next to Use Secure Connection (SSL), select [On].
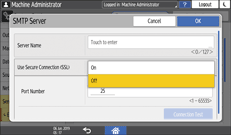
After completing the configuration, the port number changes to 465 (SMTP over SSL). When using SMTP over TLS (STARTTLS) for encryption, change the port number to 587.
When you specify the port number to a number other than 465 and 587, the communication is encrypted according to the setting in the SMTP server.
Press [OK].
Press [Home] (), and then log out of the machine.
When SSL is enabled in the SMTP server, Internet faxes are always sent via the SMTP server.
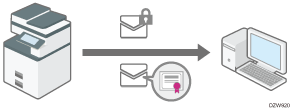
Encrypting E-mail Sent from the Machine by S/MIME
S/MIME (Secure/Multipurpose Internet Mail Extensions) is an encryption method to improve security of e-mail communications. By specifying S/MIME, you can send an encrypted e-mail attaching an encrypted file or electronic signature.
To use S/MIME, you must first specify [Administrator's Email Address] in [System Settings].
When you send e-mails to both users whose mail clients support S/MIME and users whose clients does not support it, only e-mails sent to clients supporting S/MIME are encrypted.
The receiver must use software that supports S/MIME.
You can apply either an e-mail encryption or electronic signature, or apply both functions together.
When sending an e-mail attached with an electronic signature, you do not need the user certificate. Install a device certificate, and then specify the electronic signature to attach to the e-mail. For details about installing a device certificate, see the section below:
Installing a Self-signed Certificate/Certificate Issued by a Certificate Authority
When using S/MIME, the e-mail size is larger than normal.
For details about using S/MIME with the Scanner function, see the section below:
Applying Security Settings to an E-mail When Sending a Scanned Document
For details about using S/MIME with the Fax function, see the section below:
Applying Encryption and Using a Signature for Enhanced Security When Sending an Internet Fax
Registering a user certificate to the user that will receive e-mails
To send an encrypted e-mail, first register a user certificate to the user that will receive the e-mail.
Prepare user certification in advance. You can register three types of user certificates to the machine: "DER Encoded Binary X.509", "Base 64 Encoded X.509", and "PKCS #7 certificate".
Log in to the machine as the user administrator from Web Image Monitor.
Click [Address Book] on the [Device Management] menu.
Select the user to install the certificate, and then click [Change] on the [Detail Input] tab.
In the [Email] category, specify the necessary settings.
Email Address: Enter the e-mail address of the user.
User Certificate: Click [Change] and specify the user certificate to use.
Click [OK].
Log out of the machine, and then exit the Web browser.
Use the following procedure to specify the details of encryption to be enabled.
When installing a user certificate to the Address Book using Web Image Monitor, an error message may appear if the certificate file contains more than one certificate. If this is the case, install the certificates one at a time.
Once the valid period of the selected user certificate elapses, encrypted messages can no longer be sent. Select a certificate that is within its valid period.
Configuring the encryption algorithm and attachment of an electronic signature
Log in to the machine as the network administrator from Web Image Monitor.
Click [Configuration] on the [Device Management] menu.
Click [S/MIME] in the [Security] category.
Configure the e-mail encryption and electronic signature.
Encryption
Encryption Algorithm: Select the encryption algorithm of the shared key used to encrypt e-mails with S/MIME. Select the encryption algorithm that is supported by the user's e-mail software.
Signature
Certificate Status: The certificate specified for S/MIME is displayed.
Digest Algorithm: Select the digest algorithm to use for the electronic signature.
When Sending Email by Scanner, When Transferring by Fax, When Sending Email by Fax, When Emailing TX Results by Fax, When Transferring Files Stored in Document Server (Utility): Specify whether to select the method for attaching an electronic signature in each function when sending or transferring e-mails or documents.
Operation Mode
Operation Mode: Select the timing at which the validity period of a certificate is checked.
Performance Priority: The validity period of a user certificate is checked when you select the address. The validity period of a device certificate is checked when you press [Start]. It does not meet the International Evaluation Regulations for Information Security (CC Authentication), but it responds to the user quicker than when [Security Priority] is selected.
Security Priority: The validity period is checked when you select the address and when you press [Start]. It takes some time to respond to the user and performs properly under the conditions that meet the International Evaluation Regulations for Information Security (CC Authentication).
Click [OK].
Log out of the machine, and then exit the Web browser.
When attaching an electronic signature to an e-mail, the e-mail address of the administrator is used in [From], and the e-mail address of the user selected as "Sender" is used in [Reply-To].
If a certificate was valid when transmitted but has expired before the e-mail is retrieved from the mail server to the client computer, the e-mail may not be retrieved.
If an error occurs outside the validity period of the certificate when an e-mail is sent automatically using Memory Transmission or at a specified time, an error will be reported by clear text e-mail to the e-mail address of the sender or administrator. When the job log collection function is enabled, you can view the error details in the job log.
If the selected device certificate expires, signatures cannot be attached to PDFs. Select a certificate that is within its valid period.
The signature algorithm for the device certificate's digital signature that can be attached to PDF/A files is "sha1WithRSA-1024".
Encrypting Data Communicated with Machine Management Software Via SNMPv3
When monitoring devices using Device Manager NX via a network, you can encrypt the transmitted data by using the SNMPv3 protocol.
Log in to the machine as the network administrator on the control panel.
On the Home screen, press [Settings].
On the Settings screen, press [System Settings].
Press [Network/Interface]![]() [Permit SNMPv3 Communication].
[Permit SNMPv3 Communication].
From the list next to Permit SNMPv3 Communication, select [Encryption Only].
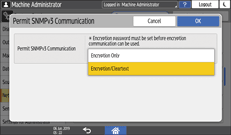
Press [OK].
Press [Home] (), and then log out of the machine.
To change the settings specified in the machine from Device Manager NX, specify an encryption password to the network administrator in [Program/Change Administrator], and then register the encryption password in the SNMP account of Device Manager NX.
If network administrator's [Encryption Password] setting is not specified, the data for transmission may not be encrypted or sent. For details about specifying the network administrator's Encryption Password setting, see the section below:
Encrypting the Login Password of Print Jobs
You can encrypt the login password for the printer driver and the password for IPP printing to increase security against password cracking.
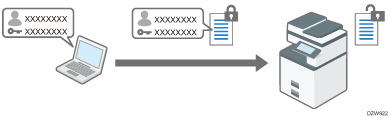
To perform printing from a LAN inside the office, specify the driver encryption key.
To perform IPP printing from an external network, encrypt the password of IPP printing.
Specifying a Driver Encryption Key to Encrypt Passwords
Specify the driver encryption key specified in the machine also to the printer driver to encrypt and decrypt passwords.
Log in to the machine as the network administrator on the control panel.
On the Home screen, press [Settings].
On the Settings screen, press [System Settings].
Press [Settings for Administrator]![]() [Security]
[Security]![]() [Extended Security Settings].
[Extended Security Settings].
Press [Change] next to Driver Encryption Key.

Enter the password to be used as the driver encryption key, and then press [Done].
Enter the password for Confirm Password again, and then press [Done].
Press [OK] twice.
Press [Home] (), and then log out of the machine.
 The network administrator must give users the driver encryption key specified on the machine so they can register it on their computers.
Make sure to enter the same driver encryption key as that specified on the machine.
When using a PCL 6 printer driver, you can enter the driver encryption key on [Printer Properties]
the [Advanced Options] tab.
You can also encrypt the print job itself. For details, see the section below.
For details about specifying the encryption key on the printer driver or TWAIN driver, see the driver help.
For details about specifying the encryption key on the LAN-Fax driver, see the LAN-Fax driver Help.
Encrypting the password of IPP printing
When printing using the IPP protocol, specify the authentication method to [DIGEST] to encrypt the IPP authentication password. Register the user name and password for IPP authentication separately from the user information in the Address Book.
Log in to the machine as the network administrator from Web Image Monitor.
Click [Configuration] on the [Device Management] menu.
Click [IPP Authentication] in the [Security] category.
Select [DIGEST] in [Authentication].
Enter User Name and Password.
If you want to use the user authentication information specified on the machine instead of the user name and password, click [On] of "User Authentication Function of Main Unit". You can use this function in the machines installed with RICOH Always Current Technology v1.2 or later.
Click [OK].
Log out of the machine, and then, exit the Web browser.
Encrypting Communication Between KDC and the Machine
You can encrypt communications between the machine and the Key Distribution Center (KDC) server when using Kerberos authentication with Windows or LDAP authentication to secure communication.
The supported encryption algorithm differs depending on the type of KDC server.
Log in to the machine as the machine administrator from Web Image Monitor.
Click [Configuration] on the [Device Management] menu.
Click [Kerberos Authentication] in the [Device Settings] category.
Select the encryption algorithm to enable.
Only Heimdal supports DES3-CBC-SHA1.
To use DES-CBC-MD5 in Windows Server 2008 R2 or later, enable it in the operating system settings.
Click [OK].
Log out of the machine, and then exit the Web browser.