Registering Administrators Before Using the Machine
Administrators refers to special users who have the authority to manage various information and settings of the machine. To use the machine safely, register the administrators and allow only the administrators to configure the important settings such as registering users and the security settings.
Overview of the Administrator Privileges
For each function, there are four types of administrator privileges. You can assign all four privileges to one person, or assign a specific privilege to another person.
Types of the administrator privileges
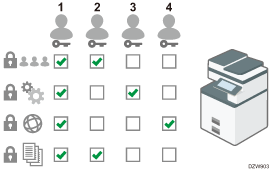
User Management: Manages information registered in the Address Book. You can add users to the Address Book and change the registered information.
Machine Management: Mainly manages the settings of the devices. You can configure the settings so that the settings for each function can be changed only by the administrator.
Network Management: Manages the settings for connecting to the network.
File Management: Manages the permission to access the stored files. You can specify the settings so that only the registered users or permitted users can view or edit the files stored in the machine.
Sharing the administrator tasks facilitates each administrator's tasks and at the same time prevents unauthorized operations by administrators.
Workflow to register the administrator
Activating Administrator Authentication.
Activate the Administrator Authentication function of the machine from [Settings].
Logging in to the machine as an administrator
Enter the login user name and login password of the administrator to log in to the machine.
Registering or changing the administrator
Assign the privileges to each administrator. You can register up to four administrators.

The administrators are distinguished from the users registered in the Address Book. A Login User Name registered in the Address Book cannot be used as an administrator.
The supervisor has the privilege to manage the administrators. When the administrator is changed, the supervisor can reset the login password. There is only one supervisor.
Administrator Authentication can also be activated via Web Image Monitor. For details, see Web Image Monitor Help.
Activating Administrator Authentication
An administrator can manage the machine by activating the management function. Select whether to activate the management function according to the range of information to manage, and then specify the allowable range of settings by users.

If you have activated Administrator Authentication, make sure not to forget the administrator login user name and password. If you forget an administrator login user name or password, you must specify a new password using the supervisor's privilege.
 On the Home screen, press [Settings].
 On the Settings screen, press [System Settings].
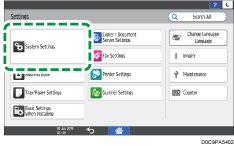
 Press [Settings for Administrator]
 [Authentication/Charge]
 [Administrator Authentication/User Authentication/App Auth.]
 [Administrator Authentication Management].
 For each administrator privilege to activate Administrator Authentication, select [On] from the list.
User Management: To manage the information registered in the Address Book, select [On].
Machine Management: To configure the settings so that the initial settings for each function can be changed only by the administrator, select [On]
Network Management: To manage the network settings, select [On].
File Management: To manage the files stored in the machine, select [On].
 From Available Settings, select the items subject to management.
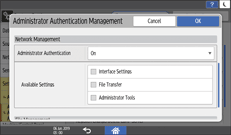
The selected items cannot be changed by users.
User Management
Administrator Tools: Mainly restrict the settings for the Address Book.
Machine Management
Press [Not Selected] next to Available Settings, select the items subject to management on the Available Settings screen, and then press [OK].
General Features: Restrict the settings for the control panel and paper output tray.
Tray Paper Settings: Restrict the settings for the size and type of the paper set in the paper tray.
Timer Settings: Restrict the settings for the time and processing hours.
Interface Settings: Restrict the settings related to the network.
File Transfer: Restrict the settings related to the e-mail send and receive functions.
Administrator Tools: Mainly restrict the settings related to the machine.
Maintenance: Restrict the settings for print correction.
Network Management
Interface Settings: Restrict the settings related to the network.
File Transfer: Restrict the settings related to the e-mail send and receive functions.
Administrator Tools: Mainly restrict the settings related to the network and security.
File Management
Administrator Tools: Restrict the settings for the File Protection and Document Server functions.
 Press [OK].
 Press [Home] (
 ).
).
Logging in to the Machine as the Administrator
To log in to the machine for the first time, login as Administrator 1. Refer to the provided guide for the Login User Name and Login Password.
Logging in to the machine using the control panel
 On the Home screen, press [Login].
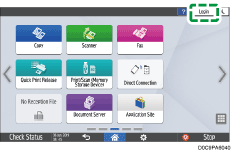
 Enter the Login User Name and Login Password of the administrator.
When you log in, the user icon is displayed at the upper left on the screen.
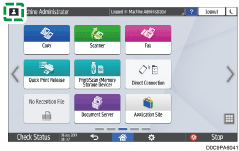
To register or change an administrator other than yourself, follow the procedures described in Adding Administrators or Changing the Privileges.
 After completing machine operations, press [Logout].
You can also log out of the machine by pressing [Energy Save].

You can also log in to the machine by pressing [Settings] on the Home screen, and then [Login] on the Settings screen.
If you log in to the machine using administrator privileges, the name of the administrator logging in appears. When you log in with a user name that has multiple administrator privileges, one of the administrator privileges associated with that name is displayed.
Logging in to the machine using Web Image Monitor
 Launch the Web browser.
 Enter "http://(IP address of the machine or host name)/" on the address bar of the Web browser, and then press the Enter key.
 Click [Login].
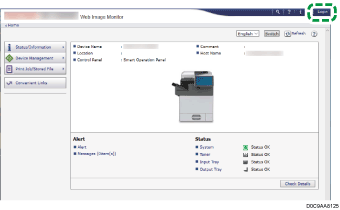
 Enter the login user name and password of the administrator, and then click [Login].
 After completing machine operations, press [Logout].
Delete the cache memory of a web browser after logging out.

The Web browser might be configured to auto complete login dialog boxes by keeping login user names and passwords. This function reduces security. To prevent the browser from keeping login user names and passwords, disable the browser's auto complete function.
Adding Administrators or Changing the Privileges
You can register up to four administrators. All four registered personnel can have all administrator privileges. To reduce the administrator's load, the four registered personnel can share the administrator privileges.
Discuss the number of users to add and privileges to give in advance, decide the Login User Name and Login Password for Administrator 2 to Administrator 4, and configure the settings.

Do not forget the Login User Name and Login Password of the administrators added.
An administrator cannot change the login user names and passwords for other administrators.
 Log in to the machine as an administrator on the control panel.
 On the Home screen, press [Settings].
 On the Settings screen, press [System Settings].

 Press [Settings for Administrator]
 [Authentication/Charge]
 [Administrator Authentication/User Authentication/App Auth.]
 [Register/Change Administrator]
 [Set Administrator Login User Name/Login Password].
 Press the desired administrator ([Administrator 1] to [Administrator 4]).
 Specify the login user name and login password, and then press [OK].
For the characters that can be used for login user names and passwords, see the section below:
When you manage the machine with software supporting SNMPv3 such as Device Manager NX, you have to specify the password to encrypt communication.
 After completing the settings for each administrator, press [Close], and then press [Set Administrator Privileges].
 Select an administrator to assign for the administrator privileges, and then press [OK].
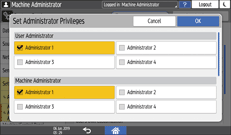
Assign the privileges of User Administrator, Machine Administrator, Network Administrator, or File Administrator to [Administrator 1] to [Administrator 4].
By default, all privileges are assigned to the login administrator (Administrator 1).
Administrator privileges assigned to a person can be shared with another person.
 Press [OK].
When settings are complete, the machine logs you out automatically.
Take note of the Login User Name and Login Password specified for the other administrators and inform them to the administrator.
Changing the Supervisor
This section describes how to change the supervisor's login user name and password.
To do this, you must enable the user administrator's privileges through the settings under Administrator Authentication Management.
Adding Administrators or Changing the Privileges
 Log in to the machine as the supervisor on the control panel.
 On the Home screen, press [Settings].
 On the Settings screen, press [System Settings].
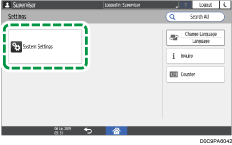
 Press [Authentication/Charge]
 [Administrator Authentication/User Authentication/App Auth.]
 [Register/Change Administrator]
 [Set Administrator Login User Name/Login Password].
 Press [Supervisor].
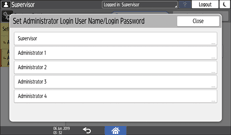
 Enter the login user name for Login User Name, and then press [Done].
 Press [Change] next to Login Password.
 Enter the login password for New Password, and then press [Done].
 Enter the login password for Confirm New Password again, and then press [Done].
 Press [OK] twice.
 Press [Close].
 Press [OK].
When settings are complete, the machine logs you out automatically.

For the characters that can be used for login user names and passwords, see the section below:
Changing the Password of an Administrator
Only the supervisor has the privilege to change the password of the administrator. If an administrator forgets the password or wants to change the password, the supervisor must reset the password.
Refer to the provided guide for the default Login User Name and Login Password of the supervisor.

Do not forget the Login User Name and Login Password of the supervisor. If you forget these, you have to restore the factory default settings, which will result in loss of data.
 Log in to the machine as the supervisor on the control panel.
 On the Home screen, press [Settings].
 On the Settings screen, press [System Settings].

 Press [Authentication/Charge]
 [Administrator Authentication/User Authentication/App Auth.]
 [Register/Change Administrator]
 [Set Administrator Login User Name/Login Password].
 Press the desired administrator ([Administrator 1] to [Administrator 4]).

 Press [Change] next to Login Password.
 Enter the login password for New Password, and then press [Done].
 Enter the login password for Confirm New Password again, and then press [Done].
 Press [OK] twice.
 Press [Close].
 Press [OK].
When settings are complete, the machine logs you out automatically.

For the characters that can be used for login user names and passwords, see the section below:
You cannot specify the same login user name for the supervisor and the administrators.
Using Web Image Monitor, you can log in as the supervisor and delete an administrator's password or specify a new one.
Usable Characters for User Names and Passwords
The following characters can be used for login user names and passwords. Names and passwords are case-sensitive.
Upper case letters: A to Z (26 characters)
Lower case letters: a to z (26 characters)
Numbers: 0 to 9 (10 characters)
Symbols: (space) ! " # $ % & ' ( ) * + , - . / : ; < = > ? @ [ \ ] ^ _` { | } ~ (33 characters)
Login user name
Cannot contain spaces, colons or quotation marks.
Cannot be left blank.
Can be up to 32 characters long.
The login user name of an administrator must contain characters other than numerical characters (numbers) if it is up to 8 characters. If it consists of only numbers, 9 or more must be used.
Login password
The maximum password length for administrators and supervisors is 32 characters and 128 characters for users.
There are no restrictions on the types of characters that can be used for a password. For security, it is recommended to create passwords consisting of uppercase or lowercase characters, numbers, and symbols. A password consisting of a large number of characters is less easily guessed by others.
In [Password Policy] in [Extended Security], you can specify a password consisting of uppercase or lowercase characters, numbers, and symbols, as well as the minimum number of characters to be used for the password.
