Transferring Received Fax Documents to Another Fax Destination
In addition to printing received faxes from the machine, you can also forward them to another fax. Using the SUB code, you can also deliver the fax to more than one destination or to different destinations by broadcast transmission according to the line the fax was received.
Transferring Received Fax Documents to Another Fax by Forwarding
Register an e-mail address to transfer the received faxes in the address book, and specify the address as the forwarding destination in [Forwarding] under [Fax Settings].
You cannot transfer a fax with Memory Lock Reception that requires entering the Memory Lock ID to print.
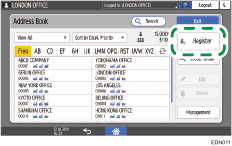
 Press [Address Book] on the Home screen.
 Press [Register] on the address book screen.
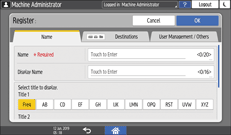
 Enter the information of the destination in the input boxes displayed on the [Name] tab, and select the title to classify the destination.
 Select the [Destinations] tab and press [Fax].
Press [Fax] also when registering an IP-Fax destination.
When registering an Internet Fax destination, press [Email Address].
 Specify the fax number and send conditions.
When registering an IP-Fax destination, specify the protocol ([H.323] or [SIP]) in [Select Line].
When registering an Internet Fax destination, register the e-mail address.
 Press [OK].
 Press [Home] (
 ) after specifying the settings.
Registering the forwarding destination is completed. Proceed to enable forwarding, and specify the forwarding destination.
 Press [Settings] on the Home screen.
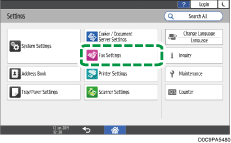
 Press [Fax Settings] on the Settings screen.
 Press [Reception Settings]
![]() [Reception File Settings]
[Reception File Settings]![]() [Action on Receiving File] to display the configuration screen.
[Action on Receiving File] to display the configuration screen.
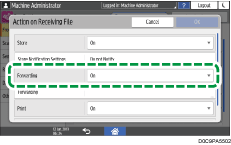
 Press [On] in [Forwarding].
 Press [Forwarding].
 Press [Receiver].
 Select [Fax] or [Internet Fax], and then specify the forwarding destination.
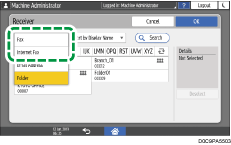
To transfer a received fax to more than one destination, specify the destination group.
 Press [OK].
 If you are not printing the forwarding fax on the machine, press OK to return to the Reception File Settings screen and then select [Off] in [Print].
 Press [OK].
 Press [Home] () after specifying the settings.
Print Forwarding Mark
You can print a stamp on the printed pages of the forwarded documents at the destination to make them distinguishable from the documents that are received normally. To print the stamp, specify [Print Forwarding Mark] on the Forwarding screen.
The stamp is not printed when the forwarding destination is an e-mail address or folder.
When you change the setting, the settings in [Forwarding] under [Output Mode Switch Timer] also change automatically.

You can also specify an e-mail address or folder destination as the forwarding destination.
Transferring a Received Fax Document to E-mail Address or Folder
You can also specify a different destination for each sender.
Specifying the Action to Perform When Receiving a Fax from Different Senders
You can change the mode to Forwarding automatically only on a specified day of the week or during a specified time period.
Changing the Fax Reception Behavior Based on the Time or Day of the Week
When the destination specified as the receiver is updated in the address book central management function, files waiting to be delivered are transferred to the following destination:
The destination specified before the update if it is a fax, IP-Fax, Internet Fax or e-mail destination.
The destination after the update if it is a folder destination.
Distributing Faxes Using Personal Boxes
When the SUB Code specified by the sender and the SUB Code in the Personal Box of the machine match, the machine distributes the received document to the destination registered in the Personal Box.
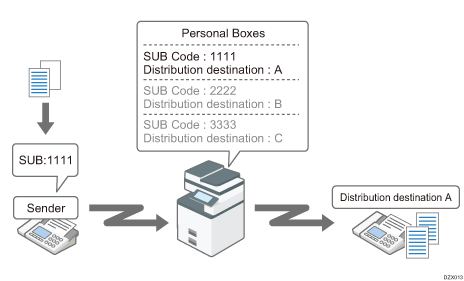
Open a Personal Box and register a destination, and then notify the SUB code to the sender.
Press [Settings] on the Home screen.
Press [Fax Settings] on the Settings screen.
Press [Reception Settings]![]() [Box Setting]
[Box Setting]![]() [Register/Change/Delete Box] to display the Box Setting screen.
[Register/Change/Delete Box] to display the Box Setting screen.
Press [Register].
Select [Personal Box], and then specify the SUB/SEP code, password, and forwarding destination of the box.
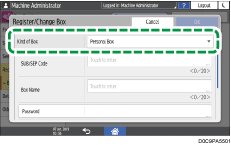
SUB/SEP Code: You can enter up to 20 single-byte characters including 0-9,
 , *, and space. Do not enter a space in the first digit.
Password: Specify when restricting access to the Personal Box on the machine. You can use the same characters as the SUB/SEP Code. A key mark (
 ) is displayed in front of the box name when you register a password.
Receiver: Register a destination to forward the received document to each Box by selecting from the address book. You can specify a fax destination, IP-Fax destination, or Internet Fax destination as the destination to forward the received document.
Remote Machine: Remote Machine cannot be specified when registering the destination. [Remote Machine] is displayed only when the Remote Fax function is enabled.
Security: Specify the method of encryption to apply or signature to attach to the outgoing e-mail when specifying an Internet Fax or e-mail address as the Receiver.
Press [OK].
Press [Home] () after specifying the settings.
If a document could not be distributed, a Communication Failure Report is printed and the document is stored as a confidential document. You can print the stored document later.
To view the list of Boxes that are configured on the machine, press [Fax Settings]
 [Reception Settings][Box Setting][Box Setting: Print List] to print the Box List. The list is useful when notifying the sender of the SUB code.
Distributing Faxes Using Transfer Box
When the SUB code specified by the sender and the SUB code in the Transfer Box of the machine match, the machine distributes the received document to the destination registered in Transfer Box by broadcast transmission.
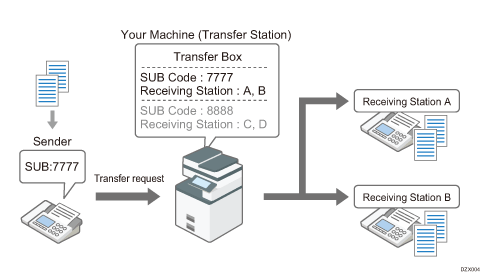
For example, you can use the function to reduce communication costs by sending a document from the headquarters to the machine of the branch office in a remote region and having the branch office distribute the document to sales offices in the same area.
You can confirm the results of the transmission to the end receiver in the SUB Code Transfer Report.
Setting up a Transfer Box
Press [Settings] on the Home screen.
Press [Fax Settings] on the Settings screen.
Press [Reception Settings]![]() [Box Setting]
[Box Setting]![]() [Register/Change/Delete Box] to display the Box Setting screen.
[Register/Change/Delete Box] to display the Box Setting screen.
Press [Register].
Select [Transfer Box], and then specify the SUB/SEP code, password, and Receiving Station of the box.
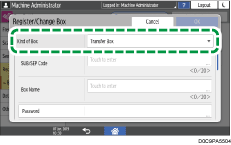
SUB/SEP Code: You can enter up to 20 single-byte characters including 0-9,
, *, and space. Do not enter a space in the first digit.Password: Enter the password using the same characters as the SUB/SEP Code. A key mark (
) is displayed in front of the box name when you register a password. When a password is specified on the box, notify the sender of the password and have the sender send the document with the password specified as the SID code.Receiving Station: Register up to 5 Receiving Stations selected from the address book to distribute the document for each box. You can specify a fax destination, IP-Fax destination, or Internet Fax destination.
Security: Specify the method of encryption to apply or signature to attach to the outgoing e-mail when specifying an Internet Fax or e-mail address as the Receiving Station.
File Type to Transfer: Specify the file format of the transferred file when the forwarding destination is an e-mail address or folder.
Press [OK].
Press [Home] () after specifying the settings.
Viewing the Distribution Result
A SUB Code Transfer Report is printed on the machine automatically when distributing the document is completed.
To view the list of Boxes that are configured on the machine, press [Fax Settings]
[Reception Settings][Box Setting][Box Setting: Print List] to print the Box List. The list is useful when notifying the sender of the SUB code.The distribution result is not sent to the sender.
The received document is deleted after the distribution is completed.
When the distribution fails, the received document is printed on the machine.