Transferring a Received Fax Document to E-mail Address or Folder
In addition to printing received faxes from the machine, you can also transfer them to an e-mail address or a shared folder on your computer (Forwarding). This feature is convenient when you want to check the content of received faxes via e-mail while you are out of your office or to manage received faxes in the folder on your computer.
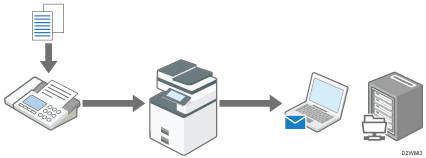
You cannot transfer a fax with Memory Lock Reception that requires entering the Memory Lock ID to print.

To transfer a received fax to more than one destination, specify the destination group.
You can also specify a different destination for each sender.
Specifying the Action to Perform When Receiving a Fax from Different Senders
Transferring Received Faxes to an E-mail Address
Register an e-mail address to deliver the received faxes in the address book, and specify the address as the forwarding destination in [Forwarding] under [Fax Settings].
 Press [Address Book] on the Home screen.
 Press [Register] on the address book screen.
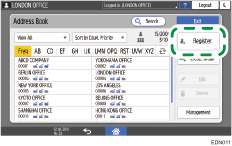
 Enter the information of the destination in the input boxes displayed on the [Name] tab, and select a title to classify the destination.
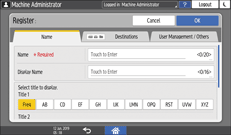
 Select the [Destinations] tab, and press [Email Address].
 Enter the e-mail address to deliver the fax into the Email Address input box.
 Select [Yes] in [Send via SMTP Server].
 Press [OK].
 Press [Home] (
 ) after configuring the setting.
Registering the forwarding destination is completed. Proceed to enable forwarding, and specify the forwarding destination.
 Press [Settings] on the Home screen.
 Press [Fax Settings] on the Settings screen.
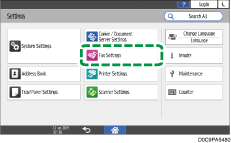
 Press [Reception Settings]
 [Reception File Settings]
 [Action on Receiving File] to display the configuration screen.
 Press [On] in [Forwarding].
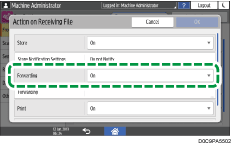
 Press [Forwarding].
 Press [Receiver].
 Select [Email Address], and then select the forwarding destination.
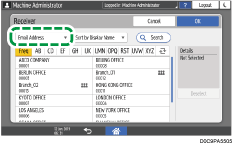
 Press [OK].
 If you are not printing the forwarding fax on the machine, press [OK] to return to the Reception File Settings screen, and then select [Off] in [Print].
 Press [OK].
 Press [Home] (
 ) after specifying the settings.
Forwarding Received Faxes to a Folder
Create a shared folder on your computer, register the path to it in the address book of the machine, and then enable Forwarding.
Creating a shared folder to store forwarded faxes
Create a shared folder on your computer, and specify the access permissions of the folder to prohibit other users from viewing the content.
 In Windows Explorer, create a folder to share.
A folder named "shared_doc" is created as an example.
 Right-click the created folder, and then click [Properties].
 On the [Sharing] tab, click [Advanced Sharing].
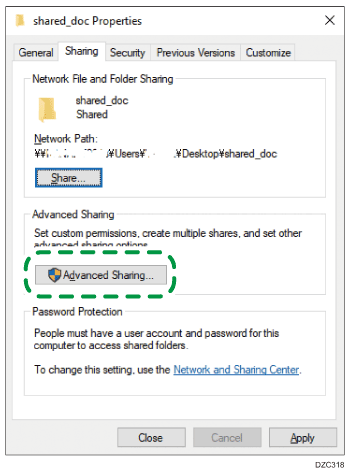
 Select the [Share this folder] check box, and then click [Permissions].
After completing the procedure, remove Everyone (unspecified user), and then add a user allowed access the folder.
 Select [Everyone] under [Group or user names], and then click [Remove].
 Click [Add]
  [Advanced]
  [Object Types].
 Select [Users], and then click [OK].
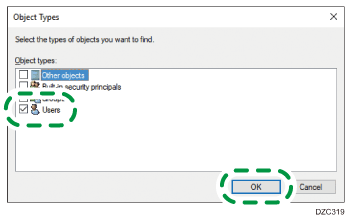
 Click [Locations], select the name of the domain or work group the user belongs to, and then click [OK].
 Click [Find Now].
 From the Search Results, select the login user name of the computer to be added, and then click [OK].
 Click [OK].
 Select the added user, and then select the [Allow] check box under [Permissions].
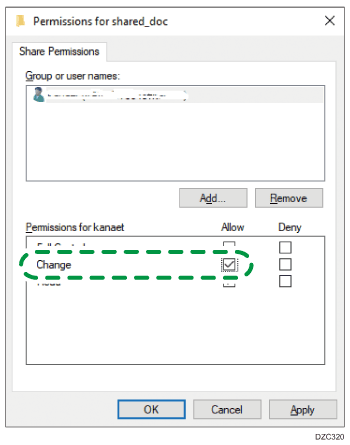
The access permissions on the folder has been successfully configured. Click [OK] to close all windows, and continue operating on the machine.
Registering the path to the shared folder in the address book
Register the "shared_doc" folder created as the forwarding destination, and check that you can access the folder.
 Press [Address Book] on the Home screen.
 Press [Register] on the address book screen.

 Enter the information of the destination in the input boxes displayed on the [Name] tab, and select the title to classify the destination.

 Select the [Destinations] tab, and press [Folder].
 Select [SMB (Send to Shared Folder on PC)] in "Protocol".
 Specify the network path to the forwarding destination folder in "Path".
Entering the path name manually
If the computer name is "User1PC", and the shared folder name is "shared_doc", enter as follows:
\\User1PC\shared_doc
Selecting a folder from the list
Enter the IP address of the computer on which to search for a shared folder, and press [Browse Network] to select the forwarding destination folder.
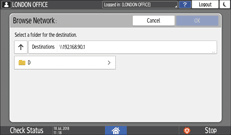
 Under "Folder Authentication Info", select [Specify Other Authentication Information] and then enter the name and password of the user on the computer where the forwarding destination folder is located.
 Press [Connection Test].
When no connection is established, check the message that appears.
When a Message Appears While Using the Fax Function
The folder is registered after a connection test successfully completed. Proceed to specify the registered folder as the forwarding destination in [Forwarding] under [Fax Settings].
 Press [OK].
 Press [Settings] on the Home screen.
 Press [Fax Settings] on the Settings screen.

 Press [Reception Settings]
 [Reception File Settings]
 [Action on Receiving File] to display the configuration screen.
 Press [On] in [Forwarding].

 Press [Forwarding].
 Press [Receiver].
 Select [Folder], and then select the forwarding destination.
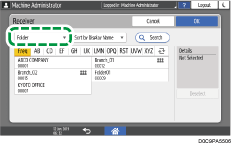
 Press [OK].
 If you are not printing the forwarding fax on the machine, select [Off] in [Print].
 Press [OK].
 Press [
 ] to return to [Reception Settings] screen, and then press [Folder Transfer Settings]
 [File Name Setting in Folder Transfer].
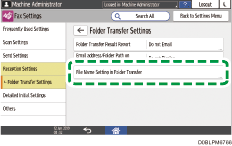
Add Sender Information to File Name
Select [Yes] to include the sender's name and fax number in the name of the forwarded file.
Limit File Name Character Type
Select [Yes] to limit the character type that can be used in the file name to prevent garbled characters appearing in the file name or data being lost.
 Press [OK].
 Press [Home] (
 ) after specifying the settings.
