Basic Procedure for Printing Documents
Specify the printer driver and configure the Document Size, Paper Type, and other settings to print a document.

Duplex printing is selected as the default setting. If you want to print on only one side, select [Off] for the two-sided printing setting.
If you send a print job via USB 2.0 while the machine is in Sleep mode, an error message may appear after the print job is completed. In this case, check whether the document was printed.
Printing a Document in Windows
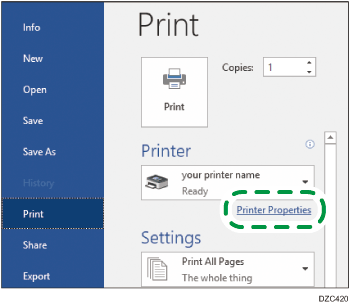
 Open a document to print on the computer, and display the setting screen of the printer driver from the print menu in the application.
The procedure to display the setting screen varies depending on the applications.
For example in Microsoft Word/Excel, click [Print] on the [File] menu, select the device to use, and then click [Printer Properties].
 Specify the Document Size, Paper Type, Paper Tray, and other settings.
You can specify the print settings on the [Frequently Used Settings] tab and [Detailed Settings] tab. Basic settings can be specified on the [Frequently Used Settings] tab, even if you do not use the [Detailed Settings] tab.
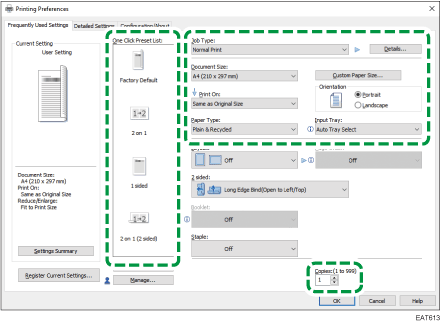
One Click Preset List: Some of the useful functions such as Combine or 2-sided are registered. Click the icon of the function to select. You can register frequently used print settings in One Click Preset.
Job Type: Select [Normal Print] to execute printing immediately.
You can make a partial print as a test and proceed to print the rest of the document (Sample Print).
Making a Partial Print as a Test and Printing the Rest of the Document
You can store documents in the machine (Locked Print, Hold Print, or Stored Print).
Document Size: Select the size of the document to print.
Orientation: Specify the orientation of the document. Select Portrait or Landscape.
Paper Type: Select the type of paper to use.
Input Tray: Select the tray loaded with the paper to use. When you select [Auto Tray Select], a suitable paper tray is selected automatically according to the specified [Print On] and [Paper Type].
If you do not want to use particular trays when [Auto Tray Select] is specified, set the machine so it does not automatically select those trays.
Settings screen type: Standard
Settings screen type: Classic
To prevent the machine from selecting other trays automatically, disable auto tray switching.
Settings screen type: Standard
Settings screen type: Classic
Copies: Enter the print quantity.
On the [Detailed Settings] tab, you can configure the advanced settings. Change the menu and specify the setting items.
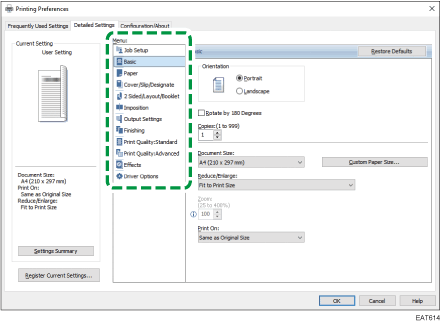
The caution icon (![]() ) indicates that there are disabled items. Click the icon to check the cause.
) indicates that there are disabled items. Click the icon to check the cause.
 After completing the configuration, click [OK].
 On the application, click the button for printing.
The procedure to print varies depending on the applications.
For example in Microsoft Word/Excel, click [Print] on the screen shown in Step 1.

On the [Devices and Printers] screen, right-click the printer icon of the machine, and then click [Print Settings] to change the default values of the printer settings.
When you use the driver distributed from the print server, [Standard settings] specified in the print server are displayed as the default.
Printing a Document in OS X/macOS
In the following example procedure, OS X 10.13 is used. The procedure may vary for different versions.
 Open a document to print on the computer, and click [Print] on the [File] menu.
 Select the printer you use from "Printer:".
 Specify Paper Size, Orientation, and other settings.
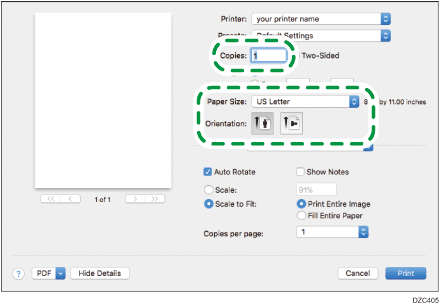
Copies: Enter the print quantity.
Paper Size: Select the size of the document to print.
Orientation: Specify the orientation of the document. Select Portrait or Landscape.
 Select a category from the pop-up menu, and then specify the paper tray and paper type.
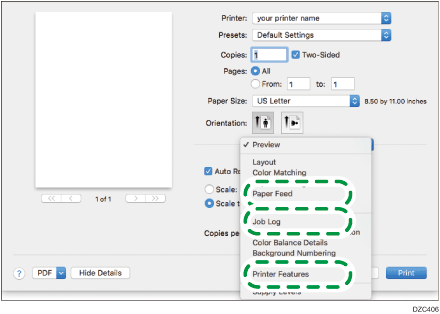
Paper Feed
All Pages From: Select the tray loaded with the paper to use. When you select [Auto Select], a suitable paper tray is selected automatically according to the specified paper size and paper type.
When the paper of the specified size is not loaded on the machine, printing is performed following the settings of the machine.
Job Log
Job Type: Select [Normal Print] to execute printing immediately.
You can make a partial print as a test and proceed to print the rest of the document (Sample Print).
Making a Partial Print as a Test and Printing the Rest of the Document
You can store documents in the machine (Locked Print, Hold Print, or Stored Print).
Printer Features
Select a category in "Feature Sets", and then specify the setting items.
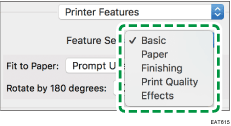
Paper
Paper Type: Select the type of paper to use.
 After completing the configuration, click [Print].
