Inserting a Chapter Page During Copy
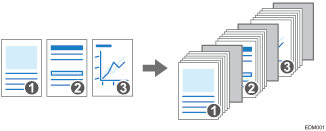
Inserting Slip Sheets Between Pages When Copying
You can insert a sheet of paper at the turn of a page when copying an original comprising multiple pages at one time (Slip Sheet).

This function is available on machines implemented with RICOH Always Current Technology v1.1 or later.
Designating Chapters
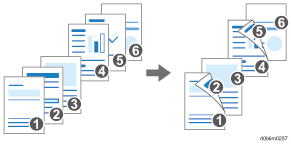
You can specify a chapter page to insert a blank sheet or specify the print side (Designate / Chapters / Chapter).

This function is available on machines implemented with RICOH Always Current Technology v1.2 or later.
Designate / Chapters
Inserts blank sheets before specified pages. Also, you can set the machine to print the data of a specified page on the pages designated as chapters.

Chapter
Prints a chapter page always on the front side during 2-sided copy.
Inserting Slip Sheets Between Pages When Copying (Settings Screen Type: Standard)
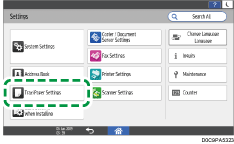
 Press [Settings] on the Home screen.
 Press [Tray/Paper Settings].
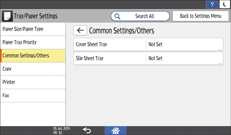
 Press [Common Settings/Others]
 [Slip Sheet Tray], and specify the tray to feed slip sheets.
As the paper to use for slip sheets, load paper of the same size and orientation as the paper to copy.
 Press [OK].
 Press [Home] (
 ) after specifying the settings.
 Press [Copy] on the Home screen.
 Press [Slip Sheet] on the Copy screen.

If you cannot find the key, select the item from [Finishing].
 Specify whether to also copy on the slip sheets, and then press [OK].
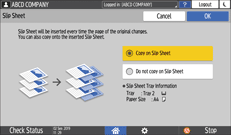
You can also copy onto the paper to be inserted as slip sheets. Slip sheets are not counted with the number of copies made in the Copier function when you are not copying onto them.
 Press paper select key, and then select the tray loaded with the paper to use for copying.
 Place an original on the machine, and then press [Start].
Inserting Slip Sheets Between Pages When Copying (Settings Screen Type: Classic)
 Press [Settings] on the Home screen.
 Press [Tray Paper Settings]
 [Slip Sheet Tray], and specify the tray to feed slip sheets.
As the paper to use for slip sheets, load paper of the same size and orientation as the paper to copy.
 Press [OK].
 Press [Home] (
 ) after specifying the settings.
 Press [Copy] on the Home screen.
 Press [Slip Sheet] on the Copy screen.

If you cannot find the key, select the item from [Finishing].
 Specify whether to also copy on the slip sheets, and then press [OK].

You can also copy onto the paper to be inserted as slip sheets. Slip sheets are not counted with the number of copies made in the Copier function when you are not copying onto them.
 Press paper select key, and then select the tray loaded with the paper to use for copying.
 Place an original on the machine, and then press [Start].
Designating Chapters (Settings Screen Type: Standard)
Specify the separation method to copy originals while separating each chapter.
 Press [Settings] on the Home screen.
 Press [Tray/Paper Settings]
 [Common Settings/Others]
 [Slip Sheet Tray] to specify the tray to feed the designated sheets.
The paper for the designation must be the same size and orientation as the paper for the body text.
 Press [OK].
 Press [Home] (
 ) after specifying the settings.
 Press [Copy] on the Home screen.
 Press [Designate / Chapters] on the Copy screen.

If the key is not displayed, select it from [Finishing].
 Press [1 Not Set].
 Select Separation method to specify the position to separate and the input tray
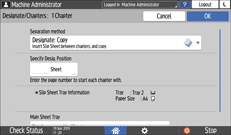
Separation method : Select the method of chapter designation.
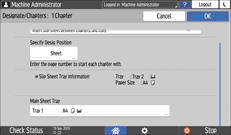
Specify Desig. Position : Enter the page number of the original at the beginning of the chapter.
Main Sheet Tray : Selects the input tray to feed paper for the text body.
 Press [OK].
 Press [2 Not Set] to specify the separation mode for the next section.
You can specify separations up to 20 locations.
 After specifying all the locations for designating chapters, press [OK] on the [Designate/Chapters] screen.
 Place the original.
 Press [Start].

When you do not copy on designated sheets, the designated sheets are not counted as the number of copies.
Even in 2-sided copy, the pages specified in the separation mode setting are always printed on the front side.
Designating Chapters (Settings Screen Type: Classic)
Specify the separation method to copy originals while separating each chapter.
 Press [Settings] on the Home screen.
 Press [Machine Features Settings]
 [System Settings]
 [Tray Paper Settings]
 [Slip Sheet Tray] to specify the tray to feed the designated sheets.
The paper for the designation must be the same size and orientation as the paper for the body text.
 Press [OK].
 Press [Home] (
 ) after specifying the settings.
 Press [Copy] on the Home screen.
 Press [Designate / Chapters] on the Copy screen.

If the key is not displayed, select it from [Finishing].
 Press [1 Not Set].
 Select Separation method to specify the position to separate and the input tray


Separation method : Select the method of chapter designation.
Specify Desig. Position : Enter the page number of the original at the beginning of the chapter.
Main Sheet Tray : Selects the input tray to feed paper for the text body.
 Press [OK].
 Press [2 Not Set] to specify the separation mode for the next section.
You can specify separations up to 20 locations.
 After specifying all the locations for separating the original, press [OK] on the [Designate/Chapters] screen.
 Place the original.
 Press [Start].

When you do not copy on designated sheets, the designated sheets are not counted as the number of copies.
Even in 2-sided copy, the pages specified in the separation mode setting are always printed on the front side.
