When Paper Is Jammed
An error message appears if a paper misfeed occurs. The error message indicates where the misfeed occurs.
Check the location and remove the paper.
![]()
- There are highly-heated parts inside the machine. When removing misfed paper, do not touch areas other than those specified in this manual. Touching those areas can result in burns.
- When replacing paper or removing jammed paper, make sure not to trap or injure your fingers.
- When replacing paper or removing jammed paper, close the front cover and do these tasks one tray at a time.
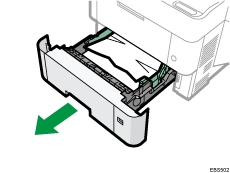
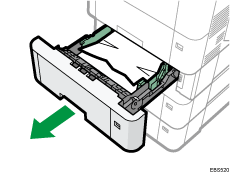
Paper Misfeed Message (A1)
The paper misfeed message " (A1)" appears when a paper misfeed occurs in the standard paper feed tray.
![]() Pull out the paper tray carefully until it stops.
Pull out the paper tray carefully until it stops.
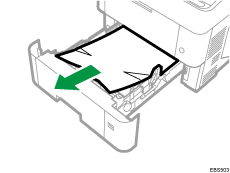
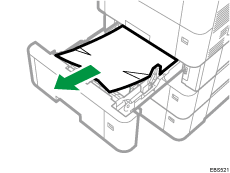
![]() Pull out the jammed paper carefully.
Pull out the jammed paper carefully.
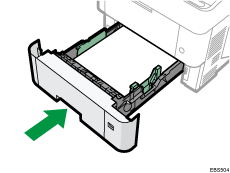
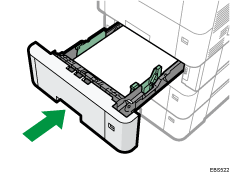
![]() Close the paper tray carefully until it stops.
Close the paper tray carefully until it stops.
Paper Misfeed Message (A2)
The paper misfeed message "(A2)" appears when a paper misfeed occurs in the bypass tray.
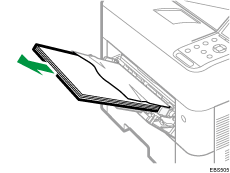
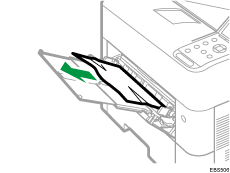
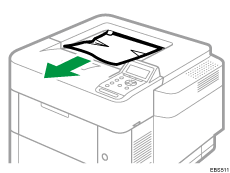
![]() Remove paper loaded in the bypass tray.
Remove paper loaded in the bypass tray.
![]() Pull out the jammed paper carefully.
Pull out the jammed paper carefully.
Paper Misfeed Message (B)
The paper misfeed message "(B)" appears when a paper misfeed occurs in the internal paper feed path.
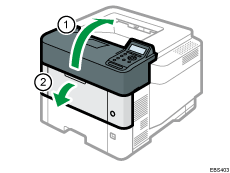
![]() Open the top cover, and then open the front cover.
Open the top cover, and then open the front cover.
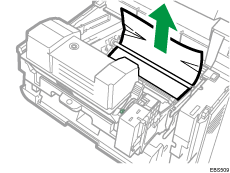
![]() Hold the clip on the print cartridge to lift it.
Hold the clip on the print cartridge to lift it.
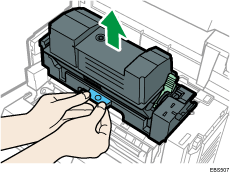
![]() Pull out the print cartridge.
Pull out the print cartridge.
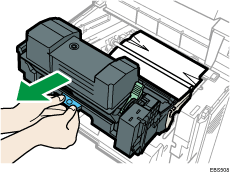
![]() Pull out the jammed paper carefully.
Pull out the jammed paper carefully.
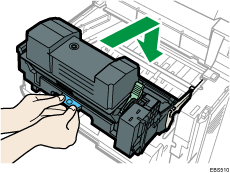
![]() Squeeze the clip on the print cartridge, and then insert it into the printer until it stops.
Squeeze the clip on the print cartridge, and then insert it into the printer until it stops.
![]() Close the front cover, and then close the top cover.
Close the front cover, and then close the top cover.
Paper Misfeed Message (C)
The paper misfeed message "(C)" appears when a paper misfeed occurs in the internal paper feed path.
![]() Remove the jammed paper from the standard tray carefully.
Remove the jammed paper from the standard tray carefully.
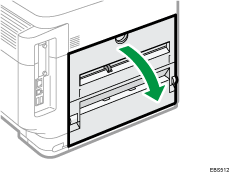
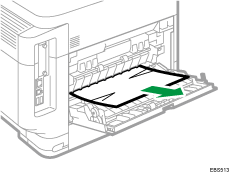
![]() Open the rear cover.
Open the rear cover.
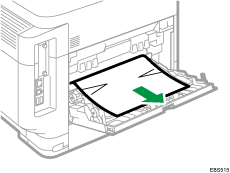
![]() Pull out the jammed paper carefully.
Pull out the jammed paper carefully.
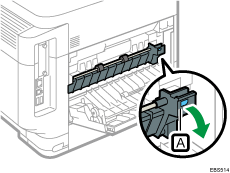
![]() If you cannot see the jammed paper or remove it, open the "C" lever
If you cannot see the jammed paper or remove it, open the "C" lever  and remove the jammed paper.
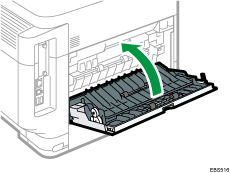
![]() Close the rear cover.
Close the rear cover.
Paper Misfeed Message (Y1) to (Y4)
The following messages are displayed according to the tray where the paper is jammed:
"
(Y1)": Tray 2"
(Y2)": Tray 3"
(Y3)": Tray 4"
(Y4)": Tray 5
The procedure for removing jammed paper is the same for all trays. In the following procedure, a paper jam that occurs in Tray 2 (with the (Y1) message displayed) is explained as an example.
![]() Pull out the paper tray until it stops.
Pull out the paper tray until it stops.
![]() Pull out the jammed paper carefully.
Pull out the jammed paper carefully.
![]() Hold the tray with both hands, slide it along the rails of the paper feed unit, and then push it straight in.
Hold the tray with both hands, slide it along the rails of the paper feed unit, and then push it straight in.
Paper Misfeed Message (Z)
The paper misfeed message "(Z)" appears when a paper misfeed occurs inside the duplex unit.
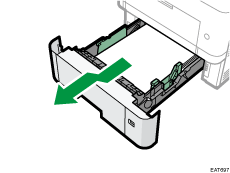
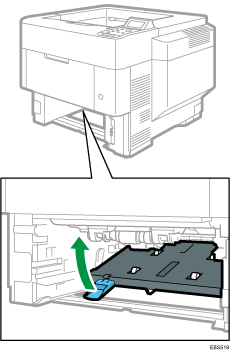
![]() Pull out the paper tray carefully until it stops, lift the front side of the tray, and then remove the tray.
Pull out the paper tray carefully until it stops, lift the front side of the tray, and then remove the tray.
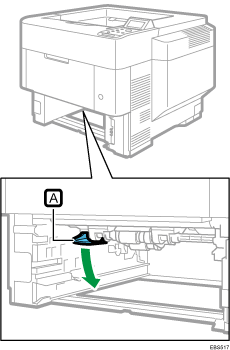
![]() Lower the "Z" lever .
Lower the "Z" lever .
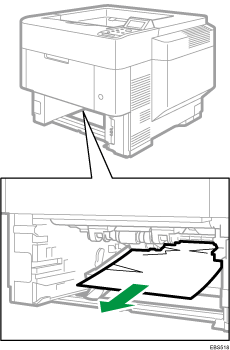
![]() Pull out the jammed paper carefully, and then return "Z" lever to its original position.
Pull out the jammed paper carefully, and then return "Z" lever to its original position.
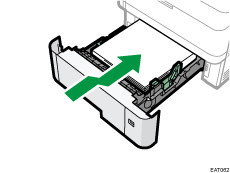
![]() Lift the front side of the tray, and then slide it into the machine carefully until it stops.
Lift the front side of the tray, and then slide it into the machine carefully until it stops.
If Paper Jams Occur Frequently
Check that the paper is loaded properly and the settings in [Tray Paper Settings] are specified correctly.
Paper condition
Items to check | Solution if applicable |
|---|---|
Are the sheets of paper in close contact with each other? | Fan the sheets thoroughly before loading them in the tray. 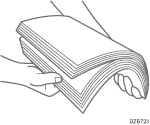 |
Are the sheets of paper curled? |
|
Is the paper flat and not folded or wrinkled? |
|
Is the paper dry and not moist? |
|
Is the cut surface of the paper smooth and clean? | If the cut surface is uneven, set the paper in a different orientation so that the cut surface faces another direction. When the paper supports duplex printing, turn over the paper. |
Is the paper too thick? Is the paper too thin? | Check the specifications for the paper that can be used on the machine, and load paper that is supported. |
Condition of the loaded paper
Items to check | Solution if applicable |
|---|---|
Are too many sheets of paper loaded? | Load paper below the upper limit mark ( |
Are the side fence and end fence in the paper source tray of the mainframe properly adjusted to the paper size? |
|
Is the bypass tray used correctly? |
|
 or
or  ) in the tray.
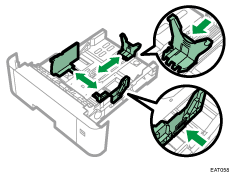
 or 81/2 × 11
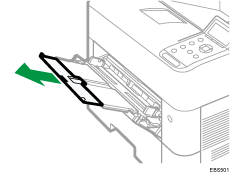
Also check the basic procedure for loading paper into the machine again.