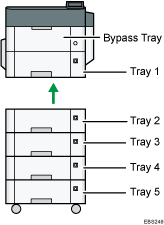
Loading Paper into the Paper Tray
The method of loading paper varies for each tray type.
![]()
- When replacing paper or removing jammed paper, make sure not to trap or injure your fingers.
Before loading paper into a tray, check the paper size and type that can be loaded in the tray.
To load paper, specify the paper type or thickness in [Paper Type: xxxx] of [Paper Input] in [Menu].
To load thin paper, thick paper, or other special paper, load the paper into the bypass tray.
When loading paper on a tray which has a few sheets of paper, multiple sheets of paper may be fed at once from the tray. Take out all sheets, fan the sheets, and then load them again.
You may hear the sound of rubbing paper. This is not a malfunction.
Loading Paper into Tray 1 to 5
Adjust the side and end fences according to the paper size.
![]()
Do not stack paper over the limit mark. If you load paper over the limit mark, the printed images may become slanted or a paper jam may occur.
Tray 1
Tray 2-5
Load paper into every tray in the same way. In the following example procedure, Tray 1 is used.
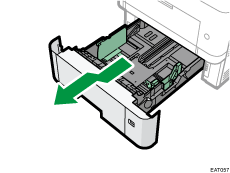
![]() Pull the tray carefully until it stops, lift the front side of the tray, and then pull it out of the machine.
Pull the tray carefully until it stops, lift the front side of the tray, and then pull it out of the machine.
Place the tray on a flat surface.
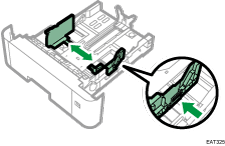
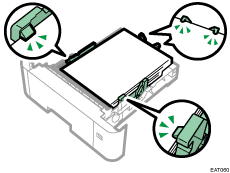
![]() Squeeze the clip on the side fence and slide it to match the paper size.
Squeeze the clip on the side fence and slide it to match the paper size.
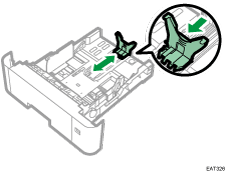
![]() Squeeze the end fence and slide it inward to match the standard size.
Squeeze the end fence and slide it inward to match the standard size.
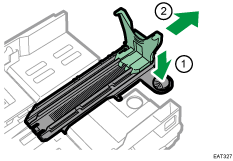
When loading paper that is larger than A4 or 81/2 × 11, push the button, and then pull the end fence out to match the paper size.
 (mainly North America)
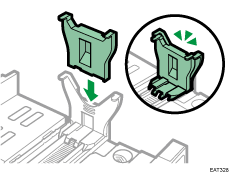
Mount the attachment to the end fence when loading 51/2 × 81/2 size paper.
You can use this attachment in Tray 1 only.
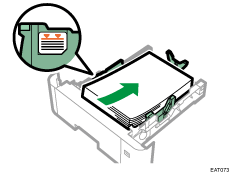
![]() Load the new paper stack print side down.
Load the new paper stack print side down.
Make sure paper is not stacked higher than the upper limit (upper line) marked inside the tray.
![]() Adjust the paper guides to close any gaps.
Adjust the paper guides to close any gaps.
Do not move paper loaded in the tray more than a few millimeters.
Moving the loaded paper excessively may cause damage to paper edges on the openings of the tray's lifting plate, resulting in sheets being folded or becoming jammed.
![]() Adjust the paper size dial to match the size and feed direction of paper in the paper tray.
Adjust the paper size dial to match the size and feed direction of paper in the paper tray.

![]() Lift the front side of the tray, and then slide it into the machine carefully until it stops.
Lift the front side of the tray, and then slide it into the machine carefully until it stops.
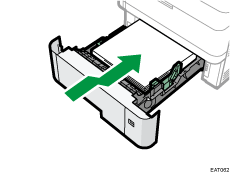
To avoid paper jams, make sure the tray is securely inserted.
![]()
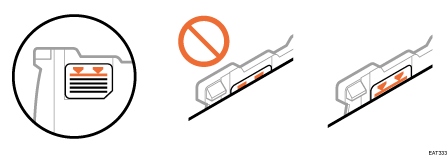
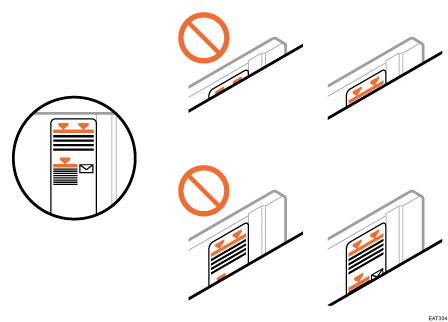
Letterhead paper must be loaded in a specific orientation.
You can load envelopes into Tray 2 to 5.
Loading Paper into the Bypass Tray
Use the bypass tray to use OHP transparencies, adhesive labels, and paper that cannot be loaded in the paper trays.
The maximum number of sheets you can load into the bypass tray depends on the paper type.
Recommended Paper Sizes and Types
![]()
After loading paper, specify the paper size and type using the control panel. When printing a document, specify the same paper size and type in the printer driver as specified on the machine.
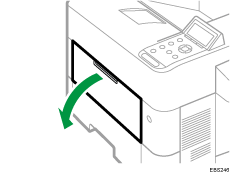
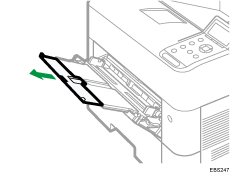
![]() Open the bypass tray.
Open the bypass tray.
Pull the extender out when loading A4, 81/2 × 11 or larger paper.
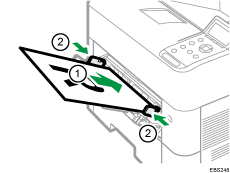
![]() Load paper face up until it stops, and then adjust both sides of the paper guide to match the paper width.
Load paper face up until it stops, and then adjust both sides of the paper guide to match the paper width.
![]()
When using the bypass tray, it is recommended that you set the paper direction to
.Letterhead paper must be loaded in a specific orientation.
You can load envelopes into the bypass tray. Envelopes must be loaded in a specific orientation.
Specifying Regular Sizes Using the Control Panel
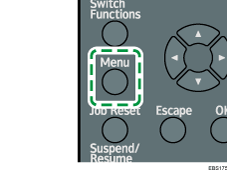
![]() Press the [Menu] key.
Press the [Menu] key.
![]() Select [Paper Input], and then press the [OK] key.
Select [Paper Input], and then press the [OK] key.
![]() Select [Paper Size: (tray name)], and then press the [OK] key.
Select [Paper Size: (tray name)], and then press the [OK] key.
![]() Select the size of the paper set in the specified tray, and then press the [OK] key.
Select the size of the paper set in the specified tray, and then press the [OK] key.
![]()
If the item you want to select is not displayed on the screen, press the [
 ] or [
 ] key on the control panel to change the screen.
Specifying a Custom Size Paper Using the Control Panel
![]() Press the [Menu] key.
Press the [Menu] key.
![]() Select [Paper Input], and then press the [OK] key.
Select [Paper Input], and then press the [OK] key.
![]() Select [Paper Size: (tray name)], and then press the [OK] key.
Select [Paper Size: (tray name)], and then press the [OK] key.
![]() Select [Custom Size], and then press the [OK] key.
Select [Custom Size], and then press the [OK] key.
![]() Enter the horizontal value, and then press the [OK] key.
Enter the horizontal value, and then press the [OK] key.
![]() Enter the vertical value, and then press the [OK] key.
Enter the vertical value, and then press the [OK] key.
![]()
If the item you want to select is not displayed on the screen, press the [
] or [] key on the control panel to change the screen.
Specifying Paper Type and Thickness Settings
If the print settings and the loaded paper that are used for a print job do not match, a mismatch error occurs.
Check and specify the paper settings before you start printing.
![]()
Before you change the settings, confirm the priority of the paper settings for printing (priority to the printer driver or to the control panel).
On the printer driver
Check the settings of paper tray and paper type on the printer driver and make sure the settings match the loaded paper.
On the control panel
Press the [Menu] key and check the settings in [Paper Size: (tray name)] in [Paper Input] and make sure the settings match the loaded paper.