Scanning Documents and Sending the Scanned Data by E-mail
Scan a document and attach the scanned data to an e-mail and send it from the machine.
Configure the SMTP server and network settings in advance.
Register an e-mail address in the address book to select the address as the destination easily when sending an e-mail.
Basic Procedure for Sending an E-mail
![]() Press [Scanner] on the Home screen.
Press [Scanner] on the Home screen.
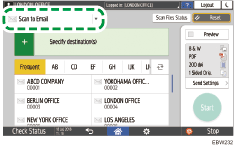
![]() Select [Scan to Email] on the scanner screen.
Select [Scan to Email] on the scanner screen.
![]() Place the original on the scanner.
Place the original on the scanner.
![]() Press [Send Settings] on the scanner screen.
Press [Send Settings] on the scanner screen.
![]() Press [Sender] and specify the sender.
Press [Sender] and specify the sender.
When a logged in user is operating the machine, the logged in user becomes the sender.
When [On] is specified in [System Settings]
 [File Transfer]
 [Auto Specify Sender Name], you can send an e-mail even when the sender is not specified. The administrator's e-mail address that is registered on the machine is used as the sender.
![]() Specify the destination on the scanner screen.
Specify the destination on the scanner screen.
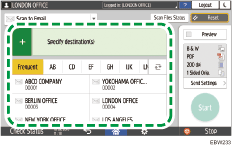
To enter the e-mail address manually or search for the destination in the address book, press
 , and specify the destination.
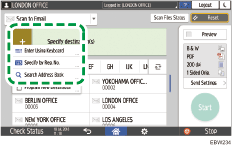
Press
 to specify the destination again or select [To], [Cc] or [Bcc].
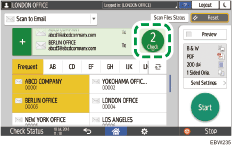
![]() Specify the scan settings according to the purpose of the scanned data.
Specify the scan settings according to the purpose of the scanned data.
![]() Press [Start].
Press [Start].
Registering the E-mail Destination Specified When Sending an E-mail in the Address Book
When specifying an e-mail address by entering it manually, you can register the e-mail address in the address book before sending an e-mail.
![]() Press [Scanner] on the Home screen.
Press [Scanner] on the Home screen.
![]() Select [Scan to Email] on the scanner screen.
Select [Scan to Email] on the scanner screen.

![]() Place the original on the scanner.
Place the original on the scanner.
![]() Press [Send Settings] on the scanner screen and configure the scan settings according to the purpose of the scanned data.
Press [Send Settings] on the scanner screen and configure the scan settings according to the purpose of the scanned data.
![]() Press
Press  and then select [Enter Using Keyboard].
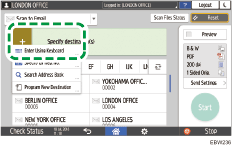
![]() Enter the e-mail address, and press
Enter the e-mail address, and press .
.
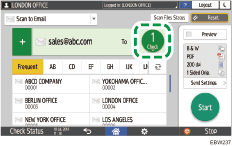
![]() Specify the e-mail address that was entered manually and press [Reg. to Add. Book].
Specify the e-mail address that was entered manually and press [Reg. to Add. Book].
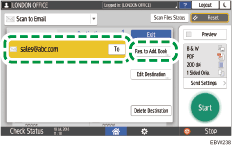
![]() Enter the name and other additional information.
Enter the name and other additional information.
![]() Press [OK] to close the address book screen after registering the information.
Press [OK] to close the address book screen after registering the information.
![]() Press [Start] on the scanner screen.
Press [Start] on the scanner screen.
