Sending a Stored Print file
![]() Click the menu button of the application you are using, and then click [Print].
Click the menu button of the application you are using, and then click [Print].
![]() Select the printer you want to use.
Select the printer you want to use.
![]() Click [Preferences].
Click [Preferences].
![]() In the "Job Type:" list, select the print method to be used for Stored Print files.
In the "Job Type:" list, select the print method to be used for Stored Print files.
You can select four methods of Stored Print:
To use the [Stored Print (Shared)] and [Store and Print (Shared)] functions, authentication must be enabled beforehand. For details, see "Managing Locked Print Files", Security Guide.
Stored Print
Stores the file in the machine and prints it later using the control panel.
Store and Print
Prints the file at once and also stores the file in the machine.
Stored Print (Shared)
Stores the file in the machine and allows any user who has print privileges to print the file later using the control panel.
Store and Print (Shared)
Prints the file immediately and also stores the file in the machine. Any user who has print privileges can print any stored file afterward.
![]() Click [Details...].
Click [Details...].
![]() Enter a User ID in the "Enter User ID:" box.
Enter a User ID in the "Enter User ID:" box.
You can optionally set a file name and a password of a Stored Print file.
![]() Click [OK].
Click [OK].
![]() Change any other print settings if necessary.
Change any other print settings if necessary.
![]() Click [OK].
Click [OK].
![]() Start printing from the application's [Print] dialog box.
Start printing from the application's [Print] dialog box.
Printing a Stored Print file using the control panel
![]()
The Stored Print files are not deleted even after the printing has been completed. For the procedure to delete the documents, see "Deleting Stored Print files", Stored Print.
![]() Press [Home] (
Press [Home] (![]() ) at the bottom of the screen in the center.
) at the bottom of the screen in the center.
![]() Press the [Printer (Classic)] icon.
Press the [Printer (Classic)] icon.
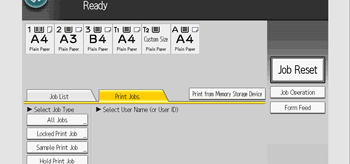
![]() Press the [Print Jobs] tab.
Press the [Print Jobs] tab.

![]() Press [Stored Print Job].
Press [Stored Print Job].
![]() Select the files you want to print.
Select the files you want to print.
You can select all the Stored Print files at once by pressing [Select All Jobs] after selecting a file.
![]() If necessary, press [Preview] to check the print image of the document.
If necessary, press [Preview] to check the print image of the document.
If you set the password in the printer driver, enter the password.
Only the first page of the document is displayed in the preview screen. No previews can be displayed when more than one document is selected.
Press [Exit] to close the preview screen.
![]() Press [Print].
Press [Print].
If you set the password in the printer driver, enter the password.
If multiple print files are selected, and some of these require a password, the machine prints files that correspond to the entered password and files that do not require a password. The number of files to be printed is displayed on the confirmation screen.
![]() To change the print settings of the document, press [Detailed Settings].
To change the print settings of the document, press [Detailed Settings].
For details about the settings that can be configured, see Settings that can be configured on the control panel.
![]() Enter the number of copies using the number keys if necessary, and then press [Print].
Enter the number of copies using the number keys if necessary, and then press [Print].
![]() Press [Home] (
Press [Home] (![]() ) at the bottom of the screen in the center.
) at the bottom of the screen in the center.
![]()
If you change the number of copies when multiple documents are selected, the newly specified number of copies will be printed for all of the selected documents. If you do not change the number, the number of copies specified when the documents were stored will be printed for each document.
To stop printing after printing has started, press [Job Reset] or the [Stop] key on the [Printer (Classic)] screen. A Stored Print file is not deleted even if [Job Reset] is pressed.
You can also print a Stored Print file from Web Image Monitor. For details, see Web Image Monitor Help.
Deleting Stored Print files
![]() Press [Home] (
Press [Home] (![]() ) at the bottom of the screen in the center.
) at the bottom of the screen in the center.
![]() Press the [Printer (Classic)] icon.
Press the [Printer (Classic)] icon.
![]() Press the [Print Jobs] tab.
Press the [Print Jobs] tab.

![]() Press [Stored Print Job].
Press [Stored Print Job].
![]() Select the files you want to delete.
Select the files you want to delete.
You can select all the Stored Print files at once by pressing [Select All Jobs] after selecting a file.
![]() Press [Delete].
Press [Delete].
If you set the password in the printer driver, enter the password to delete.
If multiple print files are selected, and some of these require a password, the machine deletes files correspond to the entered password and files that do not require a password. The number of files to be deleted is displayed on the confirmation screen.
![]() Press [Yes].
Press [Yes].
![]() Press [Home] (
Press [Home] (![]() ) at the bottom of the screen in the center.
) at the bottom of the screen in the center.
![]()
You can also delete a Stored Print file from Web Image Monitor. For details, see Web Image Monitor Help.
