Collecting Logs
You can collect logs stored in the machine to check the usage of the machine's various functions, error histories, and detailed access data to the machine.
Download the collected logs from the hard disk on the machine converting into a CSV file.
Use Web Image Monitor to download the collected logs. You can also use a log collect server instead of Web Image Monitor.

Contact your sales representative for details about a log collect server.
Log types
The machine stores three types of logs as follows:
Job log
User file-related operations such as copying, storing in the Document Server, printing, sending faxes, and sending scan files
Printing reports such as the configuration list output from the control panel
Access log
Authentications such as login and logout activities
Stored file operations such as creating, editing, and deleting
Customer engineer operations such as hard disk formatting
System operations such as viewing log transfer results
Security operations such as specifying settings for encryption, unprivileged access detection, user lockout, and firmware authentication
Eco-friendly Log
Main power ON and OFF
Transitions in power status
Job run times or time interval between jobs
Paper consumption per hour
Power consumption of the machine
Specifying Logs to Collect
Specify the types and items of logs to collect.
Specifying logs to collect using the control panel
 Log in to the machine as the machine administrator on the control panel.
 On the Home screen, press [Settings].
 On the Settings screen, press [System Settings].
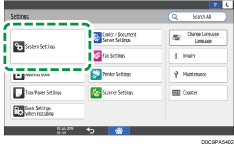
 Press [Settings for Administrator]
![]() [Data Management]
[Data Management]![]() [Collect Logs Settings].
[Collect Logs Settings].
 For each log type, select [Active] from the list.
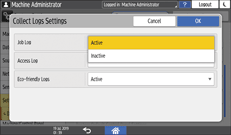
 Press [OK].
 Press [Home] (
 ).
).
 When the confirmation dialog is displayed, press [Exit]
The machine restarts automatically.
Specifying logs to collect using the control panel using Web Image Monitor
Log in to the machine as the machine administrator from Web Image Monitor.
Click [Configuration] on the [Device Management] menu.
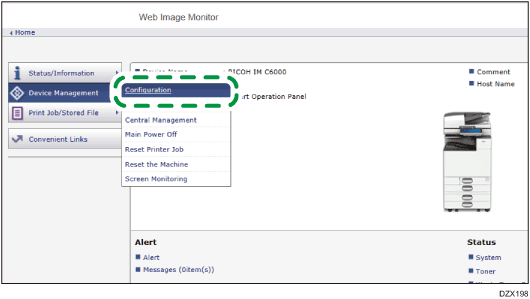
On the [Configuration] screen, click [Logs] in the [Device Settings] category.
Select [Active] of [Collect Job Logs], [Collect Access Logs], or [Collect Eco-friendly Logs] according to the log type to collect.
Specify the items to record in each log for [Job Log Collect Level], [Access Log Collect Level], or [Eco-friendly Log Collect Level].
Job Log Collect Level
Level 1: All job logs are collected.
Access Log Collect Level
Level 1: The following items are recorded in the access log.
HDD Format, All Logs Deletion, Log Setting Change, and Log Collection Item Change
Level 2: All access logs are collected.
Eco-friendly Log Collect Level
Level 1: Eco-friendly Logs are not collected.
Level 2: All eco-friendly logs are collected.
When a level is changed, the selection status of log details changes according to the level. You can change the settings of some of the items whether to collect or not.
Click [OK].
"Updating..." appears. Wait for about one or two minutes, and then click [OK].
If nothing appears on the screen after you click [OK], wait for a while, and then click the [Refresh] button on the web browser.
Log out of the machine, and then exit the Web browser.
When you changed Active/Inactive of Log Collect, delete all logs.
To display a message on the control panel and send an e-mail to the administrator when the job log storage area is almost full, enable [System Settings]
 [Settings for Administrator][Data Management][Job Execution Restrictions When Log Limit is Reached]. When the setting is enabled, execution of a new job is prevented to protect the existing logs.
Operating the Machine Giving Priority to Job Log Maintenance
Job Log Information Items
Job Log Item | Log Type Attribute | Content |
|---|---|---|
Copier: Copying | Copier: Copying | Details of normal and Sample Copy jobs. |
Copier: Copying and Storing | Copier: Copying and Storing | Details of files stored in the Document Server that were also copied at the time of storage. |
Document Server: Storing | Document Server: Storing | Details of files stored using the Document Server screen. |
Document Server: Stored File Downloading | Document Server: Stored File Downloading | Details of files stored in the Document Server and downloaded using Web Image Monitor. |
Utility: Storing | Utility: Storing | Details of files stored using a utility. |
Stored File Printing | Stored File Printing | Details of files printed using the Document Server screen. |
Scanner: Sending | Scanner: Sending | Details of sent scan files. |
Scanner: Sending and Storing | Scanner: Sending and Storing | Details of scan files stored in the Document Server that were also sent at the time of storage. |
Scanner: Storing | Scanner: Storing | Details of scan files stored in the Document Server. |
Scanner: Stored File Downloading | Scanner: Stored File Downloading | Details of scan files stored in the Document Server and downloaded using Web Image Monitor. |
Scanner: Stored File Sending | Scanner: Stored File Sending | Details of the stored scan files that were also sent. |
Printer: Printing | Printer: Printing | Details of normal print jobs. |
Printer: Locked Print (Incomplete) | Printer: Locked Print (Incomplete) | Log showing Locked Print documents temporarily stored on the machine. |
Printer: Locked Print | Printer: Locked Print | Log showing Locked Print documents temporarily stored on the machine and printed from the control panel or through Web Image Monitor. |
Printer: Sample Print (Incomplete) | Printer: Sample Print (Incomplete) | Log showing Sample Print documents temporarily stored on the machine. |
Printer: Sample Print | Printer: Sample Print | Log showing Sample Print documents temporarily stored on the machine and printed from the control panel or through Web Image Monitor. |
Printer: Hold Print (Incomplete) | Printer: Hold Print (Incomplete) | Log showing Hold Print documents temporarily stored on the machine. |
Printer: Hold Print | Printer: Hold Print | Log showing Hold Print documents temporarily stored on the machine and printed from the control panel or through Web Image Monitor. |
Printer: Stored Print | Printer: Stored Print | Details of Stored Print files stored on the machine. |
Printer: Store and Normal Print | Printer: Store and Normal Print | Details of Stored Print files that were printed at the time of storage (when "Job Type:" was set to [Store and Print] in printer properties). |
Printer: Stored File Printing | Printer: Stored File Printing | Details of Stored Print files printed from the control panel or Web Image Monitor. |
Printer: Document Server Sending | Printer: Document Server Sending | Details of files stored in the Document Server when "Job Type:" was set to [Document Server] in printer properties. |
Report Printing | Report Printing | Details of reports printed from the control panel. |
Result Report Printing/Emailing | Result Report Printing/Emailing | Details of job results printed or notified by e-mail. |
Scanner: TWAIN Driver Scanning | Scanner: TWAIN Driver Scanning | Details of scan files that were scanned using TWAIN driver. |
Printer: Hold Print File Printing | Printer: Hold Print File Printing | When a document is held for printing and stored temporarily on the machine, this records the time a user specified for the document to be printed from the control panel or Web Image Monitor. |
Fax: Sending | Fax: Sending | Details of faxes sent from the machine. |
Fax: LAN-Fax Sending | Fax: LAN-Fax Sending | Details of fax files sent from computers. |
Fax: Storing | Fax: Storing | Details of fax files stored on the machine using the Fax function. |
Fax: Stored File Printing | Fax: Stored File Printing | Details of fax files stored on the machine and printed using the Fax function. |
Fax: Stored File Downloading | Fax: Stored File Downloading | Details of fax files stored in the Document Server and downloaded using Web Image Monitor. |
Fax: Receiving | Fax: Receiving | Details of received fax files. |
Fax: Receiving and Delivering | Fax: Receiving and Delivering | Details of faxes that received and delivered by the machine. |
Fax: Receiving and Storing | Fax: Receiving and Storing | Details of faxes that received and stored by the machine. |
Access Log Information Items
Access Log Item | Log Type Attribute | Content |
|---|---|---|
Login*1 | Login | Times of login. |
Logout | Logout | Times of logout. |
File Storing | File Storing | Details of files stored in the Document Server. |
Stored File Deletion | Stored File Deletion | Details of files deleted from the Document Server. |
All Stored Files Deletion | All Stored Files Deletion | Details of deletions of all Document Server files. |
HDD Format *2 | HDD Format | Details of hard disk formatting. |
Unauthorized Copying | Unauthorized Copying | Details of documents scanned with "Data Security for Copying". |
All Logs Deletion | All Logs Deletion | Details of deletions of all logs. |
Log Setting Change | Log Setting Change | Details of changes made to log settings. |
Transfer Log Result | Transfer Log Result | Log of the result of log transfer to Remote Communication Gate S. |
Log Collection Item Change | Log Collection Item Change | Details of changes to job log collection levels, access log collection levels, and log items to collect. |
Collect Encrypted Communication Logs | Collect Encrypted Communication Logs | Log of encrypted transmissions between the utility, Web Image Monitor or outside devices. |
Access Violation*3 | Access Violation | Details of failed access attempts. |
Lockout | Lockout | Details of lockout activation. |
Firmware: Update | Firmware: Update | Details of firmware updates. |
Firmware: Structure Change | Firmware: Structure Change | Details of structure changes that occurred when an SD card was inserted or removed, or when an unsupported SD card was inserted. |
Firmware: Structure*4 | Firmware: Structure | Details of checks for changes to firmware module structure made at times such as when the machine was switched on. |
Machine Data Encryption Key Change | Machine Data Encryption Key Change | Details of changes made to encryption keys using "Machine Data Encryption Key Change" setting. |
Firmware: Invalid | Firmware: Invalid | Details of checks for firmware validity made at times such as when the machine was switched on. |
Date/Time Change | Date/Time Change | Details of changes made to date and time settings. |
Web Image Monitor Auto Logout | Web Image Monitor Auto Logout | Log of Auto Logout from Web Image Monitor. |
File Access Privilege Change | File Access Privilege Change | Log for changing the access privilege to the stored files. |
Password Change | Password Change | Details of changes made to the login password. |
Administrator Change | Administrator Change | Details of changes of administrators. |
Address Book Change | Address Book Change | Details of changes made to Address Book entries. |
Capture Error | Capture Error | Details of file capture errors. |
Machine Configuration | Machine Configuration | Log of changes to the machine's settings. |
Back Up Address Book | Back Up Address Book | Log of when data in the Address Book is backed up. |
Restore Address Book | Restore Address Book | Log of when data in the Address Book is restored. |
Enhanced Print Volume Use Limitation: Tracking Permission Result | Enhanced Print Volume Use Limitation: Tracking Permission Result | Log of when a tracking error occurs. |
Counter Clear Result: Selected User(s) | Counter Clear Result: Selected User(s) | Log of when the counter for an individual user is cleared. |
Counter Clear Result: All Users | Counter Clear Result: All Users | Log of when the counters for all users are cleared. |
Import Device Setting Information | Import Device Setting Information | Log of when a device setting information file is imported. |
Export Device Setting Information | Export Device Setting Information | Log of when a device setting information file is exported. |
Creating/Deleting Folders | Creating/Deleting Folders | Log of when folders are created and deleted. |
Stored File Editing | Stored File Editing | Log of a file edited by being combined, inserted, or deleted. |
Insertion into another File | Insertion into another File | Log of combining or inserting to another file. |
*1 There is no "Login" log made for SNMPv3.
*2 If the hard disk is formatted, all the log entries up to the time of the format are deleted and a log entry indicating the completion of the format is made.
*3 Access Violation indicates the system has experienced frequent remote DoS attacks involving logon attempts through user authentication.
*4 The first log created after the power is turned on is the "Firmware: Structure" log.
Eco-friendly Log Information Items
Eco-friendly Log Items | Log Type Attribute | Content |
|---|---|---|
Main Power On | Main Power On | Log of when the main power switch is turned on. |
Main Power Off | Main Power Off | Log of when the main power switch is turned off. |
Power Status Transition Result | Power Status Transition Result | Log of the results of transitions in power status. |
Job Related Information | Job Related Information | Log of job related Information. |
Paper Usage | Paper Usage | Log of the amount of paper used. |
Power Consumption | Power Consumption | Log of power consumption. |
Downloading the Logs
You can download the logs recorded on the machine as a CSV file.
Log in to the machine as the machine administrator from Web Image Monitor.
Click [Configuration] on the [Device Management] menu.
On the [Configuration] screen, click [Download Logs] in the [Device Settings] category.
Select the log type on [Logs to Download], and then click [Download].
When you select [Security Logs], the downloaded file includes job log and access log.
Specify the location to store the file.
Log out of the machine, and then exit the Web browser.
When a log is downloaded successfully, "Download completed." will appear in the last line of the log file.
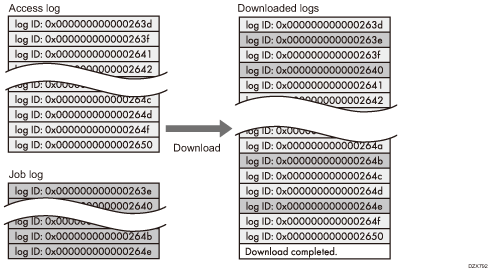
The job log and access log are downloaded as one file aligned in the order of the log IDs.
The eco-friendly log is downloaded as an independent file.
After downloading logs, delete all logs.
Downloaded logs contain data of completed jobs recorded up to the time you click [Download]. The "Result" field of the log entry for uncompleted jobs will be blank.
Download time may vary depending on the number of logs.
If an error occurs while the CSV file is being downloaded or created, the download is canceled and details of the error are included at the end of the file.
Downloaded log files use UTF-8 character encoding. To view a log file, open it using an application that supports UTF-8.
The machine administrator must manage downloaded log files appropriately.
Number of logs that can be kept on the machine
Maximum numbers of logs that can be stored in the machine are as follows:
Log types | Maximum number of logs |
|---|---|
Job logs | 4,000 |
Access logs | 12,000 |
Eco-friendly Logs | 4,000 |
If the number of logs that can be stored on the machine exceeds the limit and new logs are generated, old logs are overwritten by new ones. If logs are not downloaded periodically, it may not be possible to record the old logs onto files.
The example below shows when the number of stored logs exceeds the maximum and old logs are overwritten.
When the oldest two access logs are overwritten by the newest two access logs, the downloaded logs lack the log IDs.
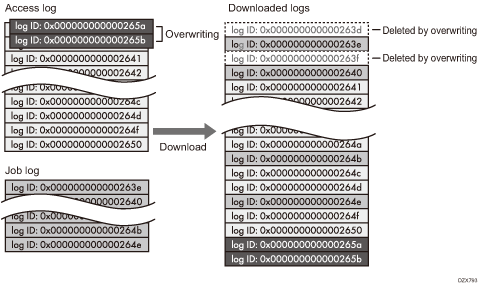
Check the message in the last line of the downloaded logs to determine whether overwriting occurs or not while the logs were downloading. The messages are shown below:
When overwriting did not occur:
Download completed.
When overwriting occurred:
Download completed.
A part of the logs before Log ID xxxx does not exist any more.
(The logs before "Log ID xxxx" are deleted.)
Order of printer job log and access log
Print log entries are recorded before the login entry is recorded in the access log.
Details of jobs (reception, processing, output of the jobs' data, and so on) are recorded as single entries.
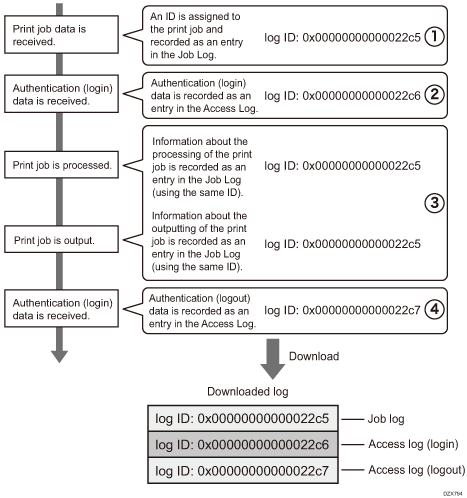
When the machine receives a print job, it creates a log ID for the job and records information about data reception in the job log. (1)
The machine then creates a log ID for the authentication information and records it in the access log of login. (2)
Log related to job data processing is added in the job log created first. (3)
In the end, it creates a log ID for logout entry and records it in the access log. (4)
In the result, when downloading job log, access log of login, and access log of logout, they are aligned in this order.
Deleting All Logs
You can delete all logs recorded on the machine.
[Delete All Logs] appears when one of the job log, access log, or eco-friendly log is set to [Active].
Deleting all logs using the control panel
Log in to the machine as the machine administrator on the control panel.
On the Home screen, press [Settings].
On the Settings screen, press [System Settings].
Press [Settings for Administrator]![]() [Data Management]
[Data Management]![]() [Delete All Logs].
[Delete All Logs].
When the confirmation dialog is displayed, press [Yes].
When the confirmation dialog is displayed, press [Exit].
Press [Home] (), and then log out of the machine.
Deleting all logs using Web Image Monitor
Log in to the machine as the machine administrator from Web Image Monitor.
Click [Configuration] on the [Device Management] menu.
On the [Configuration] screen, click [Logs] in the [Device Settings] category.
Click [Delete] of [Delete All Logs], and then click [OK].
Log out of the machine, and then exit the Web browser.
Disabling Log Transfer to the Log Collection Server
Disabling log transfer to the log collection server using the control panel
Log in to the machine as the machine administrator on the control panel.
On the Home screen, press [Settings].
On the Settings screen, press [System Settings].
Press [Settings for Administrator]![]() [Data Management]
[Data Management]![]() [Transfer Log Setting].
[Transfer Log Setting].
From the list next to Transfer Log Setting, select [Do not Forward].
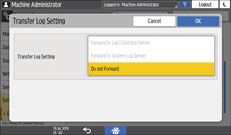
Press [OK].
When the confirmation dialog is displayed, press [OK].
Press [Home] (), and then log out of the machine.
Disabling log transfer to the log collection server using Web Image Monitor
Log in to the machine as the machine administrator from Web Image Monitor.
Click [Configuration] on the [Device Management] menu.
On the [Configuration] screen, click [Logs] in the [Device Settings] category.
On [Common Settings for All Logs], select [Inactive] of [Transfer Logs], and then click [OK].
Log out of the machine, and then exit the Web browser.
Operating the Machine Giving Priority to Job Log Maintenance
When job logs cannot be transferred to the log collection server, or when the number of logs stored in the machine approaches the upper limit, a notification message is displayed on the control panel of the machine and notification is sent to the administrator by e-mail. When the number of logs stored in the machine reaches the upper limit, the machine stops executing new jobs to prevent losing logs.

You can use this function in the machines installed with RICOH Always Current Technology v1.2 or later.
Specifying the setting using the control panel
Log in to the machine as the machine administrator on the control panel.
On the Home screen, press [Settings].
On the Settings screen, press [System Settings].
Press [Settings for Administrator]![]() [Data Management]
[Data Management]![]() [Job Execution Restrictions When Log Limit is Reached].
[Job Execution Restrictions When Log Limit is Reached].
From the list next to "Job Execution Restrictions When Log Limit is Reached" select [On].
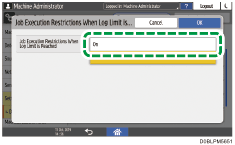
Press [OK].
Press [Home] (), and then log out of the machine.
Specifying the setting using Web Image Monitor
Log in to the machine as the machine administrator from Web Image Monitor.
Click [Configuration] on the [Device Management] menu.
On the [Configuration] screen, click [System] in the [Device Settings] category.
On [General Settings], select [Active] of [Job Execution Restrictions When Log Limit is Reached], and then click [OK].
Log out of the machine, and then exit the Web browser.