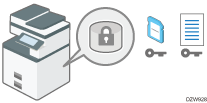
Encrypting Data to Prevent Data Leaks Caused by a Stolen or Disposed Machine
You can prevent data leaks by encrypting data on the hard disk of the machine even if the memory device is stolen, the machine is replaced with a new one, or the machine disposed is of.
Encrypting data on the hard disk
Encryption is an effective measure against data leaks. Be sure to keep the encryption key secure to use for decryption. Print it on a sheet or save it to an SD card.
Overwriting data to prevent restoration
You can delete data that you do not want to be restored. The Auto Erase Memory function deletes the data temporarily stored on the machine for copying or printing, and the Erase All Memory function deletes all data and initializes the hard disk of the machine.
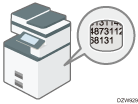
Changing the HDD Authentication Code
The Enhanced Security HDD Option attached to the machine protects the hard disk from tampering.
The self-encrypting function equipped with the Enhanced Security HDD Option encrypts all data stored in the machine. Also, the Enhanced Security HDD Option can authenticate the equipment connected to the HDD based on the Authentication Code. This function prevents the HDD data from being decrypted as long as the HDD Authentication Code is not known even if the hard disk were to be removed and connected to an analyzer.
Settings screen type: Standard
Changing the HDD Authentication Code (Settings Screen Type: Standard)
Settings screen type: Classic
Changing the HDD Authentication Code (Settings Screen Type: Classic)
Encrypting Data on the Hard Disk (Settings Screen Type: Standard)

- Keep SD cards and USB flash memory devices out of reach of children. If a child accidentally swallows an SD card or USB flash memory device, consult a doctor immediately.
You can encrypt data contained in the Address Book, authentication information, and stored documents to prevent data leaks in case the hard disk is removed from the machine.
Once encryption is enabled, all data subsequently stored on the machine will be encrypted.
The encryption algorithm used in the machine is AES-256.

The machine cannot be operated while encrypting data, updating the encryption key, or canceling encryption.
Do not turn off the power of the machine while encrypting data, updating the encryption key, or canceling encryption. If you turn off the power, the hard disk may be damaged and all data may be unusable.
The encryption process takes several hours. Once the encryption process starts, it cannot be stopped.
The encryption key is required for data recovery or migration to another machine. Be sure to keep the encryption key secure by printing it on a sheet or storing it in an SD card.
To transfer data from the machine to another machine, you must decrypt the encrypted data. Contact your service representative for data migration.
If you specify both the Erase All Memory function and the encryption function, the Erase All Memory function is performed first. Encryption starts after the Erase All Memory function has been completed and the machine has been rebooted.
 Log in to the machine as the machine administrator on the control panel.
 On the Home screen, press [Settings].
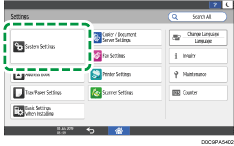
 On the Settings screen, press [System Settings].
 Press [Settings for Administrator]
![]() [File Management]
[File Management]![]() [Machine Data Encryption Settings].
[Machine Data Encryption Settings].
 Press [Encrypt].
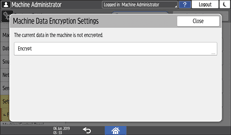
If the data has been encrypted, you can decrypt the data, update the encryption Key, or back up the data.
Update Encryption Key: Encrypts data again and creates a new encryption Key.
Cancel Encryption: Cancels encryption.
Back Up Encryption Key: Makes a backup of the encryption key. The encryption setting is not changed. Proceed to Step 7.
 Select one of the options from among [All Data], [File System Data Only], and [Format All Data] to encrypt the data.
The initial settings of the machine are not initialized regardless of the option you select.
When using the Embedded Software Architecture application, be sure to select [All Data] or [File System Data Only].
All Data: Encrypts all data.
File System Data Only: The following data are encrypted or initialized:
Data that are encrypted
Program/log of the Embedded Software Architecture application, Address Book, registered fonts, job logs, access logs, thumbnail images of stored documents, sent/received e-mail, documents transferred to the document management server, files received by Mail to Print, spooled jobs
Data that are initialized
Stored documents (documents in the Document Server, documents related to Locked Print/Sample Print/Stored Print/Hold Print, documents of fax stored reception), registered data (stamps/forms)
Format All Data: Initializes all data without encryption. The NVRAM data (memory that remains even after the machine is turned off) will not be deleted (initialized).
 Select the location to store the encryption key.
Save to SD Card: Saves the encryption key to an SD card. Insert an SD card into the media slot, and then press [Save to SD Card]
 [OK].
[OK].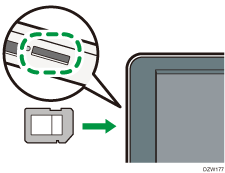
Print on Paper: Prints the encryption key on a sheet of paper. Press [Print on Paper]
[Print].
 Press [OK].
 When the confirmation dialog is displayed, press [Exit].
 Press [Home] (
 ), and then log out of the machine.
 Turn off the main power of the machine, and then turn it back on.
When the main power is turned on, the machine starts to convert the data on the memory. Wait until the message "Memory conversion complete. Turn the main power switch off." appears. After that, turn off the main power again.
Specifying Auto Erase Memory (Settings Screen Type: Standard)
You can overwrite and erase job data that was temporarily stored on the machine when using certain functions.
Log in to the machine as the machine administrator on the control panel.
On the Home screen, press [Settings].
On the Settings screen, press [System Settings].
Press [Settings for Administrator]![]() [Data Management]
[Data Management]![]() [Auto Erase Memory Setting].
[Auto Erase Memory Setting].
From the list next to Auto Erase Memory Setting, select [On], and then select an erase method.
The default erase method is [Random Numbers], and the default number of overwrites is [3].
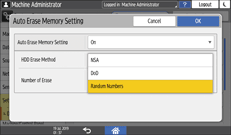
NSA*1: Overwrites data twice with random numbers and once with zeros.
DoD*2: Overwrites data with a random number, then with its complement, then with another random number, and the data is verified.
Random Numbers: Overwrites data multiple times with random numbers. Select the number of overwrites from one to nine.
*1 National Security Agency (U.S.A)
*2 Department of Defense (U.S.A)
Press [OK].
Press [Home] (), and then log out of the machine.
To check the overwriting process on the control panel
When Auto Erase Memory is enabled, the Data Overwrite icon is displayed at the bottom right of the control panel screen to indicate the status of data that is not overwritten.
The machine will not enter Sleep mode while overwriting is in progress. When overwriting has been completed, the machine enters Sleep mode.
Do not turn off the main power of the machine while overwriting is in progress. Be sure to check the data status with the Data Overwrite icon on the screen.
The Data Overwrite icon will be "Clear" when there is a Sample Print/Locked Print/Hold Print/Stored Print job.
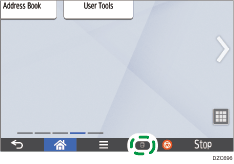
There is data to be overwritten.  | This icon lights up when there is data to be overwritten, and flashes during overwriting. Overwriting starts automatically once the job is completed. The Copier, Fax, and Printer functions take priority over the Auto Erase Memory function. Overwriting will start after the job is completed. |
No data remains.  | The trash box of the icon is empty when there is no data to be overwritten. This icon is also displayed when there is Hold Print/Stored Print/Locked Print/Sample Print data in the hard disk. |

As data scanned enabling the read-ahead function of the TWAIN driver is stored on the HDD, it can be overwritten. Data scanned without enabling the read-ahead function is not overwritten.
If the icon indicates that there is data to be overwritten even when there is no data to be overwritten, turn off the main power of the machine. Turn it on again and see if the icon changes to indicate that there is no data to be overwritten. If it does not change, contact your service representative.
Initializing the Machine with the Erase All Memory Function (Settings Screen Type: Standard)
Overwrite and erase all data stored on the hard disk when you relocate or dispose of the machine. The device settings stored on the machine's memory are initialized.
For details about using the machine after executing Erase All Memory, contact your service representative.
If the method of Random Numbers is selected and overwrite three times is set, the Erase All Memory process takes about 2 hours and 50 minutes to 3 hours and 30 minutes. You cannot operate the machine during overwriting.
When the extended features are installed on the machine, uninstall them before executing Erase All Memory. For details about uninstalling the extended features, see Extended Features Settings.
Log in to the machine as the machine administrator on the control panel.
On the Home screen, press [Settings].
On the Settings screen, press [System Settings].
Press [Settings for Administrator]![]() [Data Management]
[Data Management]![]() [Erase All Memory].
[Erase All Memory].
From the list next to HDD Erase Method, select an erase method.
The default erase method is [Random Numbers], and the default number of overwrites is [3].
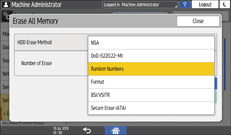
NSA*1: Overwrites data twice with random numbers and once with zeros.
DoD (5220.22-M)*2: Overwrites data with a random number, then with its complement, then with another random number, and the data is verified.
Random Numbers: Overwrites data multiple times with random numbers. Select the number of overwrites from one to nine.
Format: Formats the hard disk. Data is not overwritten.
BSI/VSITR: Overwrites data seven times with the fixed value (for example: 0x00).
Secure Erase (ATA): Overwrites data using an algorithm that is built in to the hard disk drive.
*1 National Security Agency (U.S.A)
*2 Department of Defense (U.S.A)
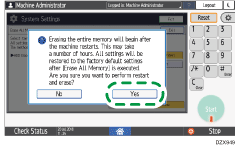
Press [Erase].
Press [Yes].
When the Erase All Memory process is completed, press [Exit], and then turn off the main power of the machine.
To print the erase result, press [System Settings]
[Settings for Administrator][Data Management][Erase All Memory], and then press [Print Report].Initialize the settings on the control panel as necessary. Press [System Settings]
[Settings for Administrator][Data Management][Restore Default Control Panel Settings] to initialize the data, including the individual application settings and cache memory.
Changing the HDD Authentication Code (Settings Screen Type: Standard)
To securely protect confidential information stored on the attached Enhanced Security HDD Option, change the HDD Authentication Code when the machine is installed and at regular intervals (using 8 to 32 alphanumeric characters).
The HDD Authentication Code currently specified is not displayed on the screen of the machine to protect data.
Prevent the HDD Authentication Code from being leaked so that the data remains secure.
Log in to the machine as the machine administrator on the control panel.
On the Home screen, press [Settings].
On the Settings screen, press [System Settings].
Press [Settings for Administrator]![]() [HDD Authentication Code].
[HDD Authentication Code].
Enter the authentication code, and then press [OK].
Press [OK].
Press [Home] (), and then log out of the machine.
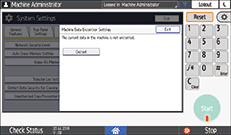
Encrypting Data on the Hard Disk (Settings Screen Type: Classic)
- Keep SD cards or USB flash memory devices out of reach of children. If a child accidentally swallows an SD card or USB flash memory device, consult a doctor immediately.
You can encrypt data contained in the address book, authentication information, and stored documents to prevent data leaks in case the hard disk is removed from the machine.
Once encryption is enabled, all data subsequently stored on the machine will be encrypted.
The encryption algorithm used in the machine is AES-256.
The machine cannot be operated while encrypting data, updating the encryption key, or canceling encryption.
Do not turn off the power of the machine while encrypting data, updating the encryption key, or canceling encryption. If you turn off the power, the hard disk may be damaged and all data may be unusable.
The encryption process takes several hours. Once the encryption process starts, it cannot be stopped.
The encryption key is required for data recovery or migration to another machine. Be sure to keep the encryption key secure by printing it on a sheet or storing it in an SD card.
To transfer data from the machine to another machine, you must decrypt the encrypted data. Contact your service representative for data migration.
If you specify both the Erase All Memory function and encryption function, the Erase All Memory function is performed first. Encryption starts after the Erase All Memory function has been completed and the machine has been rebooted.
Log in to the machine as the machine administrator on the control panel.
On the Home screen, press [Settings].
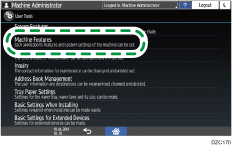
On the Settings screen, press [Machine Features Settings].
Press [System Settings]![]() [Administrator Tools] tab
[Administrator Tools] tab ![]() [Machine Data Encryption Settings] to display the setting screen.
[Machine Data Encryption Settings] to display the setting screen.
Press [Encrypt].
If the data has been encrypted, you can decrypt the data, update the encryption Key, or back up the data.
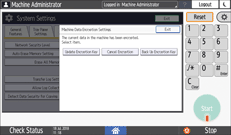
Update Encryption Key: Encrypts data again and creates a new encryption Key.
Cancel Encryption: Cancels encryption.
Back Up Encryption Key: Makes a backup of the encryption key. The encryption setting is not changed. Proceed to Step 7.
Select one of the options from among [All Data], [File System Data Only], and [Format All Data] to encrypt the data.
The initial settings of the machine are not initialized regardless of the option you select.
When using the Embedded Software Architecture application, be sure to select [All Data] or [File System Data Only].
All Data: Encrypts all data.
File System Data Only: The following data are encrypted or initialized:
Data that are encrypted
Program/log of the Embedded Software Architecture application, address book, registered fonts, job logs, access logs, thumbnail images of stored documents, sent/received e-mail, documents transferred to the document management server, files received by Mail to Print, spooled jobs
Data that are initialized
Stored documents (documents in the document server, documents related to locked print/sample print/stored print/hold print, documents of fax stored reception), registered data (stamps/forms)
Format All Data: Initializes all data without encryption. The NVRAM data (memory that remains even after the machine is turned off) will not be deleted (initialized).
Select the location to store the encryption key.
Save to SD Card: Saves the encryption key to an SD card. Insert an SD card into the media slot, and then press [Save to SD Card]
[OK].Print on Paper: Prints the encryption key on a sheet of paper. Press [Print on Paper]
[Start].
Press [OK].
The process of encryption or initialization starts.
After completing the process, press Home ().
Turn off the main power of the machine, and then turn on the main power again.
When the main power is turned on, the machine starts to convert the data on the memory. Wait until the message "Memory conversion complete. Turn the main power switch off." appears. After that, turn off the main power again.
Specifying Auto Erase Memory (Settings Screen Type: Classic)
You can overwrite and erase job data that was temporarily stored on the machine when using certain functions.
Log in to the machine as the machine administrator on the control panel.
On the Home screen, press [Settings].
On the Settings screen, press [Machine Features Settings].
Press [System Settings]![]() [Administrator Tools] tab
[Administrator Tools] tab ![]() [Erase All Memory] to display the setting screen.
[Erase All Memory] to display the setting screen.
Press [On] and select the overwriting method.
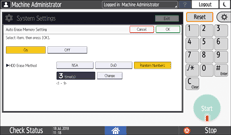
NSA*1: Overwrites data twice with random numbers and once with zeros.
DoD*2: Overwrites data with a random number, then with its complement, then with another random number, and the data is verified.
Random Numbers: Overwrites data multiple times with random numbers. Select the number of overwrites from one to nine.
*1 National Security Agency (U.S.A)
*2 Department of Defense (U.S.A)
Press [OK].
After completing the configuration, press Home ().
To check the overwriting process on the control panel
When Auto Erase Memory is enabled, the Data Overwrite icon is displayed at the bottom left of the control panel screen to indicate the status of data that is not overwritten.
The machine will not enter Sleep mode while overwriting is in progress. When overwriting has been completed, the machine enters Sleep mode.
Do not turn off the main power of the machine while overwriting is in progress. Be sure to check the data status with the Data Overwrite icon on the screen.
There is data to be overwritten. | This icon lights up when there is data to be overwritten, and flashes during overwriting. Overwriting starts automatically once the job is completed. The copy, fax, and printer functions take priority over the Auto Erase Memory function. Overwriting will start after the job is completed. |
No data remains. | The trash box of the icon is empty when there is no data to be overwritten. This icon is also displayed when there is hold print/stored print/locked print/sample print data in the hard disk. |
As data scanned enabling the read-ahead function of the TWAIN driver is stored on the HDD, it can be overwritten. Data scanned without enabling the read-ahead function is not overwritten.
If the icon indicates that there is data to be overwritten even when there is no data to be overwritten, turn off the main power of the machine. Turn it on again and see if the icon changes to indicate that there is no data to be overwritten. If it does not change, contact your service representative.
Initializing the Machine with the Erase All Memory Function (Settings Screen Type: Classic)
Overwrite and erase all data stored on the hard disk when you relocate or dispose of the machine. The device settings stored on the machine's memory are initialized.
For details about using the machine after executing Erase All Memory, contact your service representative.
If the method of Random Numbers is selected and overwrite three times is set, the Erase All Memory process takes about 2 hours and 50 minutes to 3 hours and 30 minutes. You cannot operate the machine during overwriting.
When the extended features are installed on the machine, uninstall them before executing Erase All Memory. For details about uninstalling the extended features, see Extended Features Settings.
Log in to the machine as the machine administrator on the control panel.
On the Home screen, press [Settings].
On the Settings screen, press [Machine Features Settings].
Press [System Settings]![]() [Administrator Tools] tab
[Administrator Tools] tab ![]() [Erase All Memory] to display the setting screen.
[Erase All Memory] to display the setting screen.
Select the overwriting method.

NSA*1: Overwrites data twice with random numbers and once with zeros.
DoD(5220.22-M)*2: Overwrites data with a random number, then with its complement, then with another random number, and the data is verified.
Random Numbers: Overwrites data multiple times with random numbers. Select the number of overwrites from one to nine.
BSI/VSITR: Overwrites data seven times with the fixed value (for example: 0x00).
Secure Erase (ATA): Overwrites data using an algorithm that is built in to the hard disk drive.
Format: Formats the hard disk. Data is not overwritten.
*1 National Security Agency (U.S.A)
*2 Department of Defense (U.S.A)
Press [Erase].
Press [Yes].
When the Erase All Memory process is completed, press [Exit] and turn off the main power.
To print the erase result, press [System Settings]
[Administrator Tools] tab [Erase All Memory], and then press [Print Report].Initialize the settings on the control panel as necessary. Press [Screen Features Settings]
[Screen Device Settings][Initialize Screen Features Settings] to initialize the settings of applications or bills.
Changing the HDD Authentication Code (Settings Screen Type: Classic)
To protect confidential information securely, change the HDD Authentication Code when the machine is installed and at regular intervals (using 8 to 32 alphanumeric characters).
The HDD Authentication Code currently specified is not displayed on the screen of the machine to protect data.
Prevent the HDD Authentication Code from being leaked so that the data remains secure.
Log in to the machine as the machine administrator on the control panel.
On the Home screen, press [Settings].
On the Settings screen, press [Machine Features Settings].
Press [System Settings]![]() [Administrator Tools] tab
[Administrator Tools] tab ![]() [HDD Authentication Code] to display the setting screen.
[HDD Authentication Code] to display the setting screen.
Enter the authentication code, and then press [OK].
Press [OK].
After completing the configuration, press Home ().