Preventing a Fax Transmission to the Wrong Destination
To prevent selecting a wrong fax destination, you can configure the machine to display a screen confirming the destination before sending a fax. You can also restrict broadcast transmission. Also, you can limit the destination of faxes to our machine only (Closed Network).
Overview of the Function for Preventing Selection of a Wrong Destination
Displaying the Confirmation Screen/Restricting Broadcast Transmission
Sending a fax only after entering the destination twice for confirmation (Enter Destination Multiple Times).
When entering the destination fax number manually, you are required to enter the number again for confirmation. The fax is not transmitted if the numbers do not match.
You cannot use this function when sending a fax to an IP-Fax destination.
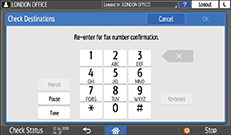
Displaying the confirmation screen after [Start] is pressed (Display Destination before Transmission).
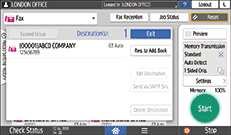
You cannot use this function when using On-hook dialing and manual dialing.
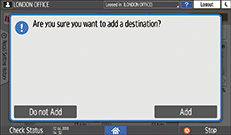
Displaying a confirmation message when adding a destination (Display Prompt for Multiple Destinations).
To prevent a wrong destination from being added by mistake, the machine displays a confirmation message when adding a new destination.
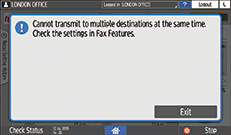
Prohibiting broadcast transmission
To prevent a wrong destination from being added by mistake, you can limit the destination to be specified for a document to only one destination. You cannot specify a group destination.
Limiting the destination of faxes to our machine only
You can restrict the destination to send faxes only to our machine that matches the registered ID.
This function is invalid when you are sending a fax to an Internet Fax destination.
Displaying the Confirmation Screen/Restricting Broadcast Transmission (Settings Screen Type: Standard)
Configure each function in [Fax Settings] [Send Settings]
 [Prevent Incorrect Transmissions].
 Press [Settings] on the Home screen.
 Press [Fax Settings] on the Settings screen.
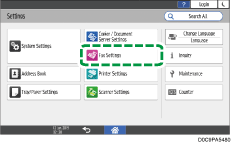
 Press [Send Settings]
 [Prevent Incorrect Transmissions] to display the [Prevent Incorrect Transmissions] screen.
 Enable the [Prevent Incorrect Transmissions] settings to be used.
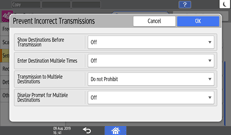
Show Destinations Before Transmission: Displaying the confirmation screen after [Start] is pressed.
Enter Destination Multiple Times: Sending a fax only after entering the destination twice for confirmation.
Transmission to Multiple Destinations: Prohibiting broadcast transmission.
Display Prompt for Multiple Destinations: Displaying a confirmation message when adding a destination.
 Press [OK].
 After completing the procedure, press [Home] (
 ).
).
Limiting the destination of faxes to our machine only (Settings Screen Type: Standard)
Register a four-digit ID in [Register Closed Network Code] of [Fax Settings] and then send a fax by specifying [Closed Network].
Registering a Closed Network code
 Press [Settings] on the Home screen.
 Press [Fax Settings] on the Settings screen.

 Press [Detailed Initial Settings]
 [Register Closed Network Code].
 Press [Register], and then enter the code.
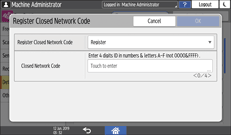
 Press [OK].
 After completing the procedure, press [Home] (
 ).
).
Sending a fax by specifying the code
 Press [Fax] on the Home screen.
 Select [Fax] on the fax screen.
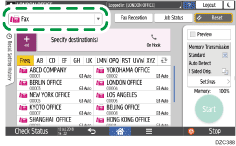
 Place the original in the Auto Document Feeder (ADF) or on the exposure glass.
 Press [Settings]
 [Closed Network].

 Configure the scan settings.
Sending a Fax at the Image Quality Suitable for the Original
 Specify the destination, and press [Start].
Displaying the Confirmation Screen/Restricting Broadcast Transmission (Settings Screen Type: Classic)
Configure each function in [Fax Settings] [Send Settings] tab
  [Prevent Incorrect Transmissions].
 Press [Settings] on the Home screen.
 Press [Machine Features Settings] on the Settings screen.
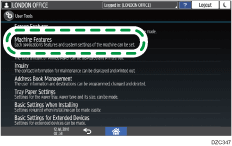
 Press [Fax Settings]
 [Send Settings] tab
  [Prevent Incorrect Transmissions] to display the [Prevent Incorrect Transmissions] screen.
 Enable the [Prevent Incorrect Transmissions] settings to be used.
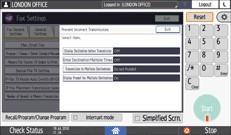
Display Destination before Transmission: Displaying the confirmation screen after [Start] is pressed.
Enter Destination Multiple Times: Sending a fax only after entering the destination twice for confirmation.
Transmission to Multiple Destinations: Prohibiting broadcast transmission.
Display Prompt for Multiple Destinations: Displaying a confirmation message when adding a destination.
 Press [Exit].
 After completing the procedure, press [Home] (
 ) .
) .
Limiting the destination of faxes to our machine only (Settings Screen Type: Classic)
Register a four-digit ID in [Program Closed Network Code] of [Fax Settings] and then send a fax by specifying [Closed Network].
Registering a Closed Network code
 Press [Settings] on the Home screen.
 Press [Machine Features Settings] on the Settings screen.

 Press [Fax Features]
 [Initial Settings] tab
  [Program Closed Network Code].
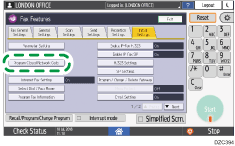
 Enter the code and then press [#].
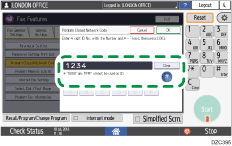
 Press [Exit].
 After completing the procedure, press [Home] (
 ).
).
Sending a fax by specifying the code
 Press [Fax] on the Home screen.
 Select [Fax] on the fax screen.

 Place the original in the Auto Document Feeder (ADF) or on the exposure glass.
 Press [Settings]
 [Closed Network].

 Configure the scan settings.
Sending a Fax at the Image Quality Suitable for the Original
 Specify the destination, and press [Start].
