Printing Documents in Document Server
You can print the documents stored in the document server with the same settings, color mode, paper size, and other settings specified when the documents were scanned. You can also change the print settings or specify a page to print.

You can also use Web Image Monitor to print a document in the document server.
Printing a Document with the Settings Specified When Scanned

When printing two or more documents at a time, the print settings specified for the first document are applied to all the remaining documents.
Some of the selected documents may not be printed due to the difference in the size or resolution.
 On the Home screen, press [Document Server].

 On the document server screen, select the desired folder.
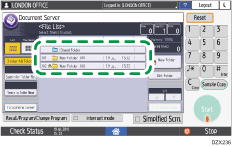
Press [Search by Folder No.] or [Search by Folder Name] to search for a folder.
 Select the document to print.
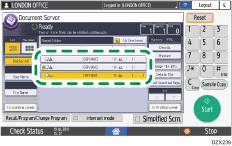
Press [User Name] or [File Name] to search for a document.
If the document is password protected, enter the password and press [OK].
To print two or more copies, enter the quantity using the number keys.
To print multiple documents at once, select the documents to print in the printing order. You can select up to 30 documents.
After selecting the documents, you can confirm the selected documents by pressing [Order] to list them in the printing order.
 Press [Start].

To stop printing, press [Stop]
 [Stop Printing].
You can change the number of sets during printing. This function can be used only when the Sort function is selected in the printing conditions. To change the quantity while printing is in progress, press [Stop], enter the quantity, and then press [Continue Printing]. The quantity you can enter differs depending on when you press [Stop].
Changing the Print Settings to Print a Document

When you select two or more documents to change the print settings, the first document keeps the changed contents after printing. The second document and later documents do not keep the changed contents and instead keep the settings of when they were stored.
 On the Home screen, press [Document Server].

 On the document server screen, select the desired folder.

 Select the document to print.

If the document is password protected, enter the password and press [OK].
To print two or more copies, enter the quantity using the number keys.
 Press [To Printing Screen].
 Change the print settings.
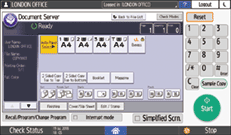
When specifying Sort/Rotate Sort, you can make a partial print as a test and proceed to print the rest of the quantity by pressing [Sample Copy].
Press [Back to File List] to return to the screen for selecting documents.
 Press [Start].
Specifying a Page to Print
 On the Home screen, press [Document Server].

 On the document server screen, select the desired folder.

 Select the document to print and press [Print Specified Page].
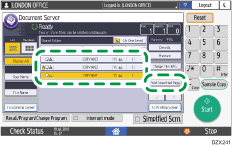
If the document is password protected, enter the password and press [OK].
To print two or more copies, enter the quantity using the number keys.
 Specify the page to print.
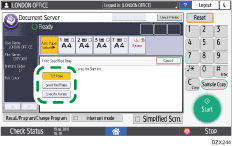
1st Page: Select this to print the first page only. When you selected two or more documents, the first page of each document is printed.
Specified Page: Select this to print the specified page.
Specify Range: Enter the page printing starts in [Start Number] and the page printing ends in [End Number].
 Press [Start].
