New Document Server Application (Saving Documents)
You can save documents scanned by the machine in the document server. You can also save them using the printer driver.
IM C530 series does not support this function.
Screen displays may differ from your model.

Documents saved in the document server are deleted automatically after three days (72 hours) in the factory-default configuration. You can change the period until documents are deleted or specify not to delete documents automatically.
[System Settings]
 [Settings for Administrator]
 [File Management]
 [Auto Delete File in Document Server]
Changing the Storage Period of Document Server or Specifying an Indefinite Period
To use the following setting items, use [Document Server (Classic)]:
Directional Magnification
Mirror Image
Scan Position
Mixed 1 & 2 Sided Print
Convert Color
Color Overlay
User Color
Copy Quality
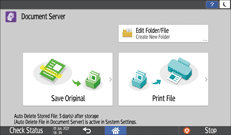
 On the Home screen, press [Document Server].

If the icon is not displayed on the Home screen, add the icon from the application list screen.
 On the document server screen, press [Save Original].

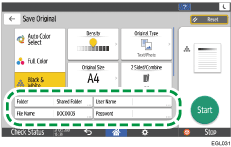
 Specify the folder to save documents, the file name, and other settings.

Folder: Select the "Shared Folder" created in the factory default configuration or a user folder created by a user to save the document. To select a user folder, create it in advance. If you select a password-protected folder, enter the password, and then press [OK].
User Name: Specify the user name displayed as the owner of the document. Select a user from the address book or enter the name.
File Name: Specify the name of the scanned document. If you do not specify the file name, a name such as "DOC0001" or "DOC0002" is assigned automatically.
Password: Specify the password required for printing the document. You can specify a number of 4 to 8 digits as the password.
 Place the original.
Place the original in the same way as in the Copy function.
 Specify the scanning conditions such as original size or original type.
 Press [Start].
When you place the original on the exposure glass, press [Finish Scn] after scanning all originals to save document.

You can specify whether to allow other users to read or edit the saved document.
Specifying Access Privileges for Documents Saved in Document Server
To prevent documents from being deleted automatically, specify the settings as shown below, and then save the documents.
[System Settings]
 [Settings for Administrator]
 [File Management]
 [Auto Delete File in Document Server]
 [Off]
[Off]When [Auto Delete File in Document Server] is set to [Specify Days] or [Specify Hours] after documents have been saved, the documents are not deleted automatically. Only the documents saved after a setting change are deleted automatically.
[Access Privileges] appears instead of [User Name] in the following cases:
When basic authentication, Windows authentication, or LDAP authentication is enabled
When authentication management of Document Server is enabled in [Application Authentication Management]
When you are logged in to the machine as a user or file administrator
Specifying Access Privileges for Documents Saved in Document Server
