The cleaning tasks varies depending on the release date.
Clean the line sensor on the following occasions:
A black band appears in the image at the position of foreign matter after executing [Density Difference: Acr Fd] in 0201: [Execute Image Quality Adjustment] in the 02: [Machine: Image Quality] group of the [Adjustment Settings for Operators] menu.
The tone or hue of the printed image changes erroneously after Auto Calibration.
The tone or hue of the printed image changes erroneously after Auto Color Diagnosis.
Cleaning procedure
Use the cleaning cloth provided with the machine to wipe the glass surface, bias roller of the revolver, and shading correction plate.
If the stains on the paper transfer bias roller and shading correction plate cannot be removed easily, wipe with a cleaning cloth soaked with a little alcohol.
Do not use alcohol to wipe the glass surface, because it will cause uneven wiping.
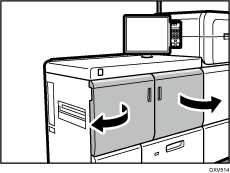
![]() Open the left front cover of the main unit.
Open the left front cover of the main unit.

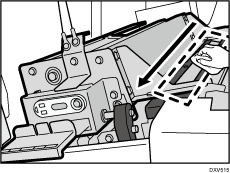
![]() Wipe the glass surface located to the right of the E3 lever in one direction, either from the back to front or from the front to back.
Wipe the glass surface located to the right of the E3 lever in one direction, either from the back to front or from the front to back.

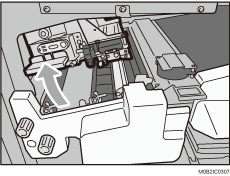
![]() Raise the E3 lever.
Raise the E3 lever.

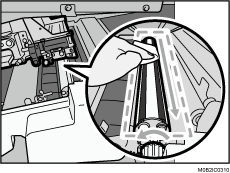
![]() Keeping the E3 lever raised, wipe the roller of the revolver and the shading correction plate in one direction, either from back to front or front to back.
Keeping the E3 lever raised, wipe the roller of the revolver and the shading correction plate in one direction, either from back to front or front to back.
Wipe the roller of the revolver and the shading correction plate while rotating the revolver.
Turn the gear on the front side to rotate the roller.
Be careful not to touch the contact glass. Cover your fingers with the cloth as shown to prevent the contact glass from becoming soiled.

![]()
The revolver consists of the transport roller, bias roller, and shading correction plate. The shading correction plate is a white curved surface located between the black bias rollers.
![]() Close all covers that were opened.
Close all covers that were opened.
