![]() Remove the jammed paper by following the procedures that are displayed on the control panel.
Remove the jammed paper by following the procedures that are displayed on the control panel.
When [Previous] or [Next] is displayed, press [Next] after completing a procedure.
![]() When the jammed paper is removed, restore the machine to the original state.
When the jammed paper is removed, restore the machine to the original state.
![]()
When you pull out and push back the right paper tray, make sure that B2 and B3 guide plates are closed. If you pull out and push back the right drawer unit while B2 and B3 guide plates are open, the right paper tray may hit the guide plates, which could result in damage to the machine.

Do not leave the right drawer unit pulled out for a long time when removing paper from B or C. Some parts may be deformed and require replacement if you leave the unit pulled out for more than 10 hours.
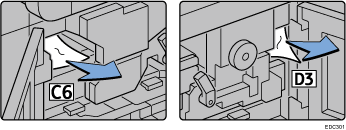
When you remove jammed paper from C6 and D3, the toner that was not fixed to the paper may attach to the carrier belt and the area around it. If the toner is attached, dampen the cleaning cloth that comes with the machine or similar cloth and wipe the toner off, and then wipe the area again with a dry cloth.
If a paper jam occurs when using banner paper of 700.1 mm–1260 mm (27.56–49.61 inches) in length, open all guide plates along the feeding path in which the paper jam occurred and remove the jammed paper.