If you want to align an image position on Side 2 to an image position on Side 1 that has been adjusted, see Aligning the Image Position on Side 2 to That on Side 1 (Using a Template to Align the Image Position on Side 1 and 2).
<If custom paper is used>
Perform the solution described in "(a) Adjust the image skew", "(b) Adjust the image position (If custom paper is used)", "(c) Adjust the magnification (Across feed direction)" and then "(d) Adjust the magnification (With feed direction)".
<If custom paper is not used>
Perform the solution described in "(a) Adjust the image skew", "(e) Adjust the image position (If custom paper is not used)".
![]()
You cannot adjust the vertical magnification and horizontal magnification of all types of paper other than custom paper. Therefore, it is recommended to pre-register the type of paper in use as a custom paper.
When manual adjustments or adjustments using a template are performed, even if 1103: [Image Position Feedback Correction] is set to [Detection Mark: Back] or [Detection Mark: Front & Back], the adjustments may not correct the image position. When using 1103: [Image Position Feedback Correction] with [Detection Mark: Back] or [Detection Mark: Front & Back] set, auto image position adjustment is required.
(a) Adjust the image skew
Adjust the vertical skew of the image.
![]() Print the image in black and white.
Print the image in black and white.
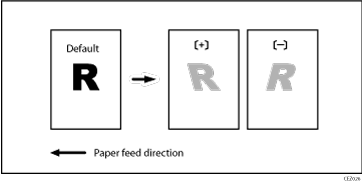
![]() Check the direction of the skew.
Check the direction of the skew.
![]() In the [Machine: Image Position] group on the [Adjustment Settings for Operators] menu, select 0105: [Perpendicularity Adjustment] and adjust the value.
In the [Machine: Image Position] group on the [Adjustment Settings for Operators] menu, select 0105: [Perpendicularity Adjustment] and adjust the value.
Move the cursor to [+] to skew the image counterclockwise or to [-] to skew it clockwise.
![]() Print the image in black and white. Check the image skew. If the problem persists, increase the value slightly.
Print the image in black and white. Check the image skew. If the problem persists, increase the value slightly.
![]() Execute color registration.
Execute color registration.
In executing color registration, the black adjustment will also be applied to cyan, magenta, yellow and special color.
For details about color registration, see "Adjusting the Color Registration" in the Maintenance and Management supplied with the machine.
![]()
In 0105: [Perpendicularity Adjustment], you cannot individually adjust the image position on sides 1 and 2.
You cannot skew paper with 0105: [Perpendicularity Adjustment]. For details about adjusting paper skew, Paper Skew.
If it is difficult to check and adjust the image position on the printed sheet, print one side of the format used in Aligning the Image Position on Side 2 to That on Side 1 (Using a Template to Align the Image Position on Side 1 and 2).
(b) Adjust the image position (If custom paper is used)
Adjust the vertical and horizontal image position so that the center (A) of the leading edge of the image is aligned to the registration mark.
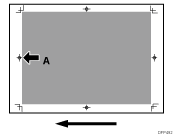
In [Advanced Settings] for the custom paper you are using, select 1104:[Image Position Gap] and adjust the image position.
[Across Feed] of [Image Position: Side 2]
[With Feed] of [Image Position: Side 2]
![]()
For details about specifying settings in the [Adjustment Settings for Operators] menu, and [Advanced Settings] menu, see the Adjustment Item Menu Guide.
If the problem persists even though you have adjusted the setting to its maximum and minimum values, contact your service representative.
If it is difficult to check and adjust the image position on the printed sheet, print one side of the format used in Aligning the Image Position on Side 2 to That on Side 1 (Using a Template to Align the Image Position on Side 1 and 2).
(c) Adjust the magnification (Across feed direction)
Adjust the horizontal magnification to adjust the width between the front and back corners (B) on the leading edge of the image.
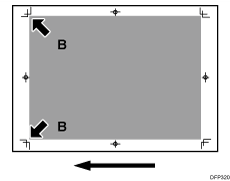
In [Advanced Settings] for the custom paper you are using, select 1104:[Image Position Gap] and adjust the value in [Across Feed] of [Image Magnification: Side 2].
Press [+] to increase the scaling and [-] to reduce it.
![]()
If it is difficult to check and adjust the image position on the printed sheet, print one side of the format used in Aligning the Image Position on Side 2 to That on Side 1 (Using a Template to Align the Image Position on Side 1 and 2).
(d) Adjust the magnification (With feed direction)
Adjust the vertical magnification to adjust the length (position of (C)) of the image.
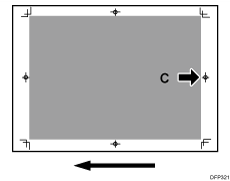
In [Advanced Settings] for the custom paper you are using, select 1104:[Image Position Gap] and adjust the value in [With Feed] of [Image Magnification: Side 2].
Press [+] to increase the scaling and [-] to reduce it.
![]()
If it is difficult to check and adjust the image position on the printed sheet, print one side of the format used in Aligning the Image Position on Side 2 to That on Side 1 (Using a Template to Align the Image Position on Side 1 and 2).
(e) Adjust the image position (If custom paper is not used)
Adjust the vertical and horizontal image position so that the center (A) of the leading edge of the image is aligned to the registration mark.
In the [Machine: Image Position] group on the [Adjustment Settings for Operators] menu, adjust the image position.
0101: [Image Position: Across Feed: Side 1]
0102: [Image Position: Across Feed: Side 2]
0103: [Image Position: With Feed: Side 1]
0104: [Image Position: With Feed: Side 2]
![]()
For details about specifying settings in the [Adjustment Settings for Operators] menu, and [Advanced Settings] menu, see the Adjustment Item Menu Guide.
If the problem persists even though you have adjusted the setting to its maximum and minimum values, contact your service representative.
If it is difficult to check and adjust the image position on the printed sheet, print one side of the format used in Aligning the Image Position on Side 2 to That on Side 1 (Using a Template to Align the Image Position on Side 1 and 2).